 PROBLEM STATEMENT
Many times in application development, we are faced with situations wherein we need to present a huge volume of data, be it live feeds or a huge amount of master/transaction data.
As the volume of data is huge, it is imperative that the data be handled in an effective way to present in the DOM to avoid any performance impact on the application.
This voluminous data can be distributed and presented in broadly two ways:
- Pagination: Data split across multiple pages using pagination. Though this is the old style of displaying data, this is relevant in some situations when the user is searching for something in particular within the list of results as it gives better control on the data. It requires an extra click action from the user but it may make sense if the user wants to keep track of the location of the finite results on each page and also get an idea of the total number of results available.
- Scroll: Scroll is the preferred user action to view large lists of data in today’s world of mobile devices and gives a better user experience. The complete data is presented to the user in a single view as he scrolls on the screen.
Data in a Scrollable view can be handled and presented in 2 ways:
Infinite scroll loads a small set of data to start with and then keeps appending data into the list as the user scrolls. Spread on the same screen which the user can look through while scrolling across what appears to a seamless expanse of flowing data. This technique may lead to slow down as the DOM element size keeps increasing with all the data getting appended and loaded in the DOM.
Virtual scroll combines the benefit of scrolling by having a small set of data loaded at a time in the viewport and keeps changing the visible set of records as the user scrolls. It keeps the number of DOM elements constant hence maintaining the performance of the application.
In this blog, we will see how we can achieve the above two presentations namely pagination and virtual scroll for huge data sets using Angular 7 + Angular material for best performance.
PREREQUISITES
Install the latest version of Angular CLI, with its new set of capabilities and prompts.
1 |
<span style="font-family: Rubik;">npm install -g @angular/cli</span> |
If you have an existing older version, you can update using
1 |
<span style="font-family: Rubik;">ng update @angular/cli @angular/core</span> |
GETTING STARTED
Let’s first start with creating a new Angular 7 application.
1 2 3 |
<span style="font-family: Rubik;">ng new ang-mat-appl cd ang-mat-appl</span> |
With Angular devkit6+, you can use the ng add the command to add the other dependencies:
1 2 3 |
<span style="font-family: Rubik;">ng add @angular/material ng add @angular/cdk</span> |
Now, we create the components for the demo using the CLI shortcuts:
1 2 3 4 5 |
<span style="font-family: Rubik;">ng g c virtualScrollDemo ng g c matPaginationDemo ng g c demoCard</span> |
SETTING DATA FOR DISPLAY
Set up a MatDemoService, service to return the periodic table elements json data which will be used to display in this example.
Courtesy: https://github.com/Bowserinator/Periodic-Table-JSON/blob/master/PeriodicTableJSON.json
1 2 3 4 5 6 7 8 9 10 11 12 13 14 15 16 17 18 19 |
<span style="font-family: Rubik;">import { Injectable } from '@angular/core'; import { HttpClient } from '@angular/common/http'; import { Observable } from 'rxjs'; @Injectable() export class MatDemoService { constructor(private http: HttpClient) {} getElements() : Observable<any> { return this.http.get('assets/elements.json'); } }</span> |
PAGINATION OF DATA CARDS
Importing required modules
Import the required material modules which will be needed to display the data in a presentable format and include in your app.module.ts imports.
MatPaginatorModule is required to include the material paginator.
1 2 3 4 5 6 7 8 9 10 11 12 13 14 15 |
<span style="font-family: Rubik;">import { MatCardModule, MatSidenavModule, MatListModule, MatIconModule, MatToolbarModule, MatPaginatorModule } from "@angular/material";</span> |
Defining the Data card component.
Define the demoCard component which will be used to display the data.
1 2 3 4 5 6 7 8 9 10 11 12 13 14 15 16 17 18 19 20 21 22 23 |
<span style="font-family: Rubik;"><mat-card class="democard"> <mat-card-header> <mat-card-title>{{element.elementname}}:{{element.symbol}}</mat-card-title> <mat-card-subtitle>{{element.discovered_by}}</mat-card-subtitle> </mat-card-header> <mat-card-content> <section > Category : {{element.category}}<br> {{element.summary}} </section> </mat-card-content> </mat-card></span> |
The only addition in the demo-card.component.ts is the inclusion of the Input element.
1 |
<span style="font-family: Rubik;">@Input() element: any;</span> |
Now the DemoCardComponent is ready and can be used to display the data in card format.
Using Angular Material Paginator – mat-paginator
Now we will work on the MatPaginationDemoComponent to handle the paginated view.
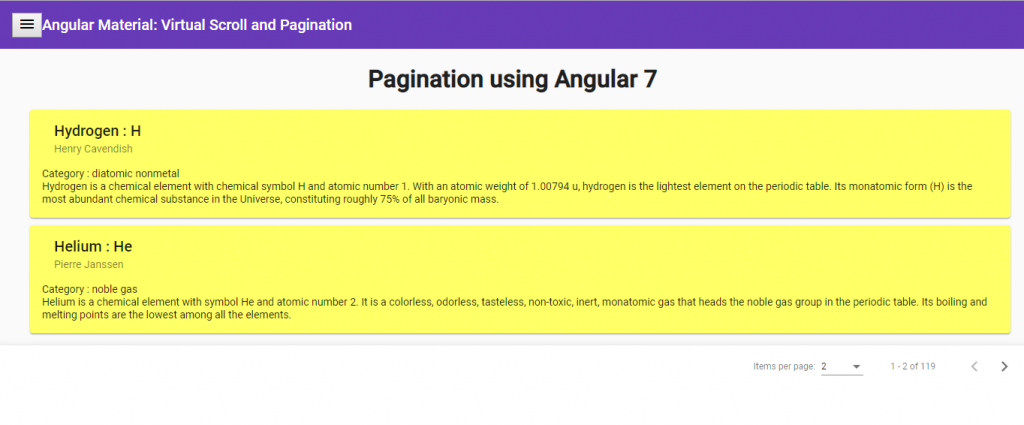
The HTML logic (mat-pagination-demo.component.html) will include the app-demo-card component to display the element obtained from the datasource using ngFor. The mat-paginator component is added to handle the pagination.
1 2 3 4 5 6 7 8 9 10 11 12 13 14 15 16 17 18 19 20 21 22 23 24 25 |
<span style="font-family: Rubik;"><h1 class="center">Pagination using Angular 7</h1> <ul class="list"> <li *ngFor="let element of dataSource.connect() | async"> <app-demo-card [element]="element"></app-demo-card> </li> </ul> <mat-paginator #paginator class="mat-elevation-z8" [length]="length" [pageIndex]="pageIndex" [pageSize]="pageSize" [pageSizeOptions]="[5, 10, 25, 100]" (page)="pageEvent = $event; pageChange($event)" ></mat-paginator></span> |
In order to display the data card in a paginated fashion and set up the datasource for the display, we will import the following in (mat-pagination-demo.component.ts)
1 2 3 4 5 6 7 8 9 10 11 12 13 |
<span style="font-family: Rubik;">import {PageEvent, MatPaginator} from '@angular/material'; import {DataSource} from '@angular/cdk/collections'; import {BehaviorSubject} from 'rxjs/BehaviorSubject'; import {Observable} from 'rxjs/Observable'; import 'rxjs/add/observable/merge'; import { map } from 'rxjs/operators'; </span> |
The following properties to be declared to handle pagination properties and datasource:
1 2 3 4 5 6 7 |
<span style="font-family: Rubik;"> length = 0; pageIndex = 0; pageSize = 5; database: Database; pageEvent: PageEvent; dataSource : MyDataSource; @ViewChild(MatPaginator) paginator: MatPaginator;</span> |
In order to set up the DataSource, we will define the asynchronous data for that to be set up as BehaviourSubject. This can be used to dynamically get data from custom datasource. In the current example, we will try to replicate the custom data flow by emitting the same data in the constructor.
1 2 3 4 5 6 7 8 9 10 11 12 13 14 15 16 17 18 19 20 21 22 23 |
<span style="font-family: Rubik;">export class Database { // {{{ /** Stream that emits whenever the data has been modified.*/ dataChange: BehaviorSubject<any[]> = new BehaviorSubject<any[]>([]); get data(): any[] { return this.dataChange.value; } constructor(data) { // Fill up the database . this.dataChange.next(data); } getChange(data){ this.dataChange.next(data); } }</span> |
The DataSource will be defined using the above database, which returns the stream of data as an Observable and the paginator reference(using ViewChild) which was added in the view.
A DataSource is an abstract class(extends DataSource) that has two methods: connect and disconnect. The connect method will be called to receive a stream that emits the data array that should be rendered. The disconnect is called when the viewport is destroyed to clean up any subscriptions that were registered during the connect process.
1 2 3 4 5 6 7 8 9 10 11 12 13 14 15 16 17 18 19 20 21 22 23 24 25 26 27 28 29 30 31 32 33 34 35 36 37 38 39 40 41 42 43 44 45 46 47 48 49 50 51 52 |
<span style="font-family: Rubik;">export class MyDataSource extends DataSource<any> { /** Stream of data that is provided to the table. */ constructor(private dataBase: Database, private paginator: MatPaginator) { super(); } /** Connect function called by the table to retrieve one stream containing the data to render. */ connect(): Observable<any[]> { //To handle data change event or paginator page change event const displayDataChanges = [ this.dataBase.dataChange, this.paginator.page ]; return Observable.merge(displayDataChanges).pipe(map(() => { let data; this.dataBase.dataChange.subscribe(xdata=>{ data=Object.values(xdata); } ); // // Grab the page's slice of data. const startIndex = this.paginator.pageIndex * this.paginator.pageSize; const finalData = data.splice(startIndex, this.paginator.pageSize); return finalData; })); } disconnect() {} } </span> |
Finally, the data will be initialized in the ngOnInit function to instantiate the datasource which will provide the data and link it to the paginator.
1 2 3 4 5 6 7 8 9 |
<span style="font-family: Rubik;">ngOnInit() { this.demoService.getElements().subscribe(data=>{ console.log(data); this.elements= data.elements; this.length = this.elements.length; this.database=new Database(this.elements); this.dataSource = new MyDataSource(this.database, this.paginator); }); }</span> |
Using above we can get the Paginator for the custom datasource.
 VIRTUAL SCROLL
Using Virtual Scroll – Scrolling Module:
Import the ScrollingModule to implement virtual scroll in app.module.ts.
1 |
<span style="font-family: Rubik;">import { ScrollingModule } from '@angular/cdk/scrolling';</span> |
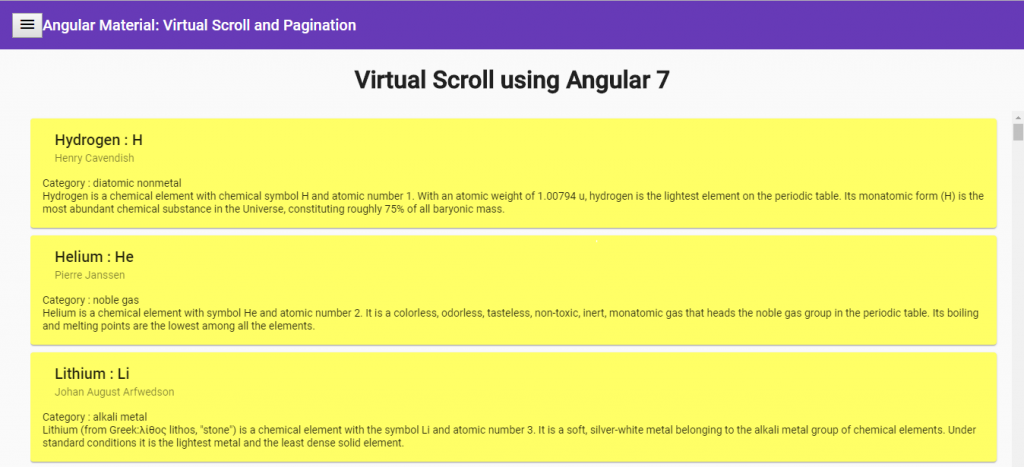
The VirtualScrollDemoComponent view will comprise of cdk-virtual-scroll-viewport, which takes care of loading only the data which fits the screen.
*cdkVirtualFor is similar to *ngFor directive to which we provide the data to be displayed. *cdkVirtualFor accepts data in the form of an Array, Observable<Array>, or a custom DataSource. The DataSource for the virtual scroll is similar to the one used in the pagination example and used in other table and tree material components. Here we will use a simple data array.
1 2 3 4 5 6 7 8 9 10 11 12 13 14 15 |
<span style="font-family: Rubik;"><h1 class="center">Virtual Scroll using Angular 7</h1> <ul class="list"> <cdk-virtual-scroll-viewport style="height: 500px" itemSize="90" > <ng-container *cdkVirtualFor="let element of elements"> <app-demo-card [element]="element"></app-demo-card> </ng-container> </cdk-virtual-scroll-viewport> </ul></span> |
In this example, we use a simple array obtained from service as below:
1 2 3 4 5 6 7 8 9 10 11 12 13 14 15 |
<span style="font-family: Rubik;">elements : any[]; constructor(private demoService : MatDemoService) { } ngOnInit() { this.demoService.getElements().subscribe(data=>{ console.log(data); this.elements= data.elements; }); }</span> |
If you explore the elements being rendered in the inspect DOM section, you will see that the number of DOM elements remain fixed, only the content keeps changing as we scroll in the application.
You can find the complete code here – https://github.com/abhilashahyd/ang-mat-appl
( A sidenav and toolbar is added to the app.component to view the 2 components for Pagination and Virtual Scroll )
SUMMARY
In this blog, we saw how we can implement pagination and virtual scroll using Angular Material. The choice between pagination and scrolling would depend on the context of your application design and how the content needs to be delivered and accessed to achieve the best balance between user experience and application performance.




How to use CDKvirtualfor with Mat table data source. Need to implement virtual scroll with mat table with a variable length of items. Could you please provide a sample for the same.
Virtual scroll works good with items with FIXED height. For variable heights it is complicated task, and Angular Material CDK Scrolling with Autoheight IS STILL ON EXPERIMENTAL STAGE!