


Blogs
Nested Grid in PrimeNG

It is a known fact to all of us that grid is the most widely used component in enterprise application development area. Nested Grid is a concept nesting a grid inside a grid. It is also a common use case in enterprise application development. The most famous example is to show the list of orders and the corresponding list of items glued to each of the order. Nested Grid is the most suitable component to show such data more intuitively, where the user can see Order Items of a given order below the Order itself without navigating to other pages/screens or pop up.
In this article, you will learn how to construct a nested grid to show order list with the corresponding item list in a PrimeNG enabled Angular application. This articles also cover steps to create PrimeNG based Angular app. If you already know how to do this, while reading you can skip the corresponding steps.
Pre-Requisites:
End Goal
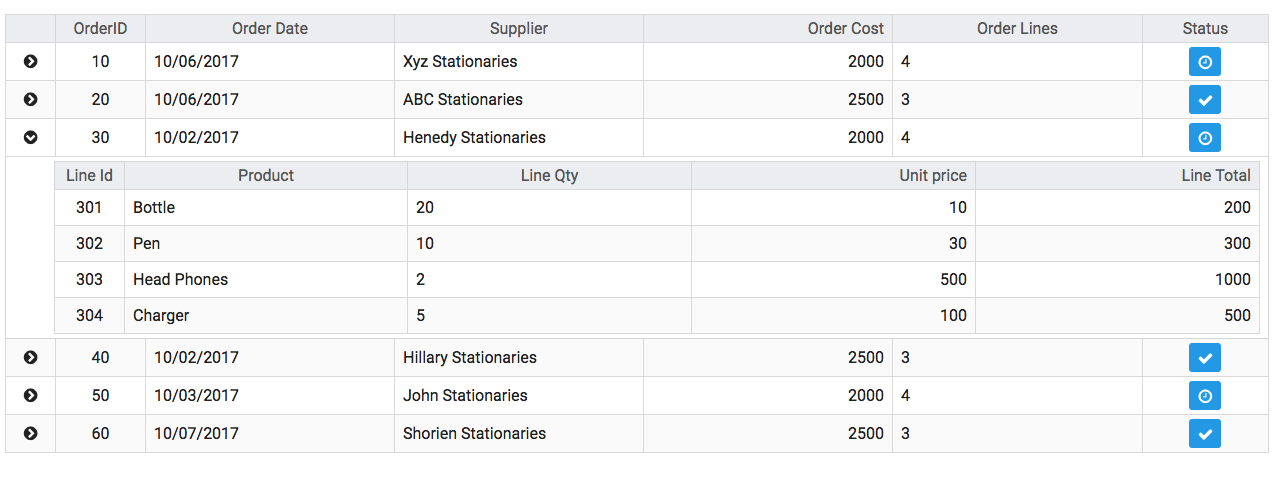
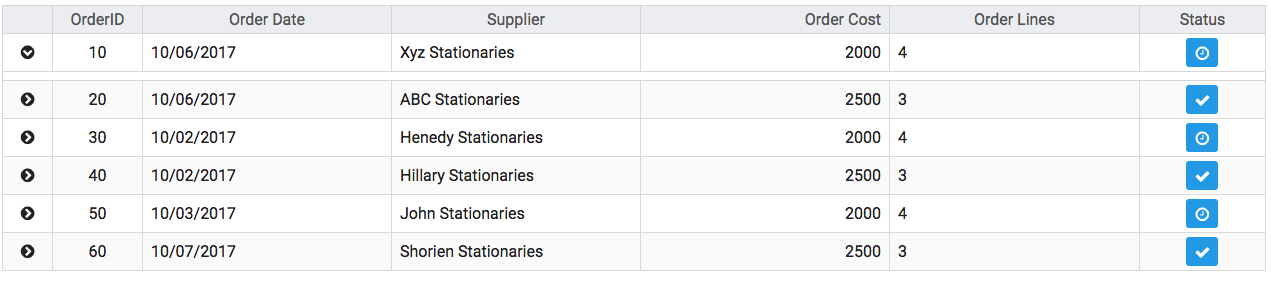
By the time you finish reading this article, you will get to know the steps to construct a Nested Grid depicted below. I am covering the same example i.e. orders that we discussed in the previous section.
Setup Angular Project with PrimeNG
- Generate new Angular project with angular cli with the name “nestedgrid”
- Run below command in terminal to generate the project, assuming angular-cli is installed globally in your machine, if not please install and then run below command:
$ ng new nestedgridYou will find the below directory structure generated in nestedgrid folder in the current directory: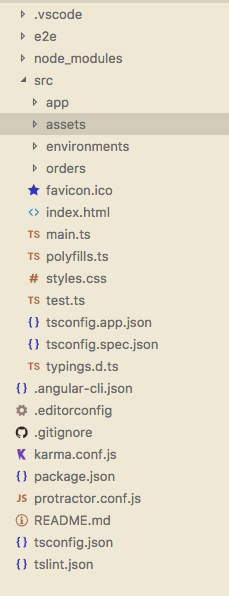
- Run below command in terminal to generate the project, assuming angular-cli is installed globally in your machine, if not please install and then run below command:
- Add PrimeNG and font-awesome packages to your project by adding package.json file in the project root directory:
“primeng”: “^4.1.0-rc.3”
font-awesome”: “^4.7.0”,
- Run npm install command in the terminal from the project root directory, which will install PrimeNG and font-awesome npm packages into your project.
$ npm install - Import PrimeNG and font-awesome style sheets into your project style sheet, i.e style.css in src directory which is under the project root directory as shown below:
@import ‘~font-awesome/css/font-awesome.min.css’;
@import ‘~primeng/resources/primeng.min.css’;
@import ‘~primeng/resources/themes/omega/theme.css’;
With this your angular project nestedgrid has got PrimeNG library, Now you can use PrimeNG components in your application by importing the required Modules and Classes.
Setup Order Modules (Keep the ingredients ready)
- Create new NgModule for Orders, which will have the new component that we are going to develop and its related service.
- Create a component with the name OrderTable with the selector order-table through angular-cli running below command from project root directory:
$ ng generate module orders –module app- This will generate module.ts file inside nestedgrid/src/app/orders folder and import this module into app.module
- Create service with the name OrderService through angular-cli by running the below command from project root directory terminal:
$ng generate service orders/Orders -m orders- This command will generate orders.service.ts file in nestedgrid/src/app/orders folder and import this module into orders.module
- In order to develop this component we are going to use DataTable component which is available in DataTableModule and Button component which is available in ButtonModule of PrimeNG, We have to import these two modules in app and orders module.
Orders Data Preparation
- Before building a DataTable component let us create the data for orders with order lines to render into the Grid, Save the data into a json file under asset/data folder.
  {

        "Orddate":"10/06/2017",

        "orderId":"10",

        "status":"pending",

        "orderTotal":"2000",

        "totalLines":"4",

        "SupplierName":"Xyz Stationaries",

        "lines":[

           {

                "orderlineId":"101",

                "productID":"123",

                "productName":"Bottle",

                "qty":"20",

                "unitPrice":"10",

                "linePrice":"200"

            },

            ….

        ]

    }
- In the above data, there are six orders with their own order lines
- In Order, you can see below fields:
- Orderdate – date of the order
- orderId – Id of the order
- Status – status of the order ( Pending – show waiting icon, confirmed – show tick icon)
- orderTotal – Total cost of the order
- totalLines – No of Lines in order
- supplierName – Supplier name of the order
- In Order Line, you can see below fields:
- orderlineId – id of the order line
- productionId – id of the product in the order line
- productName – name of the product in the order line
- Qty – quantity of the product in order line
- Unitprice – Unit price of the product
- linePrice – Total price of the line
Build Service to fetch orders data
- Define a function with the name getOrders in OrderService
- Implement the function making HTTP call to assets/data/orders.json file and return the data as shown below:
@Injectable()

export class OrdersService {


constructor(private http: Http) {}


    getOrders() {

        return this.http.get('assets/data/orders.json')

                                .toPromise()

                                    .then(res =>  res.json())

                    .then(data => {  return data; });

    }


}
Now your service is ready!
Build a Grid ( DataTable) in OrderTable Component to show the list Orders as first step
- In OrderComponent import DataTable component from PrimeNG as shown below:
import {DataTable} from ‘primeng/primeng’; - Add p-table tag in order-table.component.html file with columns orderId, orderdate, suppliername, orderTotal, totalLines and status as shown below:
<p-dataTable [value]="orders" >
    <p-column field="orderId" header="OrderID" [style]="{'width':'90px','text-align':'center'}"></p-column>

    <p-column field="Orddate" header="Order Date"></p-column>

    <p-column field="supplierName" header="Supplier"></p-column>

    <p-column field="status" header="Status"></p-column>

    <p-column field="orderTotal" header="Order Cost" [style]="{'text-align':'right'}"></p-column>

    <p-column field="totalLines" header="Order Lines"></p-column>

</p-dataTable>
- Define orders property in the component class which has been used in the p-table component as value.
- Calling OrderService.get Orders assign orders fetched from order.json to the order’s property of the component which fills the data in the DataTable as shown below:
export class OrderTableComponent implements OnInit {
  orders:any[];

  constructor(private orderSvc:OrdersService) { }


  ngOnInit() {


    this.orderSvc.getOrders().then( data => this.orders = data);

  }

}
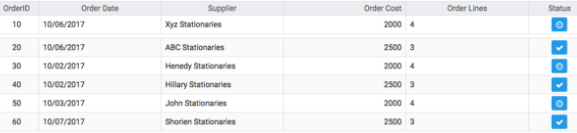
- Run ng serve command in terminal and launch the application in the browser with URL http://localhost:4200.
The output should look like below:
Enable Row Expansion for the Grid (DataTable)
- The current grid will only show Orders, In the data, we have orderliness as well. To show order lines we need one more DataTable configured with the orderLine columns.
- Configure the current Grid to allow Row expansion with the following steps:
-
- Add expandableRows property to p-table with value true, this will enable grid to expander column (column to show expanded icon and will expand the row by listening click on the column), Adding this property p-table will expect a ng-template of pTemplate type rowexapnsion to be shown on expanding a row, which will have access to the rowData.
- Add expander column to the p-table, expander column is a general column with expander property with value true as shown below:
<p-column expander=”true” styleClass=”col-icon” [style]=”{‘width’:’50px’,’text-align’:’center’}”></p-column> - In the above code snippet, we have added arrow icon to the column to visually indicate expansion
After this change it will look like as below:
-
Add Nested Grid ( DataTable) for Order Lines( Secret Sauce )
- Here is the HTML template for OrderLines Grid
<p-dataTable [value]="lines" [style]="{'margin-left':'40px'}" [editable]="true">
    <p-column field="orderlineId" header="Line Id" [style]="{ 'width':'70px','text-align':'center'}"></p-column>

        <p-column field="productName" header="Product" ></p-column>

        <p-column field="qty" header="Line Qty" [editable]="true"></p-column>

        <p-column field="unitPrice" header="Unit price" [style]="{'text-align':'right'}"></p-column>

        <p-column field="linePrice" header="Line Total" [style]="{'text-align':'right'}"></p-column>

      </p-dataTable>
- Above template Grid with LineId, productName, Qty, unitPrice, Line Price columns can be displayed
- As pointed in the previous section, expandableRows enabled grid can have ng-template of pTemplate type rowexpansion to can have access to the RowData, Will add OrderLines Grid template to the row expansion template as shown below:
<ng-template let-order pTemplate="rowexpansion" >
      <div>

        <p-dataTable [value]="order.lines"  [style]="{'margin-left':'40px'}" [editable]="true">

        <p-column field="orderlineId" header="Line Id" [style]="{ 'width':'70px','text-align':'center'}"></p-column>

        <p-column field="productName" header="Product" ></p-column>

        <p-column field="qty" header="Line Qty" [editable]="true"></p-column>

        <p-column field="unitPrice" header="Unit price" [style]="{'text-align':'right'}"></p-column>

        <p-column field="linePrice" header="Line Total" [style]="{'text-align':'right'}"></p-column>

      </p-dataTable>

      </div>

    </ng-template>
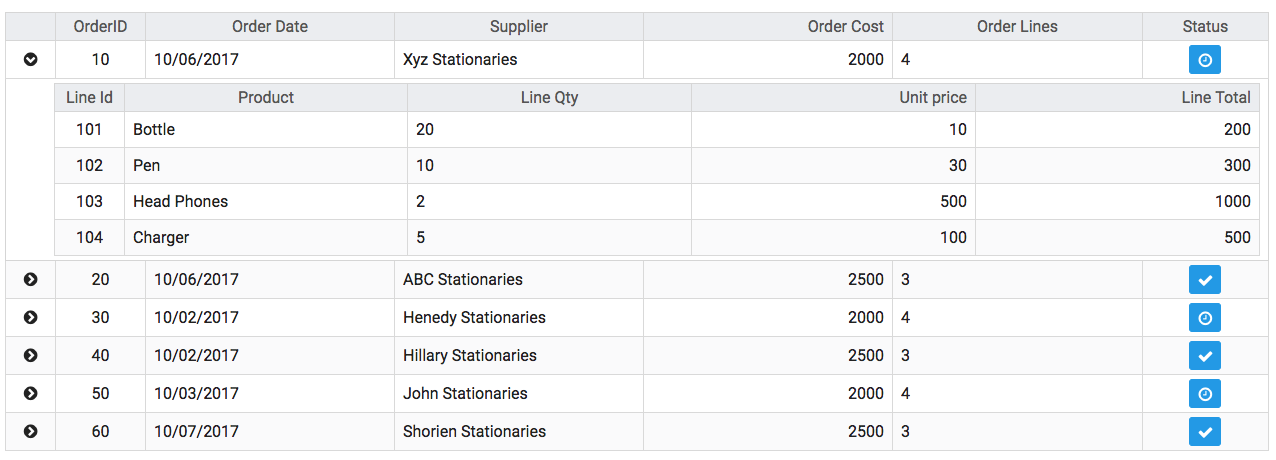
- With this template added you have orderLiness grid in Order grid, Nested Grid is achieved.
The output of this change would look like:
Code Access
You can access to sample JSON data and code at this URL
Summary
In this article, we have learned steps on how to create a Nested Grid in PrimeNG enabled the Angular application. Hope this article will save a good amount of time for you when you come across this kind of need.


github is missing angular.json file so i cannot run the application. Can you please add it? Plus the sample code shows p-dataTable but the articles refers to p-table. Can we just switch the tags to make it work? Thanks
https://github.com/walkingtree/sample-projects/tree/master/angluar2/primeNgNestedGrid
Hello Dan,
The source code in the git is the old version of angular not angular6. You have to upgrade the project to angular.
Article on upgrading the angular project to angular6 is in pipeline, you can refer that if needed.
Yes swapping the tabs will work. Thanks for pointing this out, will update the article.
i need to have filter functionality on both outer & inner tables…
can u plz help me out in that
Hello Sir, I have a query that if I need to display all data default first load. What property would be set in p-datatable and p-column. Please guide me as soon as possible. or mail me this kind of example. My email id is: btiwari033@gmail.com
Hi,
Since p-dataTable is not available, how can we achieve the same output? Do we use p-treeTable or p-table?
Thanks in advance