


Blogs
Setting up your Production-ready Polymer 1.0 Application Development
Any technology we choose to build our project, it is very important that our project lifecycle is managed with effective set of tools that make our overall project development efficient. Depending upon the technology, it may take a while, initially, to set it up but once it is in place, the benefit of it cannot be undermined. Besides, it gives you the much needed agility when it comes to releasing quality code, frequently.
In this article, we are going to run through the different stages of a project life-cycle for a Polymer 1.0 project and talk about the related tools that can help you run the project, efficiently.
A typical project development involves following (not necessarily in the mentioned sequence):
- Generate project using a template – termed as Scaffolding
- Making changes to the generated code
- Code documentation
- Ensuring Code Quality
- Running application
- Cross browser testing
- Unit Testing the code (& CI)
- Building the application for QA
- E2E Testing (& CI)
- Production deployment
Let us review each of these items and see how do we setup our project for the same.
Scaffolding Project
Project scaffolding acts as a good starting point for a project. This, typically:
- generates application folder structure that is best for the technology in terms of:
- development
- documentation
- testing
- build
- release
- sets up dependencies. E.g. setting up JSHint related configuration
- sets up the build configuration
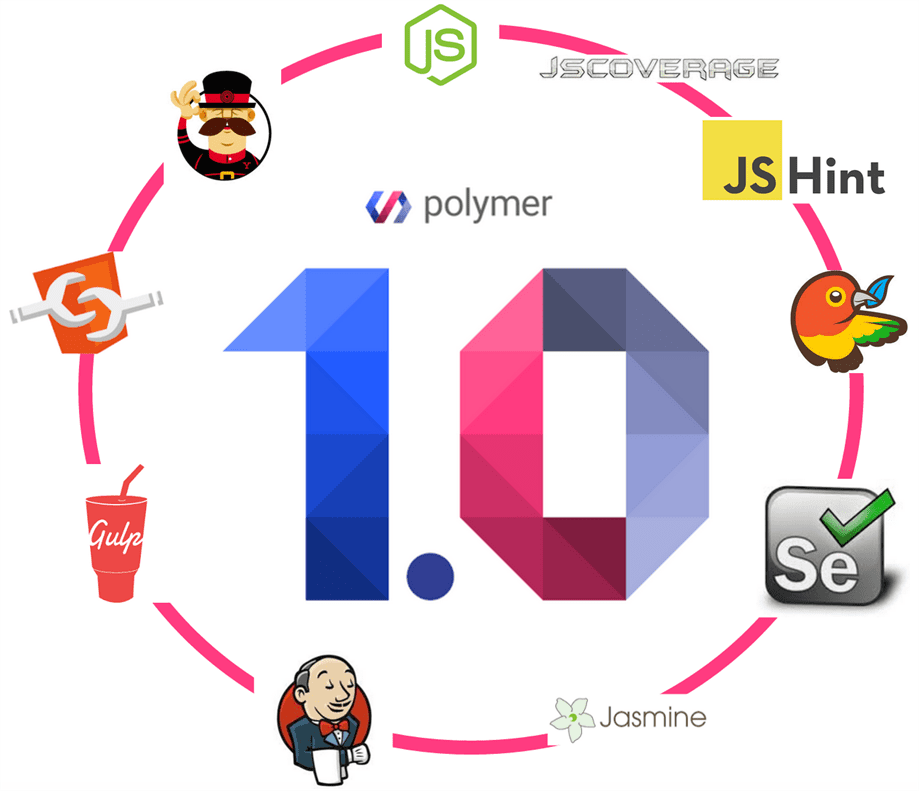
For Polymer project scaffolding, I recommend using the following tools:
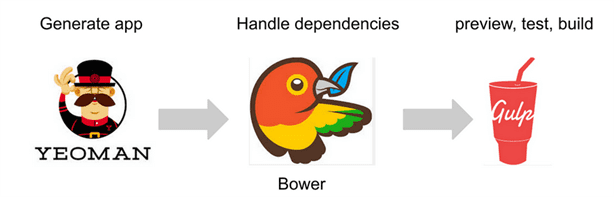
First, install the following:
- Node
- Yeoman
- Bower
- Gulp
- generator-polymer – this is a scaffolding tool for Yeoman, which generates a sample Polymer 1.0 project using Polymer Start Kit
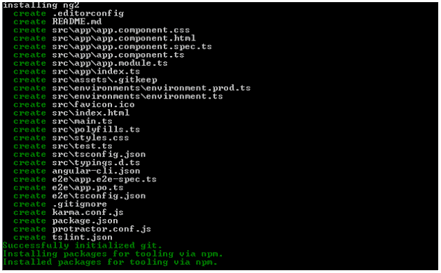
Now, run the following commands to scaffold a Polymer 1.0 project:
mkdir <your project folder>
cd <your project folder>
yo polymer
If everything was installed properly you shall see the following Terminal/Command output:
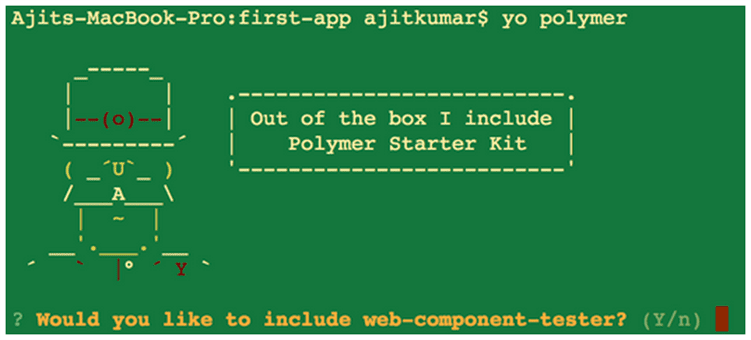
When prompted, answer Y to the following question and hit enter:
Would you like to include web-component-tester? (Y/n) Y
After this, the generator will run through various steps and setup the project for us. Say, we have generated our first-app. Let us see what files and folders are generated and what do they contain:
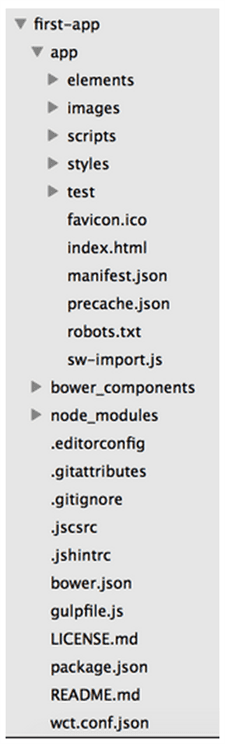
- index.html – this is the starting point of our application when accessed from a browser
- app – application folder where the complete application code shall reside. It has various sub-folders:
- elements – this is where your application specific Polymer element implementation must reside. A sub-folder must be created for each distinct element you create. E.g. I will create a sa-pokemon sub-folder for my element <sa-pokemon> and create its implementation file , say sa-pokemon.html inside that sub-folder
- images – contains various images that are used by the application. I suggest keeping the element specific images inside the element specific folder. E.g. if I have pokemon images, which I will use on <sa-pokemon> element, I will create sa-pokemon folder inside images and keep them there
- styles – this is where the application level styles definition shall go. Styling is a topic in its own and needs a separate discussion. In this article, we will focus on basic CSS based styling. This must not contain element specific styles as they shall be inside their respective definition files.
- test – contains the test scripts written to test the elements using Web Component Tester. The location of test folder is not in-sync with Create a reusable element, which outlines the process of developing custom Polymer elements and publishing them to GitHub so that others can also use them in their projects. But, this may not be a big problem, if you do not intend to release your custom elements
- bower_components – this is where Bower downloads and keeps all the dependencies. You shall be able to see Polymer’s iron, paper, etc. elements related folders inside it, which were downloaded when we generated the Polymer project. To add more dependencies, you will have to modify the bower.json file and run bower install command inside your project folder.
- node_modules – contains project-specific Node.js related dependencies
- .editorconfig – contains configuration that can be used with any text editor or IDE
- .jscrc – contains JavaScript Code Style (jscs) related configuration
- .jshintrc – contains JSHint related configuration
- gulpfile.js – contains Gulp tasks and their definitions
- package.json – contains all the dependencies and their versions that we use in our application development
- wct.conf.json – contains Web Component Tester related configuration
You should be able to run this application as the scaffolding process generates a complete working application. To run the application, you may run the following command:
gulp serve
and, you shall see the following output in your default browser:
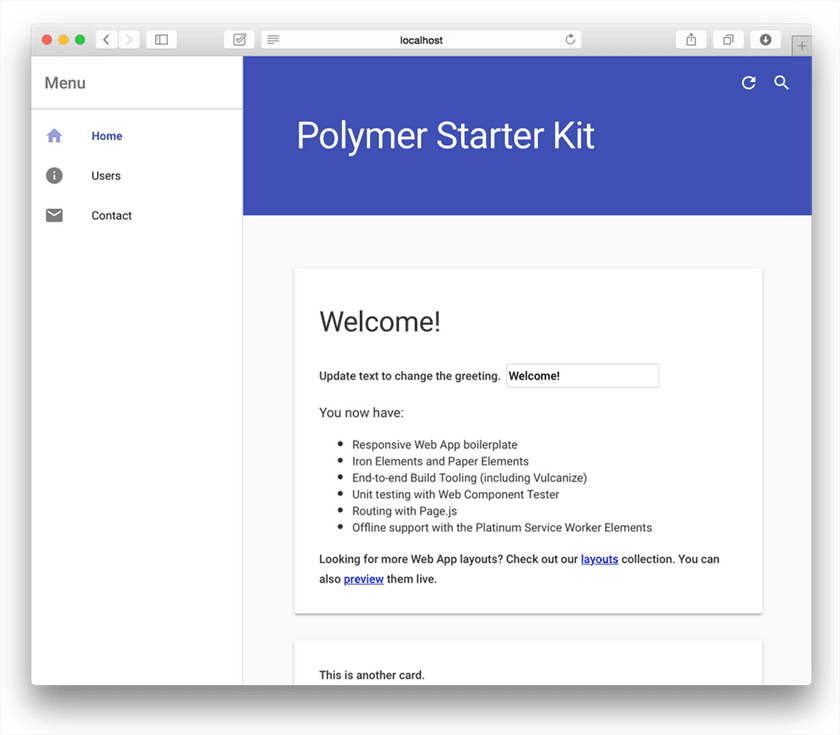
The default URL is http://localhost:3000/
Now, the next thing is, what tool should I use for editing the code and are their any guidelines around that.
Making changes (and Debugging)
generator-polymer generates .editorconfig file, which contains the configuration for text editors and IDEs, which are compatible with specs outlined on http://editorconfig.org/. Popular editors like Sublime Text, Brackets, Visual Studio, JetBrains, etc. support this spec and it ensures that the code editing configuration is common across developers irrespective of their preferred editor or IDE. This boosts developer efficiency and still ensures consistent editing rules.
Complete list of supported editors and IDEs is available here.
The generated .editorconfig contains certain default settings based on the industry best practices. However, you may edit it to override the defaults or add additional project specific properties. For the complete list of supported properties, refer to this.
Debugging
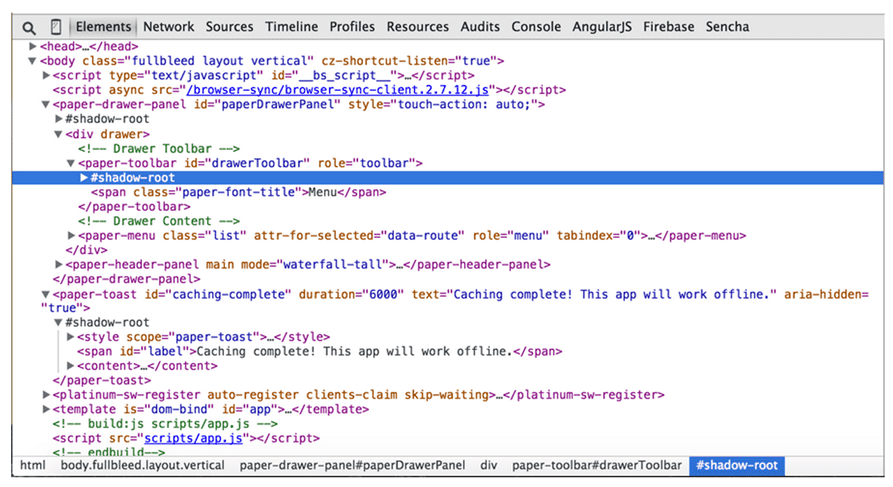
No special tool is required to debug Polymer application. You can continue to use you dev tools that come with the browsers for debugging. However, there is one thing that you can enable for Web Components (if they are supported by your browser). E.g. In Chrome, you can enable Show user agent shadow DOM setting as shown below:

With the above setting in place, you can see the shadow root and shadow host once you have enabled Shadow DOM in your Polymer application:
Documentation
By default, the generated project does not have the support for generating documentation from the code. To produce documentation for Polymer custom elements and behaviours, you shall use iron-component-page element. However, an application may go beyond the components where you may have additional JS/HTML files. In that case, we will use the existing JSDoc to generate the documentation from the code. And, to add the support for JSDoc:
1) install gulp-jsdoc to your project
npm install --save-dev gulp-jsdoc
2) Edit the gulpfile.js and include the module
var jsdoc = require("gulp-jsdoc");
3) Define a new Gulp task, say, jsdoc
gulp.task('jsdoc', function () {
 return gulp.src([
 'app/scripts/**/*.js',
 'app/elements/**/*.js'
 ])
 .pipe(jsdoc('dist/jsdoc'));
});
4) Now, you can run gulp jsdoc command to run this target and produce the documentation. In case, you want this to be executed whenever you do a full build, then you can add jsdoc task to the runSequence call for the default task
NOTE: In Polymer, we implement Web Components which is HTML+JavaScript. There could be some documentation done as part of the HTML, which you might want to be part of the generated documentation. JSDoc will not parse HTML files. You shall look at using jsdoc-parse module with its HTML parsing feature. It is experimental, though!
Ensuring Code Quality
Besides documentation, there are other aspects to code quality:
- Code indentation – this we discussed as part of Making Changes section
- Coding guidelines and best practices
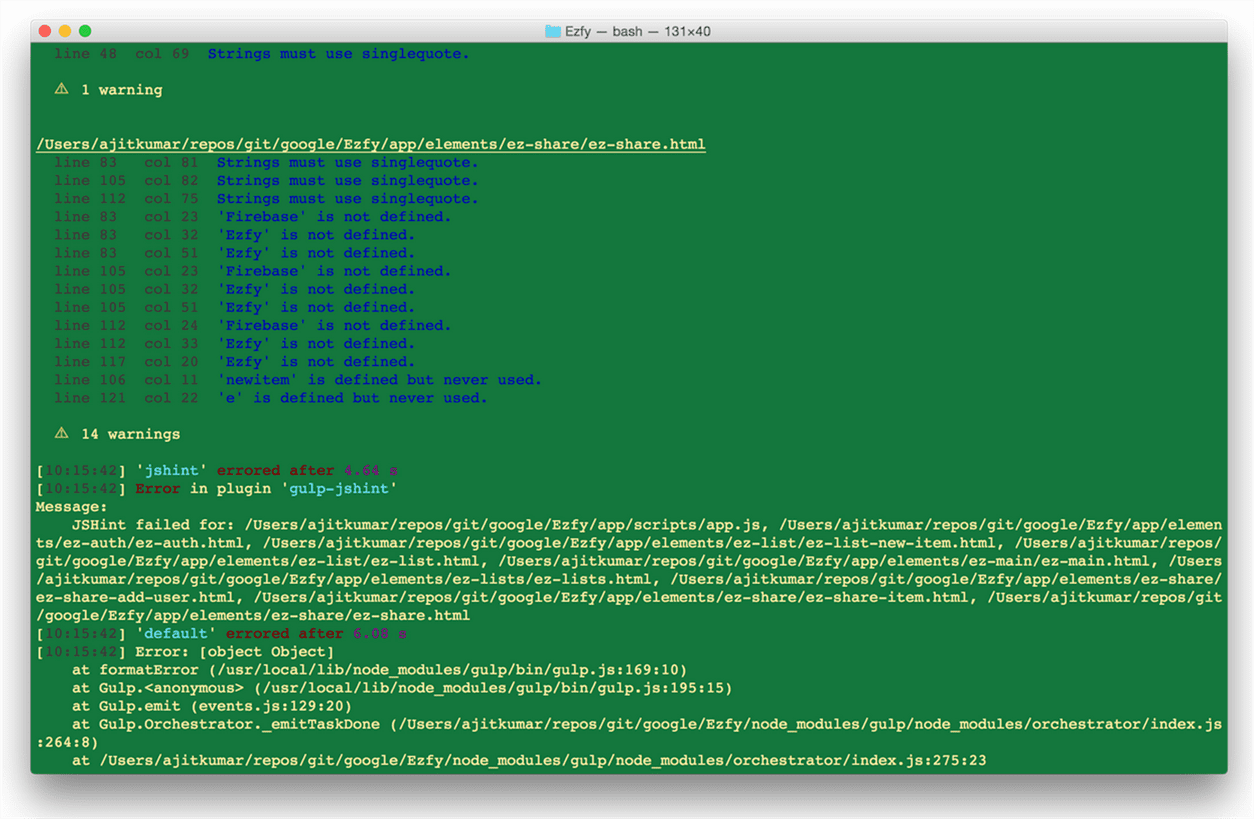
The generator comes along with JSHint pre-configured to check the code quality against the configured coding guidelines in .jshintrc file, which you can tailor for your project. During the build, the code is verified against the configured rules by the jshint task and it prints the report and terminates the build if the rules were violated.
Here is a screenshot showing the JSHint violations and build failing due to that:
Unit Testing the code
To unit test, a Polymer element, Web Component Tester has already been integrated into the application by the generator. Also, there are some sample test cases created inside the app/test folder.
This is a good starting point to understand how to write test cases. Once the test cases are in place, you can run them on all different browsers (that are installed on your system) by running the following command:
gulp test:local
The following output shows that the test cases were run, successfully, on Chrome, FireFox, and Safari on my system:
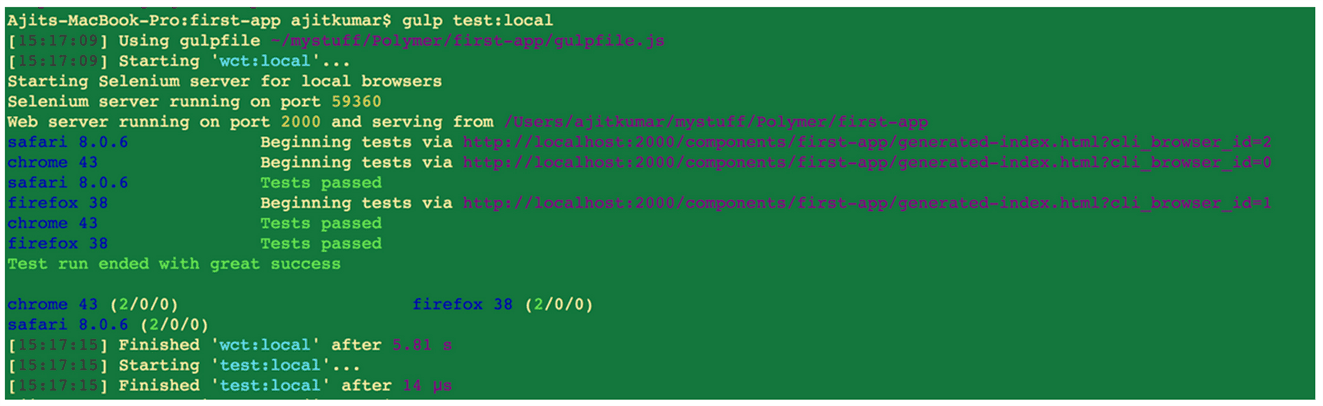
In the background, it relies on Selenium WebDriver, which is installed as part of the project scaffolding. In case you need to run your test cases against remotely installed browsers, you can do that by running the following command:
gulp test:remote
This, however, uses sauce server from SauceLabs and you can leverage their cloud-based infrastructure to take your automation testing to the next level.
Once these test cases are written, they can stay inside the test folder as Regression test cases, which can be executed as part of test automation – possibly, integrated with a CI tool.
Cross-browser testing
In UI application, cross-browser testing is a critical aspect of the delivery and can cost you money, time, and effort. And, the effort can multiply based on the number of browsers to be supported.
Automated Testing
This has been taken care of in our project where we can run all the test cases, simultaneously, on multiple browsers by running one of the commands:
gulp test:local
gulp test:remote
Manual Testing
Also, in case you want to do the manual testing on different browsers, and you have set of devices & browsers to test for, you can run the application by running one of the following commands:
gulp serve
gulp serve:dist
This uses BrowserSync in the background and you can control the application from one browser and it will sync all the browsers to show the application output based on your interaction. As a developer, you can use this capability while you are making the code changes to see the output on different browsers to ensure that it meets the cross-browser support requirement and be sure that you will cut down on the bugs reported from QA/Production.
You may view the BrowserSync configurations by accessing http://localhost:3001/ URL in your browser, as shown below:

E2E Testing the application
Similar to the Unit testing, E2E testing can also be – manual as well automated. And, the mechanism stays the same for E2E, as well. However, how do you write test cases is something that differs from Unit Testing.
When it comes to writing testcases for E2E testing of an application, Polymer Web components are just like HTML elements and the same testing tools and rules can be applied to them. I will recommend writing the test scripts using Jasmine 2 (as one can test asynchronous operations), running them with Karma & Gulp, and automating them by integrating it with CI platforms like Jenkins. As an alternative to Jasmine 2, you may look at Mocha (+Chai) if you intend to use Node.js.
Code Coverage
Similar to documentation, code coverage support has not been included, by default, at the time of scaffolding. However, you can install gulp-coverage to get the JavaScript coverage for you application.
Deploying for DEV deployment
For development testing, you shall deploy well formatted (non-minified/non-uglified) and nicely structured code (not merged) so that it is easier to debug when you see an error on your browser console. And, to achieve this, we don’t have to do anything. We just checkout the project code into a folder and run the application using the built-in Web Server by running:
gulp serve
This serves the files from the project app folder, directly.
Deploying for QA deployment
For QA, you generally, deliver the package, which is closest to the production package. That means, you would like to deploy the merged and minified code. However, in some projects, there could be two separate phases – Functional testing and Performance testing. And, you might want to release the debug version for Functional testing whereas non-debug version for Performance testing. In either case, I recommend the following approach:
- Checkout the project code from the repo on the target test server
- Do a build by running gulp command. This will build the artefacts and keep them inside the dist folder
- Start the application by running gulp serve:dist command. This will start serving the content from the dist folder, which contains the merged and minified code
This distribution allows the QA team to quickly switch to the debug version of the application – by running gulp serve command – and provide a better stack trace to the development team, in case of errors.
Specific to Web Components, where we have HTML+JS for elements. So, if I have 10 elements, I may have at least 10 .html files and they may have comments, as well. From production deployment perspective, it is required that these HTMLs are merged, white spaces are removed, and comments are stripped off. For this, the project is already configured with Vulcanize and it is used to create the production-ready packaging.
Deploying for Production Deployment
Production deployment is about:
- configuring metadata – make sure you review the following files and make the required changes for your application:
- manifest.json
- index.html
- configuring offline support (optional) – this is, by default, available and it uses Polymers’ platinum-sw element to pre-cache
- all the files that are listed inside the precache.json file. This file content is updated during the build process
merging and minifying the code – this is done during the build
Also, the deployment might not require the built-in server. So, in this case, you will have to copy the content of the dist folder and deploy it on the production server. This task is, generally, manual. However, based on your infrastructure setup, you may be able to automate this.
Epilogue
This brings us to the end of our setup process. In this article, we looked at how we can setup a Polymer based project using the tools which can help us develop, test, and deploy quality application. For brevity, we considered only Polymer for the application. However, you may include PHP, Firebase, JSP, Java, etc. to build your end-to-end project and when you do so, you shall have to extend the build process for overall effectiveness.
I hope this article will help you in your day-to-day project activities and help manage them better. I look forward to your inputs and suggestions!
To get more detail about Walking Tree’s offering in the area of Polymer based end-to-end application development, you may contact Walking Tree.
What about compatibility? https://www.polymer-project.org/0.5/resources/compatibility.html
Polymer, by default, uses Shady DOM, where it uses the WebComponents polyfills. You may refer to https://github.com/WebComponents/webcomponentsjs#browser-support for the browser support.
Very nice, thank you. I’d like to see such end to end guides more oftenly. They should be as in depth as possible for the new comers to get up and work easily.
Thank for your efforts.
Thanks for your input, Murat!
Love to see an article on Polymer + Meteor, now that both have hit 1.0, there are bits and pieces around the web, but nothing really solid.
Given that Polymer helps us create custom Web Components, which are HTML elements, integration of it with Meteor shall be straight forward. However, only when we try we would come to know about the real compatibility challenges 🙂
This is certainly on my list as Meteor is looking promising given the fact that there are very (very very) few frameworks that offer complete stack to develop JavaScript based web apps. Let us see how it goes.
Though Polymer is now production ready and actually I like it but I still feel there are some challenges like:
1. How it blends with architectural framework like Angular/Backbone ? There are some hooks like polymerize but not sure how much reliable they would be. After all just being able to create custom component won’t solve the problems that are faced in any enterprise app. We need to have good MVC framework in place as well.
2. How are we going to deal with SASS/LESS based styling if we using Polymer. SASS helps me to avoid redundant code. Polymer helps me to create custom components but at a cost of not being able to write SASS as each Polymer component has it style defined within it.
3. I have tried using polymer with Angular. Though works well but I actually decided to not use it as vulcanize process was not blending well with my existing workflow.
@Vicky,
1. Well, Angular 1.x and Backbone were not created with Web Components in mind. So, it would not be good to see how we can use Polymer with Angular/Backbone. That’s one of the primary reasons why AngularJS 2.0 is coming out, which is aligned with the Web Component architecture. Similarly, Backbone would be re-discovering itself to leverage the benefits of Web Components. Here is one such presentation http://webcomponents.org/presentations/webcomponents-plus-backbone-a-game-changing-combination-at-backbone-conf/
2. Using SASS and LESS for styling….as I mentioned styling Web Components require a separate discussion. However, again, let me tell you that SASS/LESS are not the great way to style elements. You might want to read through http://dev.w3.org/csswg/css-scoping/ to understand why CSS Scoping is being done.
3. This relates to my point #1.
Great post, you say “the generated project does not have the support for generating documentation from the code. There is no special documentation tool for Polymer”. But you can use the iron-component-page element for this and pass the template url to the src property instead of using gulp-jsdoc if you like.
Thanks a tonne, dan, for your suggestion! I was talking more from an overall application perspective. However, I have made the edits to mention that iron-component-page element can be used to produce documentation for Polymer elements and behaviours.
Cheers!
Great Post. Thanks a lot for your efforts.
Great Post, Awesomeness! Please note i couldn’t serve up with gulp till i installed browser sync with this command “install browser-sync gulp –save -dev” within the project directory 🙂
Thanks Frank!
It could have been due to the version of generator-polymer that you are using! Ideally, it should have setup the browsersync as a dependency and bower would have downloaded it for you! But, glad to know that you could get it working!
Hi, I can’t understand how to deploy a polymer js application to my live server
Hi Kishore,
I have mentioned about it in the last section – “Deploying for Production Deployment” where I have mentioned that you may have to copy the content of the dist folder to your production/live server folder (based on the server that you are using). In order to automate it, you may look at adding a gulp task to copy the content for you.
Hope this helps!
Can you please give an example for polymer shadow-root end to end testing with Jasmin 2, Karma & Gulp, and automating them by integrating it with Jenkins
Is it possible to do end to end functional test automation for any polymer shadow-root web-site ? Can you share some ideas or example with us