In this blog series, we started with identifying the need for handling and converting Flash applications and saw Apache Royale as one of the main options where the MXML and ActionScript code remains and some part of it can be reused, also the code gets transpiled to HTML/JS to be run on the browser.
In this last blog of this series, we will look at how this conversion from Flex to Royale can be done using an example.
In order to convert an existing flex project, we can manually copy the flex project files (MXML and as ) into the src folder of our newly created Royale Project.
For this exercise, we picked a simple flex file displaying a Data Grid.
To start with the conversion, the following are the steps which need to perform for the migration to Royale:
- Namespace: In every MXML file we need to make the following updates:
From the flex namespace as below:
1 2 |
xmlns:s="library://ns.adobe.com/flex/spark" xmlns:mx="library://ns.adobe.com/flex/mx" |
Update to the royale namespace as below:
1 2 |
xmlns:s="library://ns.apache.org/royale/spark" xmlns:mx="library://ns.apache.org/royale/mx" |
- Flash Components: To start with, we will have to comment out all the imported flash components. Later we will have to see if the flash functionality is required separately and if it is covered by a Royale emulation component. If not then this may require some extra component enhancement/development.
- Flex Components: The flex components will be replaced by the Royale emulation components for the same functionality.
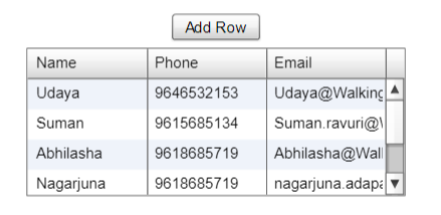
We will try this out for a flex application using a simple Grid as below:
The following steps were followed to build this simple flex application.
- Created a flex project by choosing the new flex browse project in Moonshine IDE.
- Made use of js and fx tags from flex libraries and other local packages which are required to run the application.
- Used datagrid and array of collection to show the data in a grid and used click events to add the data into the grid calling the required function in the script tag.
The flex code for this grid comprises of Flex_grid_project.mxml code(in the src folder) as below:
1 2 3 4 5 6 7 8 9 10 11 12 13 14 15 16 17 18 19 20 21 22 23 24 25 26 27 28 29 30 31 32 33 34 35 36 37 38 39 40 41 42 43 44 45 46 47 48 49 50 51 52 53 54 55 56 57 58 59 60 61 62 63 64 65 66 67 68 69 70 71 72 73 74 |
<?xml version="1.0" encoding="utf-8"?> <s:Application xmlns:fx="http://ns.adobe.com/mxml/2009" xmlns:s="library://ns.adobe.com/flex/spark" xmlns:mx="library://ns.adobe.com/flex/mx" xmlns:local="*"> <fx:Script> <![CDATA[ import mx.collections.ArrayCollection; import Contact; protected function addValue():void { // Note: this sample uses bidirectional data binding, so we do not have to // explicitly set the contact fields to save them! var contact:Contact = new Contact(); contact.name = "Nagarjuna"; contact.phone = "9618685719"; contact.email = "nagarjuna.adapa@walkingtree.tech" contacts.addItem(contact); } ]]> </fx:Script> <fx:Declarations> <local:Contact id="contact"/> <mx:ArrayCollection id="contacts"> <local:Contact name="Udaya" phone='9646532153' email="Udaya@WalkingTree.tech"/> <local:Contact name="Suman" phone="9615685134" email="Suman.ravuri@WalkingTree.tech"/> <local:Contact name="Abhilasha" phone="9618685719" email="Abhilasha@WalkingTree.tech"/> </mx:ArrayCollection> </fx:Declarations> <s:BorderContainer height="100%" width="100%" id = "mainContainer" styleName = "container" > <s:Button id = "myButton" label = "Add Row" click = "addValue();" /> <mx:DataGrid id="dg" rowCount="4" dataProvider="{contacts}"> <mx:columns> <mx:DataGridColumn dataField="name" headerText="Name"/> <mx:DataGridColumn dataField="phone" headerText="Phone"/> <mx:DataGridColumn dataField="email" headerText="Email"/> </mx:columns> </mx:DataGrid> <s:layout> <s:VerticalLayout verticalAlign = "middle" horizontalAlign = "center" /> </s:layout> </s:BorderContainer> </s:Application> The above code imports the contact definition as defined below in a separate Contact.as file: package { import mx.collections.ArrayCollection; [Bindable] public class Contact { public var name:String; public var phone:String; public var email:String; public var address:String; public var city:String; public var state:String; public var zip:String; public var currency:String; public function Contact(){ super(); } } } |
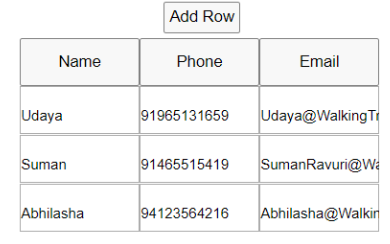
By following the approach of migration explained, we were able to convert the flex grid to Apache Royale as below.
The following steps were followed:
-
- Created a royale project by choosing the new royale browse project in Moonshine IDE
-
- Used js, fx tags from royale libraries and other local packages which are required to run the application
The application was divided into three parts as
- valuesImpl – To handle simple CSS values
- Product Model – To handle the data
- InitialView – To take care of the view
-
- in InitialView( MyInitialView.mxml) – This is the code which is viewed in the browser with all the required functionality imported into the MXML file
Here we created a dynamic grid so that while firing on the event on the button it will add the data dynamically into the grid.
Below is the code:
1 2 3 4 5 6 7 8 9 10 11 12 13 14 15 16 17 18 19 20 21 22 23 24 25 26 27 28 29 30 31 32 33 34 35 36 37 38 39 40 41 42 43 44 45 46 47 48 49 50 51 52 53 54 55 56 57 58 59 60 61 62 63 64 65 66 67 68 69 70 71 72 73 74 75 76 77 78 |
<?xml version="1.0" encoding="utf-8"?> <js:View xmlns:fx="http://ns.adobe.com/mxml/2009" xmlns:js="library://ns.apache.org/royale/basic"> <fx:Script> <![CDATA[ import models.ProductsModel; import org.apache.royale.html.DataGrid; import products.Product; import org.apache.royale.collections.ArrayList; private function addValue():void { var product:Product = new Product("xx100","Nagarjuna",9618685719,"nagarjuna.adapa@WalkingTree.tech"); (applicationModel as ProductsModel).productList.addItem(product); } private function removeValue():void { (applicationModel as ProductsModel).productList.removeItemAt(2); (applicationModel as ProductsModel).productArray.splice(2,1); } ]]> </fx:Script> <fx:Style> @namespace js "library://ns.apache.org/royale/basic"; /* Puts a box around each cell of the DataGrids. */ js|DataGrid .DataItemRenderer { border: 1px solid #ACACAC; line-height: 40px; } js|DataGrid .StringItemRenderer { border: 1px solid #ACACAC; line-height: 40px; } js|DynamicDataGrid { border: 0px; line-height: 40px; } /* Allows the DataGrid to be specified with percentage widths for the columns (rather * than pixel widths) and does not respond to changes to its dataProvider. */ .PercentageColumnWidths { IBeadLayout: ClassReference("org.apache.royale.html.beads.layouts.DataGridPercentageLayout"); border: 1px solid #ACACAC; } </fx:Style> <js:TextButton x="720" y="280" text="Add Row" click="addValue()" /> <js:DynamicDataGrid id="dataGrid2" x="600" y="310" width="400" height="350" visible="true" rowHeight="40"> <js:beads> <js:ConstantBinding sourceID="applicationModel" sourcePropertyName="productList" destinationPropertyName="dataProvider" /> </js:beads> <js:columns id="columnGrid"> <!--<js:DataGridColumn label="Image" dataField="image" columnWidth="100" itemRenderer="products.ProductItemRenderer"/>--> <js:DataGridColumn label="Name" dataField="name" columnWidth="100" /> <js:DataGridColumn label="Phone" dataField="phone" columnWidth="100" /> <js:DataGridColumn label="Email" dataField="email" columnWidth="100" /> </js:columns> </js:DynamicDataGrid> </js:View> |
Below is the data grid in the corresponding Royale grid project. You can view the complete project code here.
https://github.com/nagarjunaAdapa/royaleproject.git
During the process of conversion, we realised that some of the functionalities were not implemented in the Apache Royale Framework code and would require further enhancement of the framework.
Conclusion
We concluded our exercise of the evaluation of Apache Royale as the approach for migration of flex with the following observations:
- The Royale emulation components are available and functional for simple components like button, label, checkbox, dropdowns, radio buttons etc. to build simple forms. The framework code includes some examples showing the use of these basic components. In most cases, these examples are able to generate outputs and can be converted.
- The complex UI components like Grid exist for basic functionality, but advanced features like dynamic column inclusion are not fully supported.
- The complex UI components for charts like Pie charts, Bar charts, line charts etc., though included in the examples do not produce any results and give errors indicating they have not been implemented completely by the framework, which would require further drill-down and investigation of the framework code.
- The community support is not wide due to a smaller user base of this open-source, due to which you do not get much help on the errors, even on Google search.
- Unavailability of ready-to-use and fully functional components and incompleteness of docs makes the overall progress slower.
Apache Royale will be the recommended approach if you are looking to migrate the simple components with not very complex UI. For complex UI components, this will be a time taking proposition as the current code is in not very stable status and absence of completely implemented UI Components.
With time, Apache Royale will definitely mature and become more stable and ready to use.

