Blogs
Implementing Dependency Injection in Angular

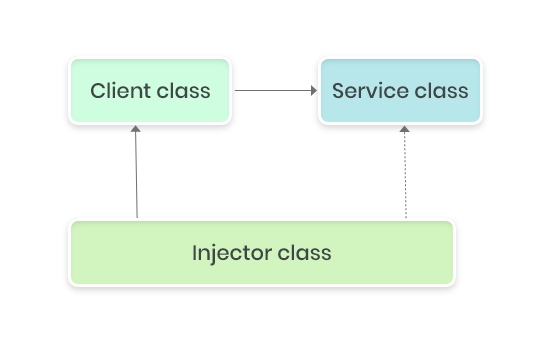
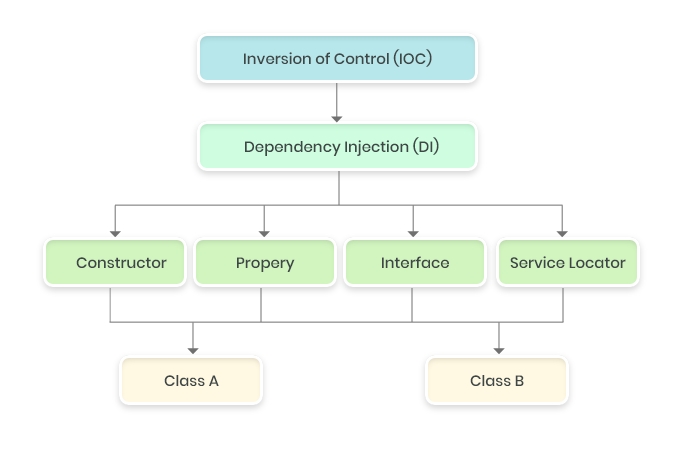
The dependency injection is the core part of Angular that allows us to inject dependencies into the component, pipes, directives, or services without needing to know – how those dependencies are created, or what dependencies they need themselves.
“Dependency Injection (DI) is a software design pattern in which a class requests dependencies from external sources rather than creating them.”
Angular uses the Dependency Injection design to work efficiently. This programming paradigm allows components, classes, and modules to be interdependent while maintaining consistency. Thus, reducing the frequency with which the class changes. In this blog on Angular Dependency Injection, we will cover the following topics:
- What is Dependency Injection & why to use it?
- Forming the components of Dependency Injection!
- Benefits of adopting Dependency Injection.
What is Dependency Injection & why to use it?
In simpler words, a ‘dependency’ is an object that can be used, for instance – as a service; and ‘dependency injection’ is a technique whereby one object supplies the dependencies of another object.
Well, now the question is – why use it?
Creating objects directly within the class is quite inflexible as it commits the class to particular objects. Thus, making it impossible to change the instantiation later independently. It stops the class from being reused if other objects are required and it makes it hard to test since the real objects cannot be replaced with mock objects.
While depending on an interface is more flexible than on concrete classes. These provide ways in which you can replace those abstractions with concrete implementations at runtime. It is the best way to make your codebase flexible and reusable.
Forming the components of Dependency Injection!
1. Creating an Injectable service
The @Injectable() decorator specifies that Angular can use this class in the DI system. The metadata, providedIn: ‘root’, means that the MyServiceService is visible throughout the application.
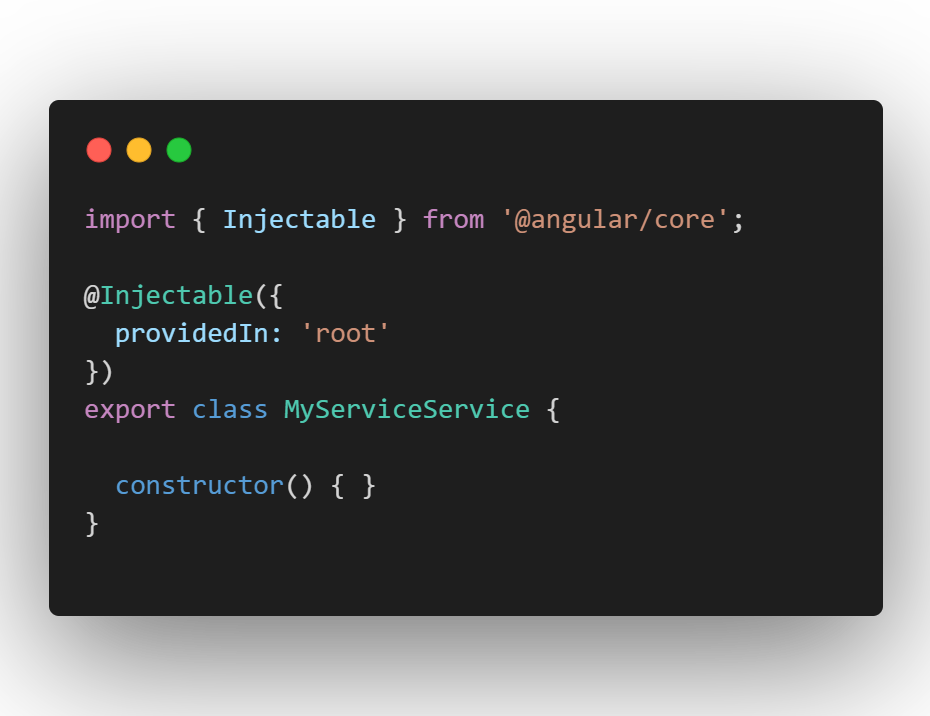
Typically when using Angular services, we think of services as being an application-wide singleton. Singleton services by default in Angular mean that Angular creates one instance of our service and shares that instance to all the components in our application.
2. Injecting services using Constructor
Injecting services results in making them visible to a component.
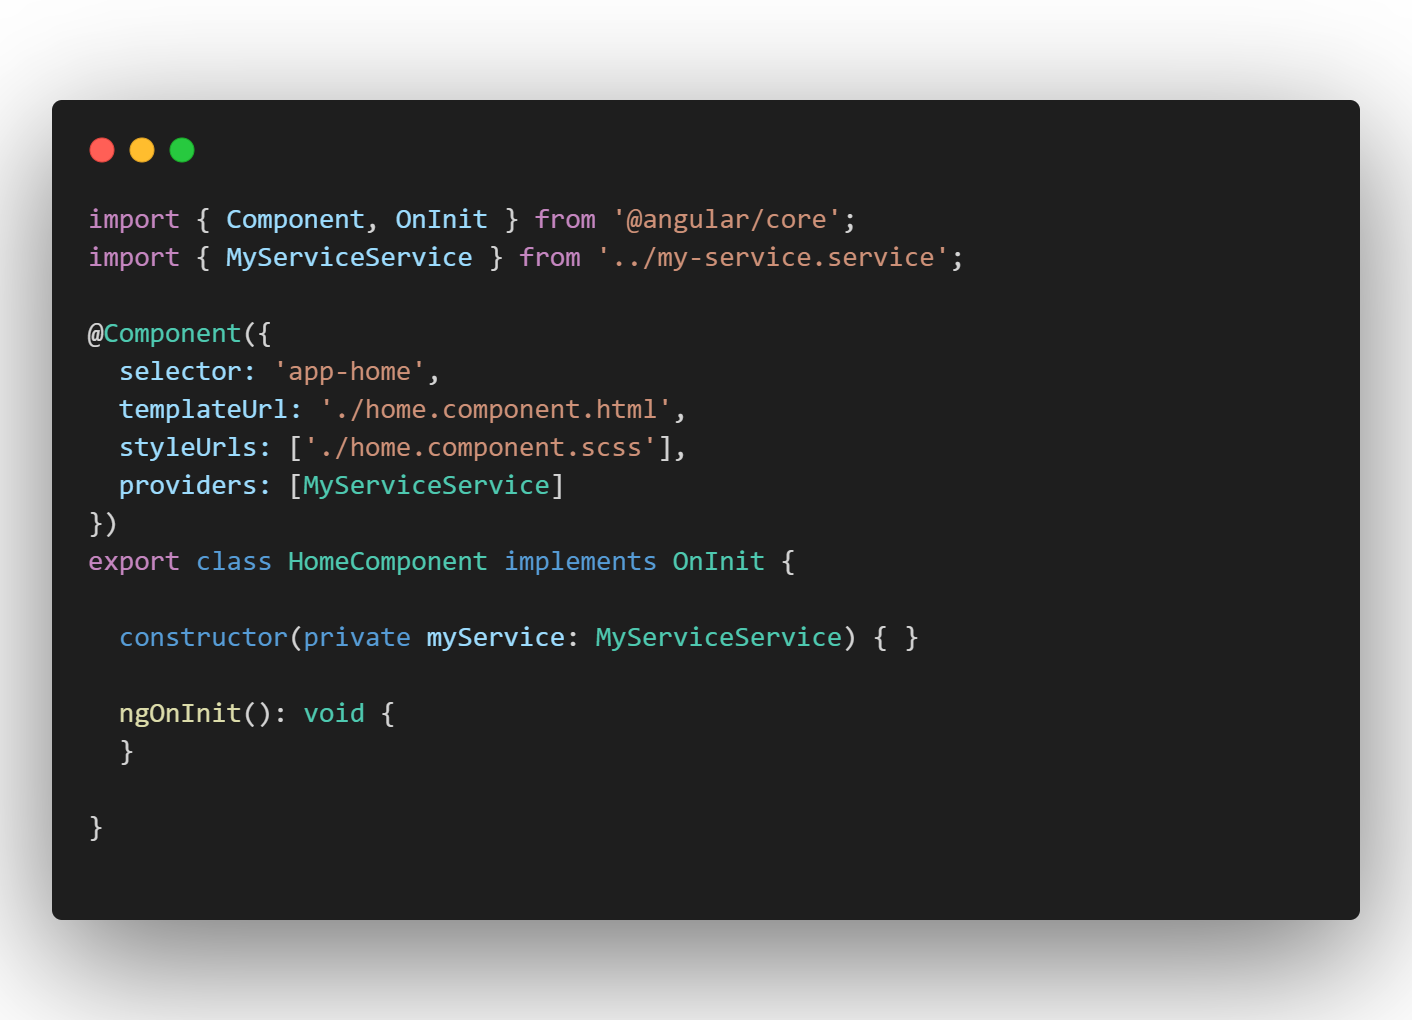
To inject a dependency in a component’s constructor(), supply a constructor argument with the dependency type. The following example specifies the MyServiceService in the HomeComponent constructor. The type of myService is MyServiceService.
3. Hierarchical injectors and their type
Injectors in Angular have rules that you can leverage to achieve the desired visibility of injectables in your apps. By understanding these rules, you can determine in which NgModule, Component, or Directive you should declare a provider.
There are two injector hierarchies in Angular:
- ModuleInjector hierarchy:
You can easily configure a ModuleInjector in this hierarchy using an @NgModule() or @Injectable() annotation.
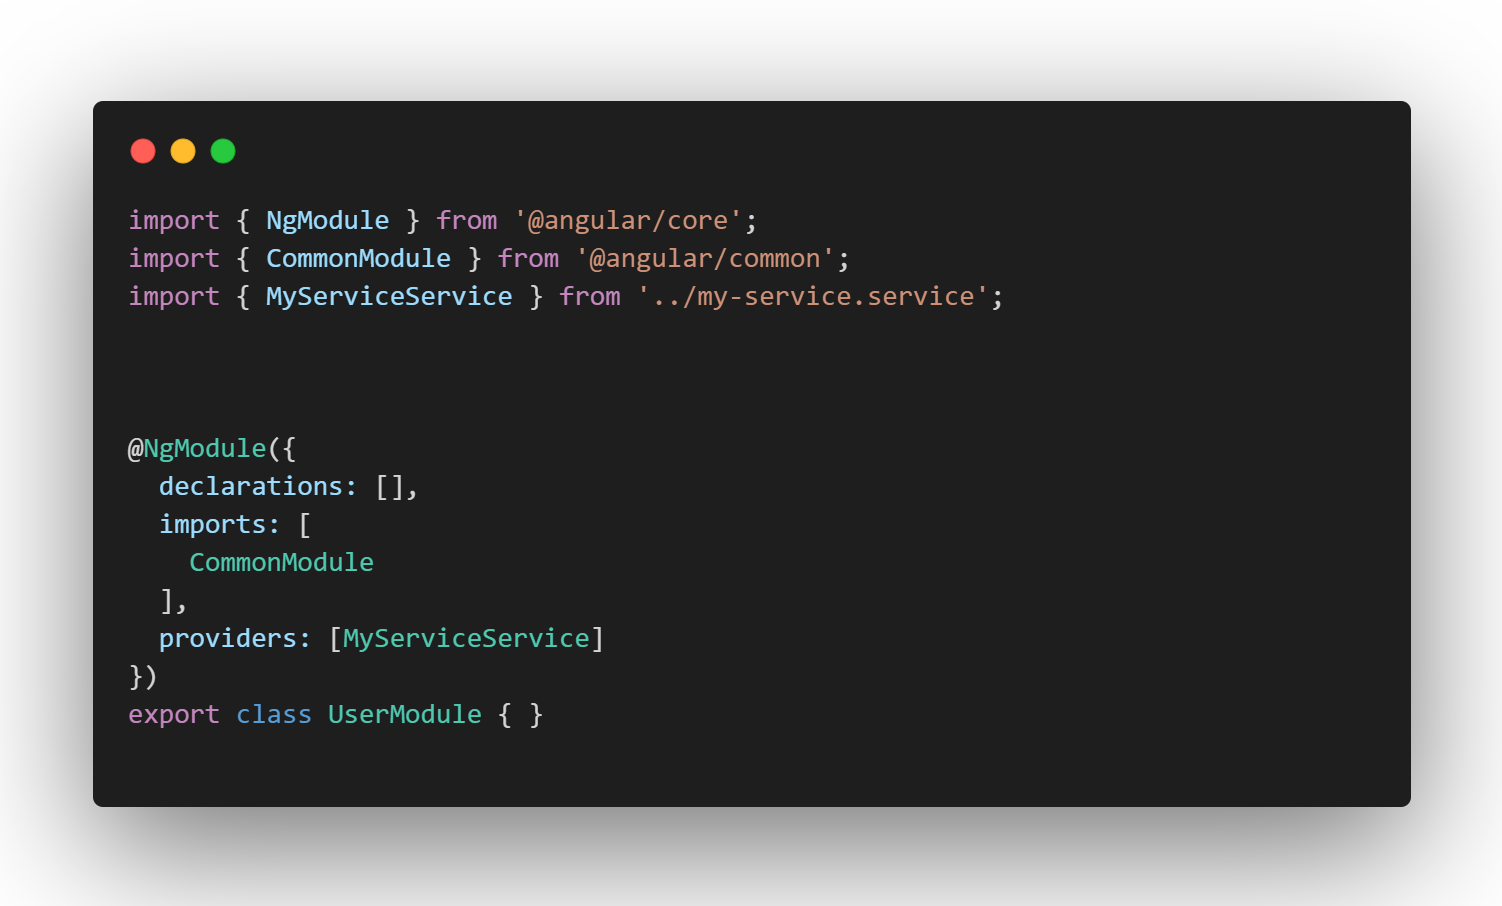
When you register a provider with a specific NgModule, the same instance of a service is available to all components in that NgModule. To register at this level, use the provider’s property of the @NgModule() decorator.
- ElementInjector hierarchy:
You can implicitly create ElementInjector at each DOM element. An ElementInjector is empty by default unless you configure it in the provider’s property on @Directive() or @Component().

In this case, the service is not a singleton and we get a new instance of the provided service every time we use the component in the template of another component. It also means that the service instance will be destroyed together with the component.
When you register a provider at the component level, you get a new instance of the service with each new instance of that component. At the component level, register a service provider in the provider’s property of the @Component() metadata.
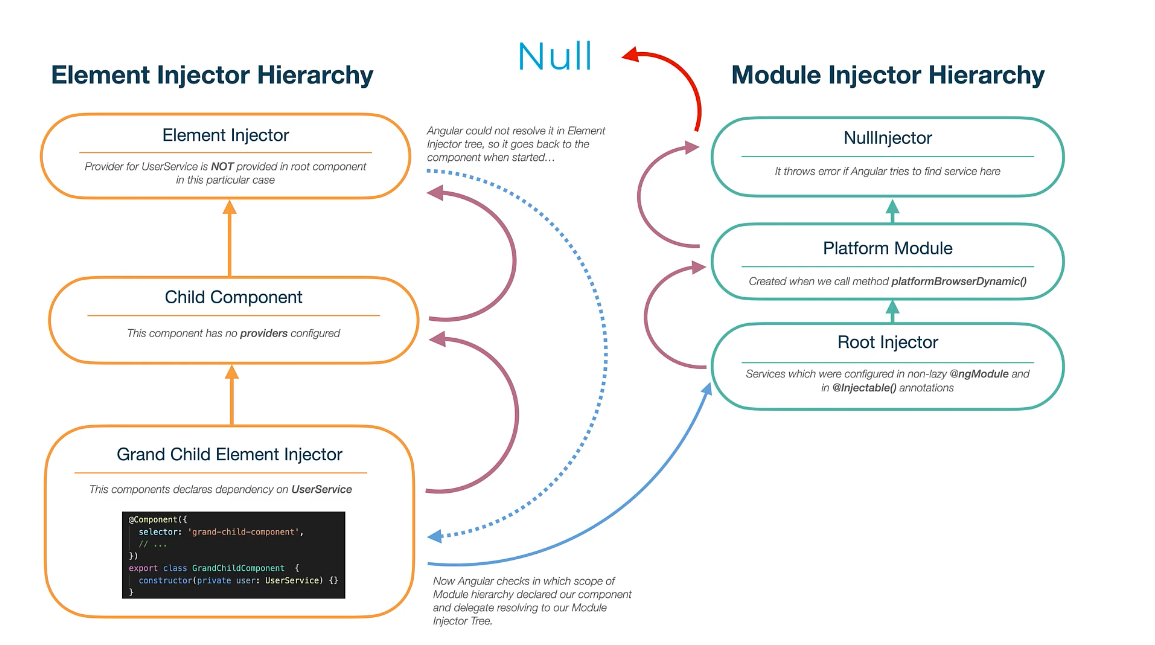
When a class requires a dependency, that dependency is added to the constructor as a ‘parameter’. When Angular needs to instantiate the class, it calls upon the DI framework to supply the dependency. By default, the DI framework searches for a provider in the injector hierarchy, starting at the component’s local injector of the component, and if necessary bubbling up through the injector tree until it reaches the root injector.
There are several options for modifying the default search behavior, using parameter decorators on the service-valued parameters of a class constructor. These are:
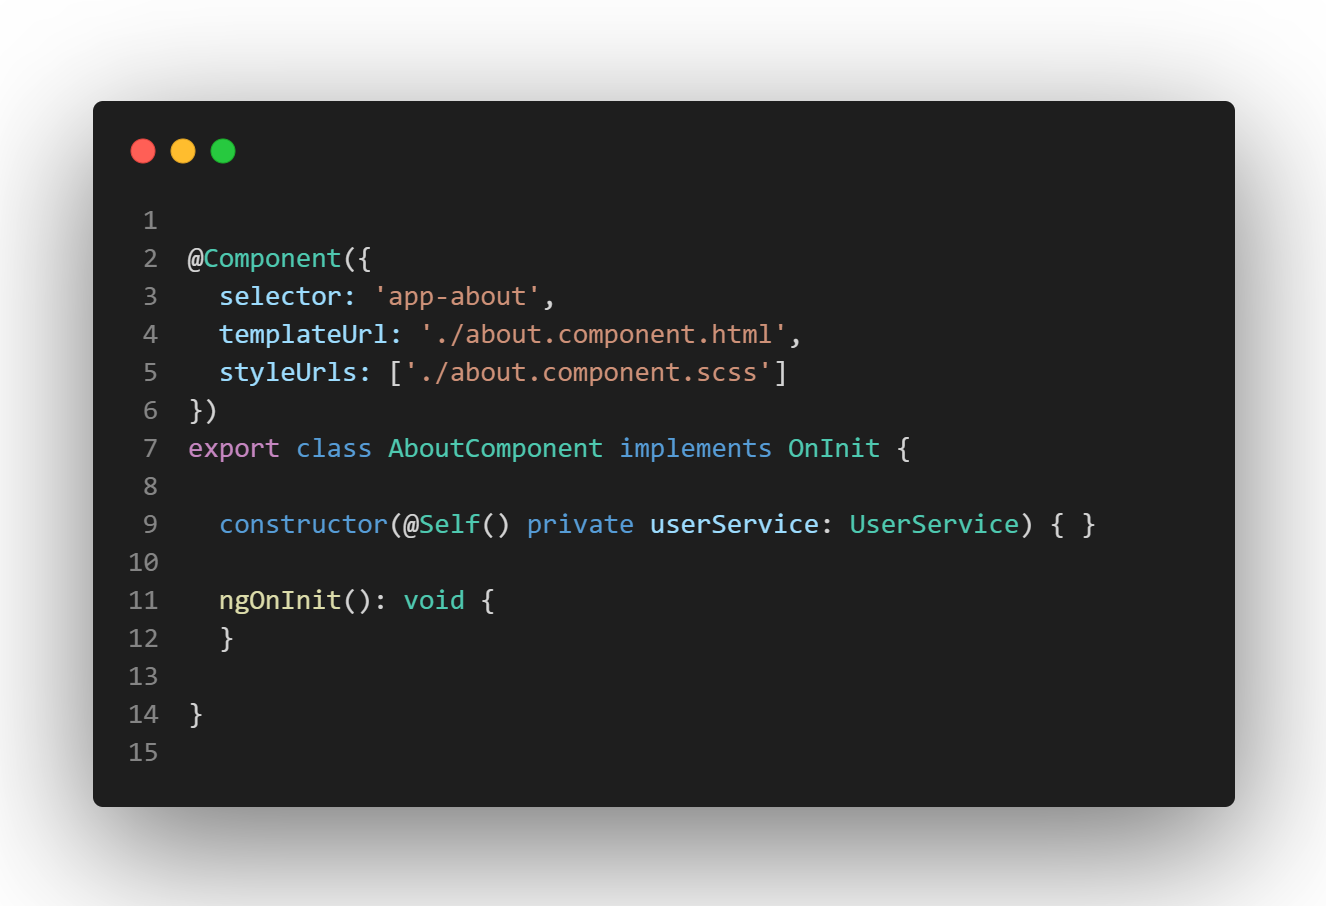
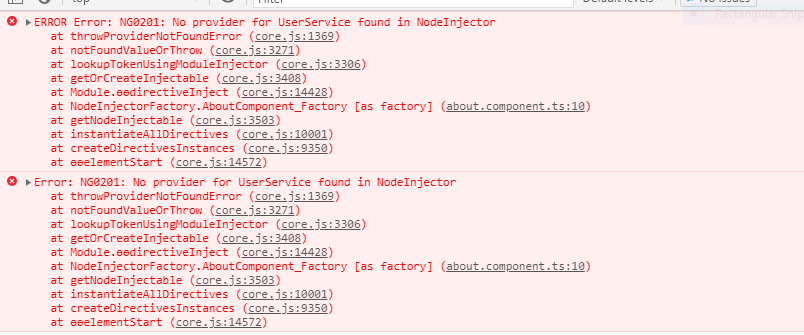
a) @Self()
Using the @Self decorator, the injector only looks at the component’s injector for its providers. If it isn’t defined there that would be an error.
The following example shows the component doesn’t contain providers.
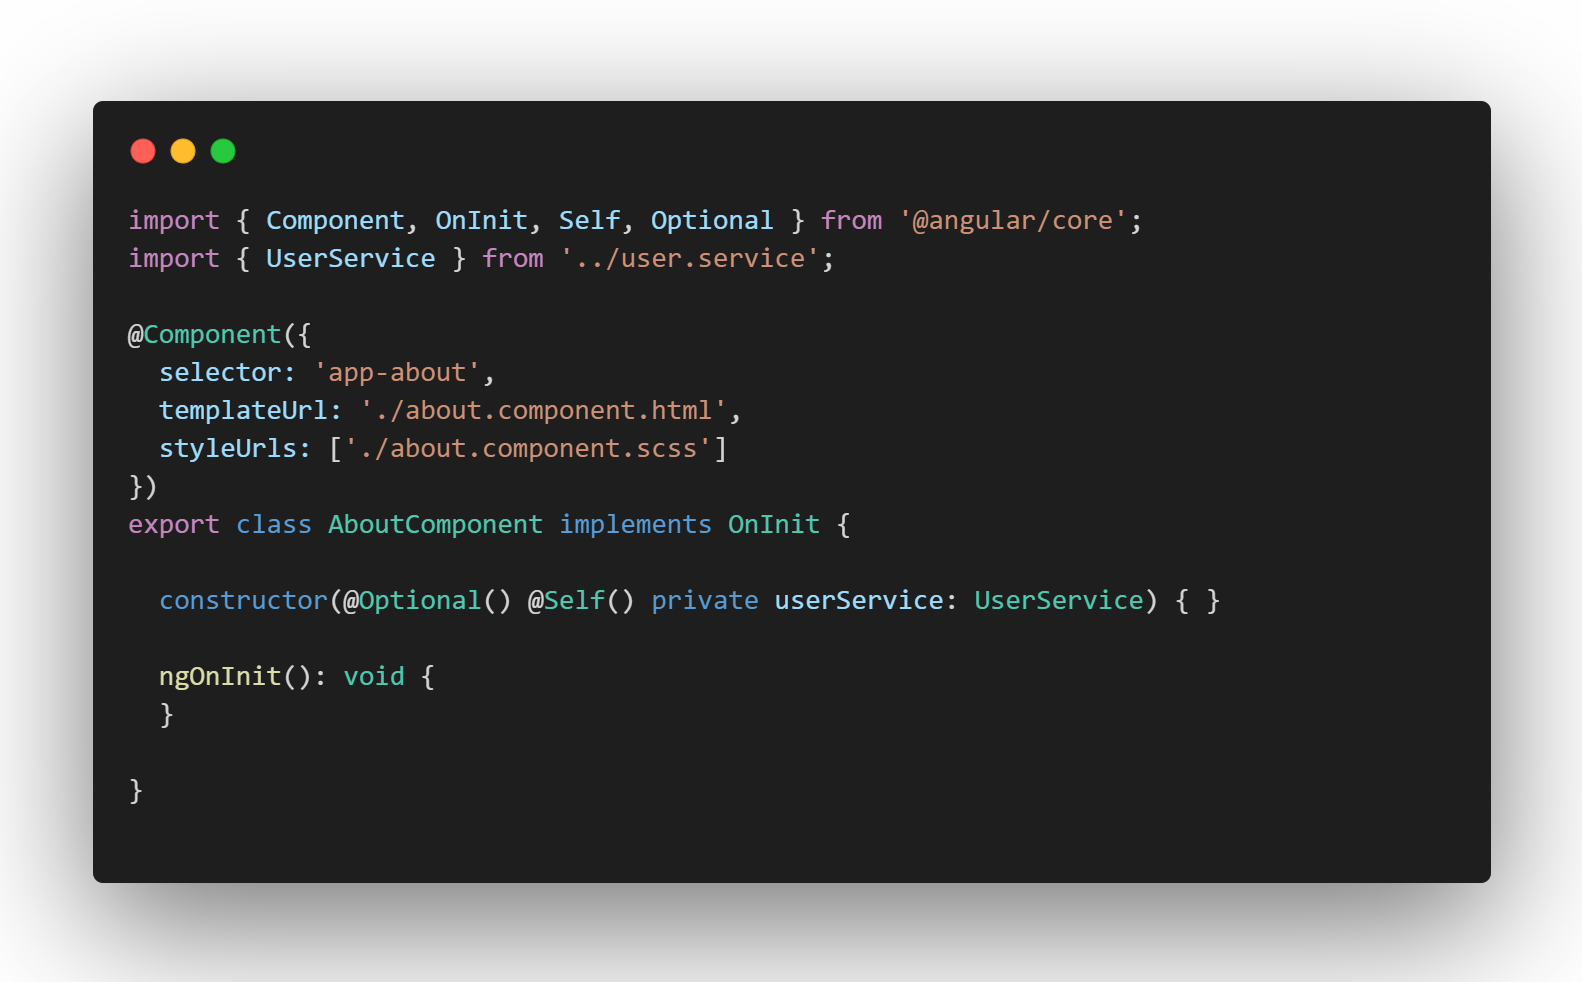
b) @Optional()
The @Optional decorator marks the dependency as optional, thus the injector will not raise an exception even if the service provider for the dependency is not defined.
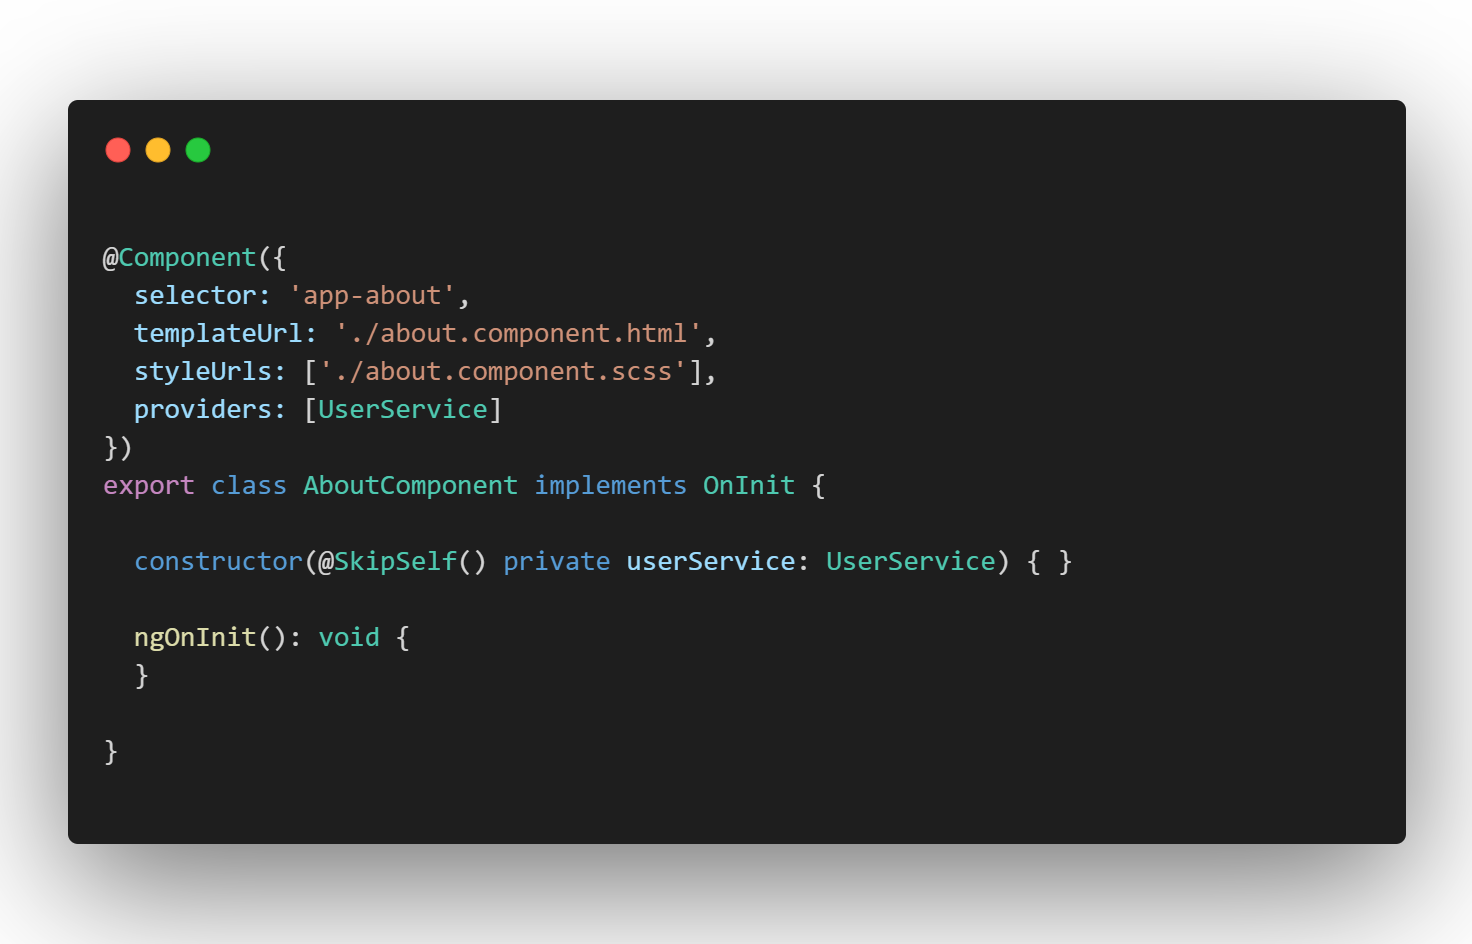
c) @SkipSelf()
Using the @SkipSelft() decorator to be used on constructor parameters, which tells the DI framework to start dependency resolution from the parent injector. Resolution works upward through the injector hierarchy, so the local injector is not checked for a provider.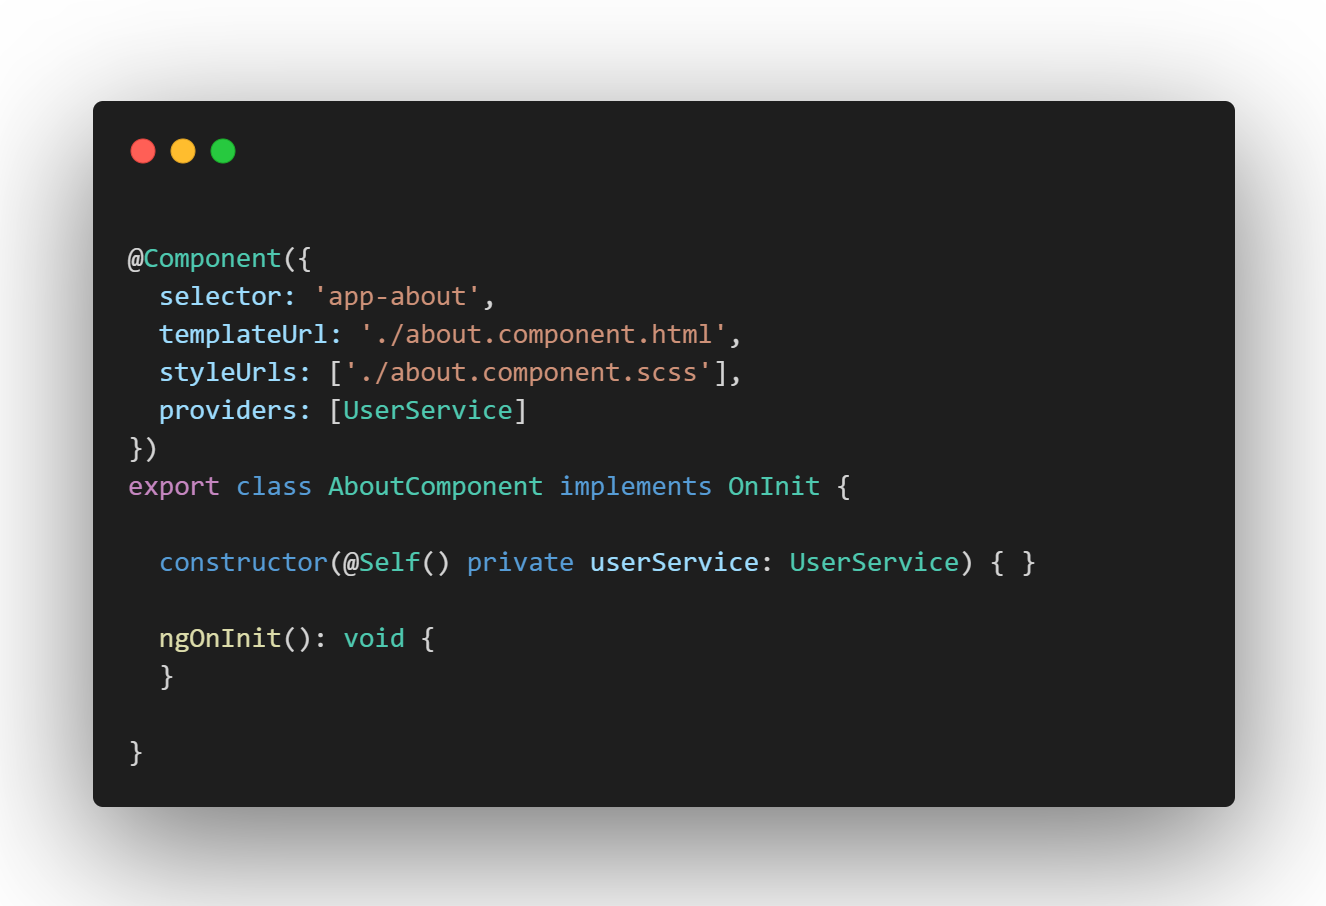
d) @Host()
The @Host property decorator stops the upward search at the host component. The host component is typically the component requesting the dependency. However, when this component is projected into a parent component, that parent component becomes the host.
4. Provider
A provider is an instruction to the Dependency Injection system on how to obtain a value for a dependency. Most of the time, these dependencies are services that you create and provide.
The Angular Dependency Injection provides several types of providers:
a) useClass
b) useValue
c) useExisting
d) useFactory
When we provide the value as a class name, what happens behind the scene is that angular creates a provider configuration object using this provided value.
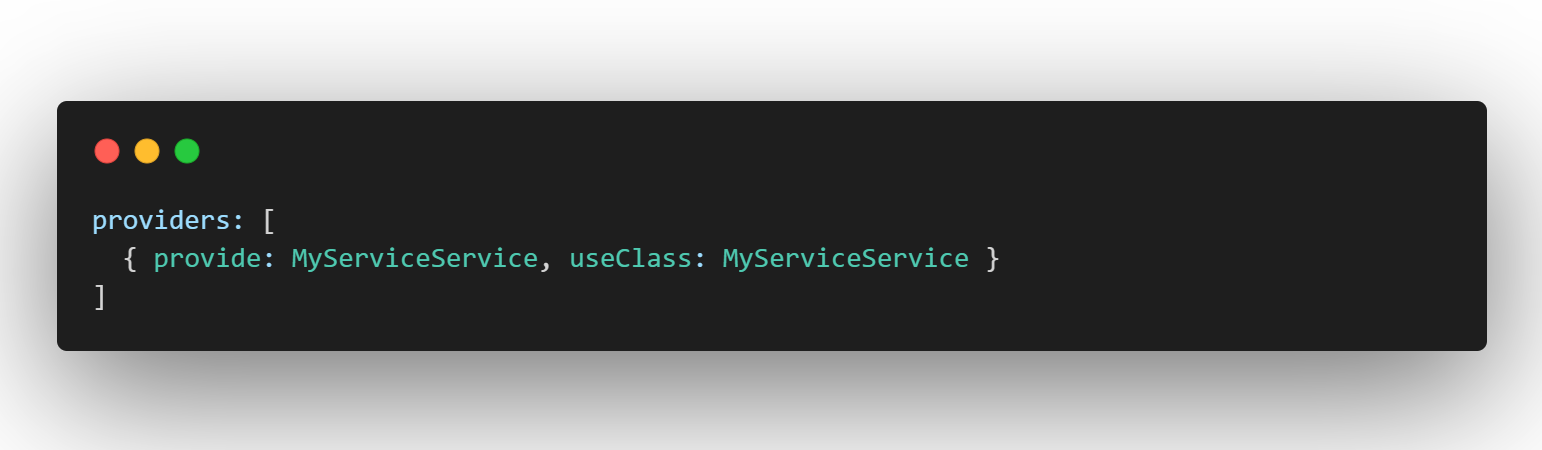
a) useClass
Using the useClass property we can use some different classes instead of the same class used as a token.
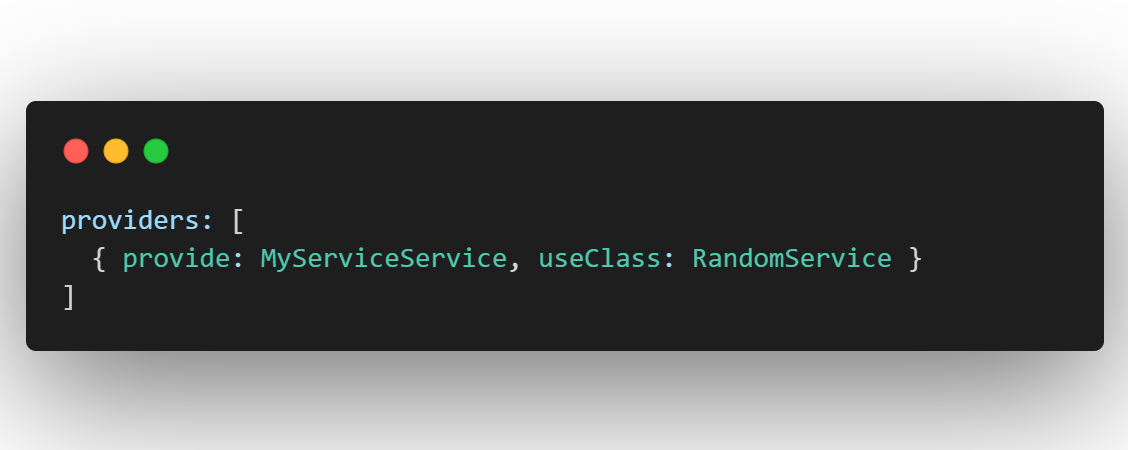
In the following example, the useClass property tells the injector to use RandomService class when MyServiceService is required somewhere in the application using DI.
b) useExisting
Using the useExisting property we can use a class different from token but that class is already used as a provider. For example, look at the following example –

In this case, the injector will create two different instances of the RandomService class.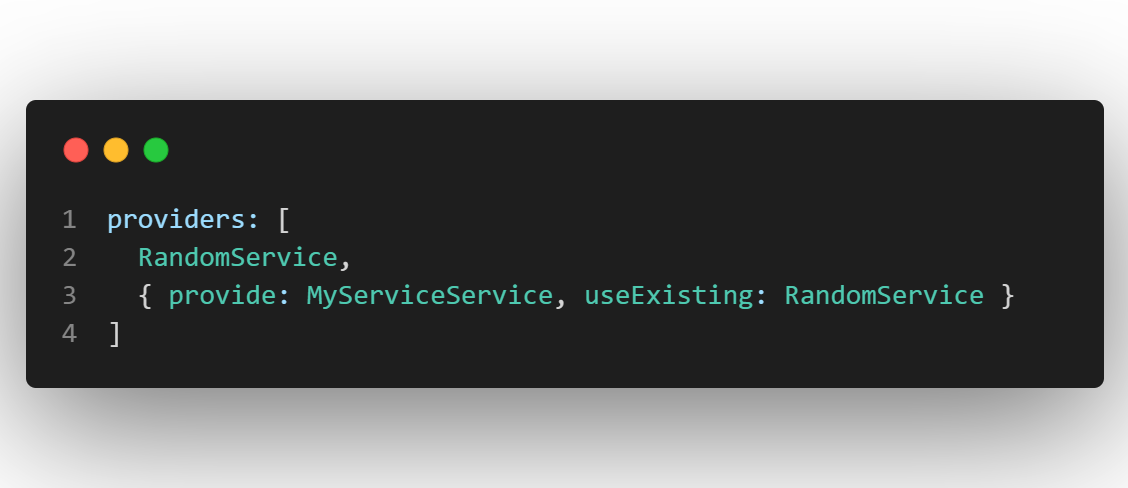
To solve this problem we can use the useExisting configuration property, which will use the existing class instance instead of creating a new instance again.
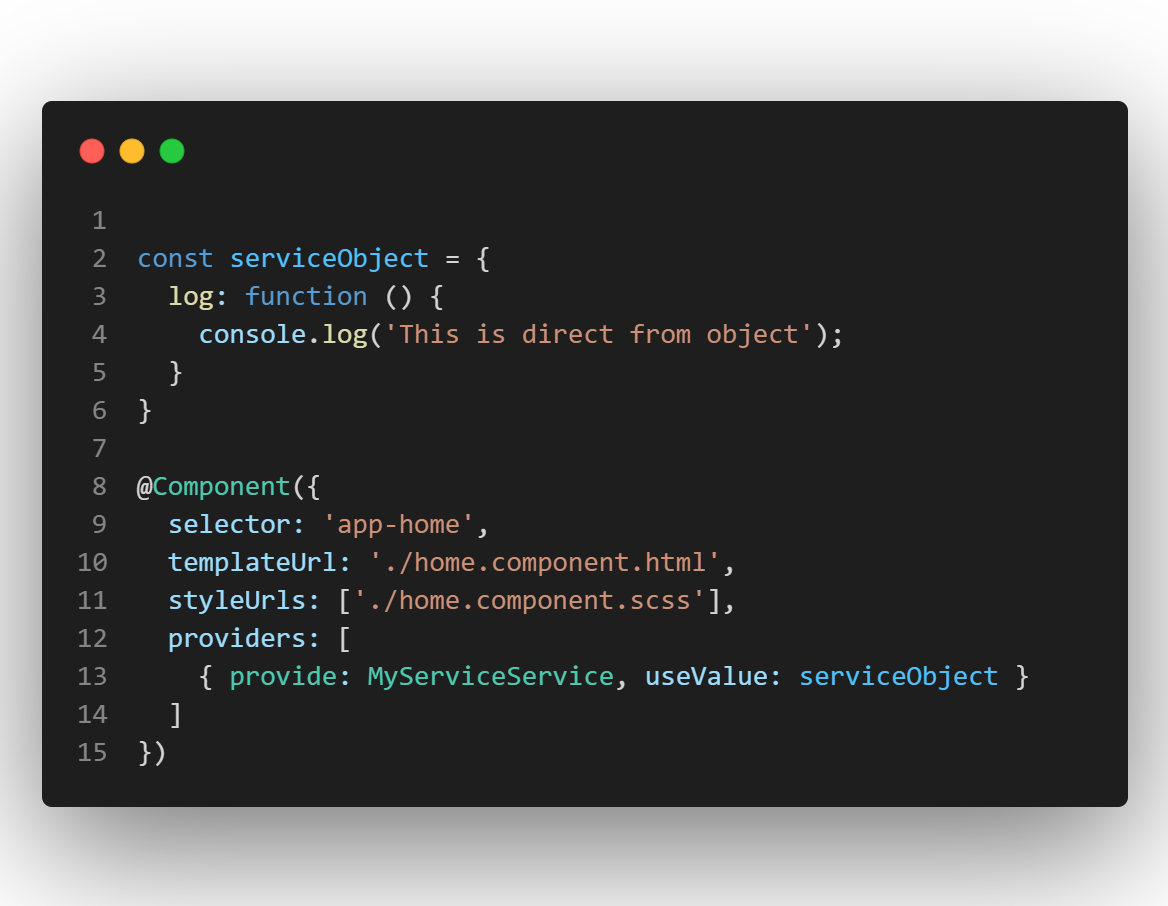
c) useValue
Using the useValue property we can provide a ready-made object rather than asking the injector to create it from a class. To inject an object, which you have already created.
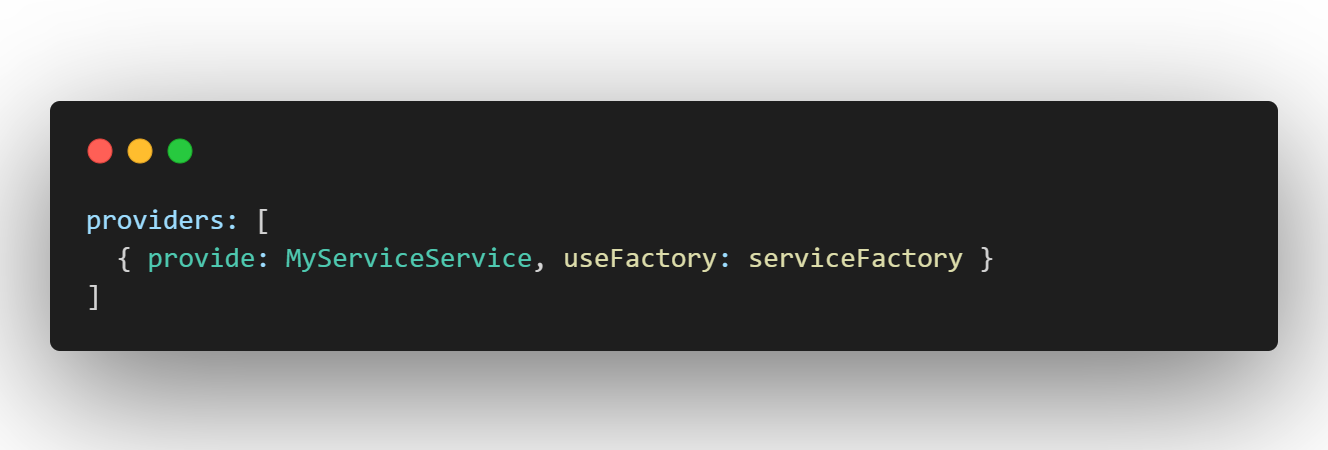
d) useFactory
Using usefactory we can create dependency values dynamically, using some runtime values. For example, we want to create a service class object based on the condition.

Benefits of adopting Dependency Injection
Dependency Injection in Angular comes with some incredible benefits. Here are some of them:
- The pattern helps with the unit testing process.
- Boilerplate code is lessened, as initializing of dependencies is carried by the injector component.
- Extending the application becomes easier and more manageable.
- It enables loose coupling, which is imperative in application programming.
Dependency Injection – a step towards success!
Here are the outcomes from the article – Dependency Injection allows a client to remove all knowledge of a concrete implementation and create more flexible code. The entire process focuses on switching out one implementation for another without changing the layer.
We can more easily test our code without worrying about errors and time, as it Promotes reusability, testability, and maintainability. It provides a way to separate the creation of an object from its usage allowing you to replace a dependency without changing any code.
I hope that this tutorial helped you understand how to inject services into components and how multiple components can use a single piece of code without any complications. If you have feedback or questions on the topic, please drop us a comment here!