Blogs
Avoid failures in project setup like the plague – Part 1
Annually, 70% of software projects fail globally due to lack of proper practices or project workflows. Given the increased competition in today’s industries, companies demand project teams to perform consistently and quickly. Only superior project setup tactics can improve your performance to make it speedier and more efficient.
Failures can happen at any time. However, what makes a project successful is the ability to learn from these failures, course-correct in time, and move ahead. In this two-part blog series, we will be walking you through the best practices that will help you avoid failures by nipping the causality in the bud.
Top Best Practices in Project Set Up
Have an Initial Meeting
All project stakeholders are invited to this first meeting, and their alignment with the project’s primary objectives is discussed. The project manager also makes sure that everyone’s interests are aligned. It’s easier to host a project kickoff meeting and build a workable communication plan for the project by having everyone on the same page and introducing everyone to the parties.

Know the Exact Requirements from the Clients
It is not mandatory to understand everything in a single meeting. Always discuss in detail with the client about the exact scope of work, quality expectations, required time frame, and other set of requirements related to features/solutions. This will help you get off on the right foot and deliver the required project successfully.
Outline Feasibility Analysis
A feasibility analysis determines if a project is worthwhile. If a project takes too many resources, for example, those resources will be unable to execute other jobs. In general, failing to use those resources for the time necessary to complete the project may cost the organization more than the project may earn. As a result, a well-designed feasibility study should include a set of parameters that we, as project managers, can identify as necessary for a thorough evaluation of a project.
Technical Feasibility
This assessment is focused on the organization’s technological resources. It aids organizations in determining whether technical resources are enough and whether the technical team is capable of translating concepts into operating systems. The evaluation of hardware, software, and other technological requirements is also part of the technical feasibility.
Financial Feasibility
This assessment usually includes a cost-benefit analysis of the project, which aids businesses in determining the feasibility, costs, and benefits of a project before allocating financial resources.
Legal Feasibility
This assessment usually includes a cost-benefit analysis of the project, which aids businesses in determining the feasibility, costs, and benefits of a project before allocating financial resources.
Operational Feasibility
This evaluation involves carrying out a study to analyze and determine whether and to what extent the needs of the organization can be met by completing the project. The operational feasibility studies also analyze how a project plan meets the requirements identified in the analysis phase.
Conduct Feasibility Planning
This is the most crucial appraisal for the project’s success. If a project is not completed on time, it will fail. An organization predicts how long it will take to finish the project successfully during feasibility planning.
After these areas have been investigated, the feasibility study can be used to identify any potential project restrictions, such as:
- Internal constraints: technology, budget, resources, etc.
- Internal business constraints: financial, marketing, export, etc.
- External constraints: logistics, environment, laws and regulations, etc.
Conduct Feasibility Analysis
Anyone conducting a feasibility study must follow a set of guidelines. These are some of the actions:
Preliminary Analysis: Many businesses may do a preliminary analysis, a sort of project pre-selection, before moving forward with the full feasibility study procedure. The purpose of the preliminary analysis is to identify insurmountable hurdles and hazards that would render a feasibility study ineffective. If no major roadblocks are detected following this examination, a more extensive feasibility study can be conducted.
Defining the scope: In order to identify the scope of the feasibility study, it is necessary to define the project’s scope. The number and mix of internal and external stakeholders will be included in the project’s scope.
Market Research: No project can be started without conducting market research. The feasibility study’s authors will dig deeper into the current competitive landscape to see if there is room for the project in that market.
Financial evaluation: The feasibility study will look at the project’s economic costs, such as the equipment or other resources, the hours of work, the project’s expected benefits, the associated financial risks, and the potential financial impact if the project fails.
Alternative options: if any possible problems arise during the investigation, alternative solutions will be investigated to ensure the project’s success.
Re-evaluation of the findings: a re-evaluation of the feasibility study is necessary, especially if it has been some time after it was completed. A feasibility study’s ultimate phase is to make a go/no-go conclusion. In a nutshell, this is where it is decided whether the project can begin (proceed) or not (no-go).
Presales: Identify the Milestone Level
Companies frequently believe that their sales process is sufficiently formalized. The stages in their sales funnel are usually referred to as:
- The very first meeting
- The second meeting Proposal submitted
- Project completed
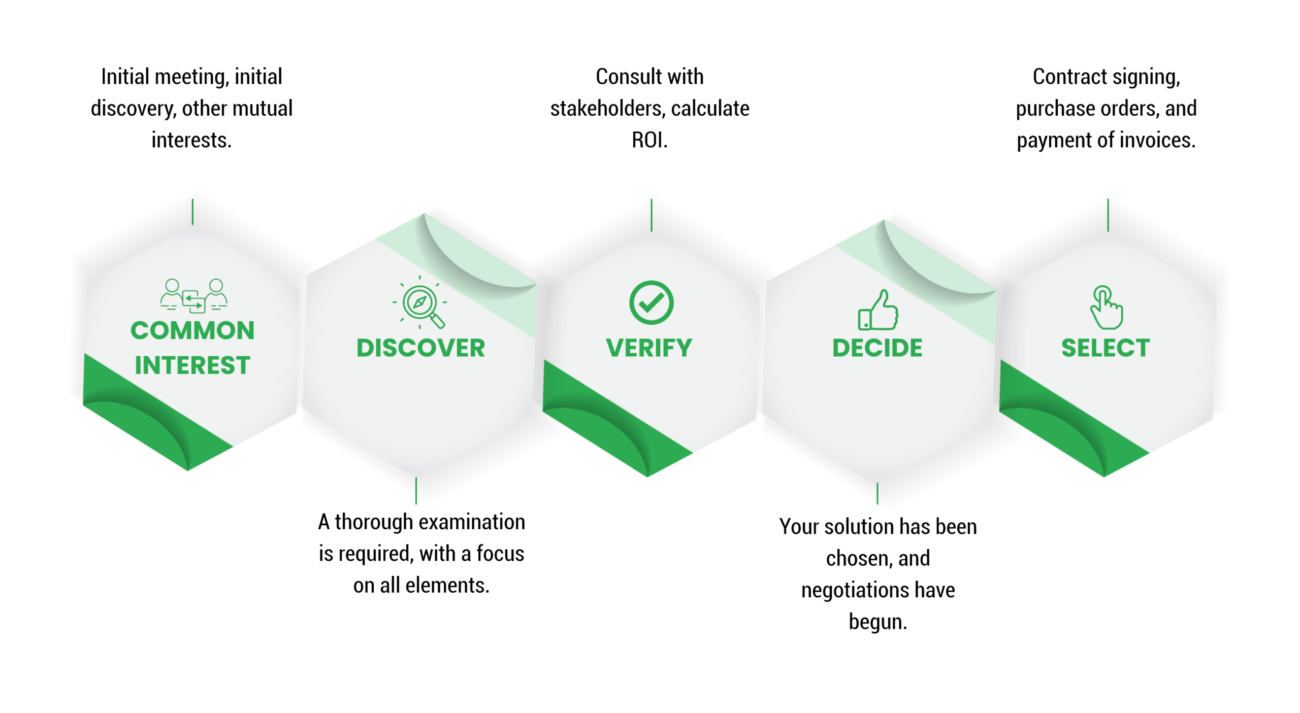
That doesn’t tell you anything about your client’s situation. It is merely a summary of actions, not a list of milestones. Companies that have already achieved some sales will find it easier to create a sales procedure. If you’re one of them, make a list of all the activities that both parties had to complete in order to close a deal (talking to a stakeholder, presenting a solution, discovering the pain, including procurement, going through POC, allocating money, signing contracts, etc.) and then analyze the activities by grouping them into logical clusters.
New businesses may not have a perfect first sales process, but they will benefit from having one from the start. It will first function as a primary navigation tool, and then it will be adjusted based on the analyses and tasks that need to be completed.
You may believe you’ve completed the “discover” stage (stakeholders identified, detailed use case, evaluation process, buying process). Despite this, you forgot or failed to meet one of the mutually beneficial milestones. You have a choice of two alternative options to take:
Return your opportunity to the “shared interest” stage of the sales process until you’ve reached the missing milestone, such as discovering the motivation. You’ve probably figured out that some of the milestones aren’t required to win opportunities. Discuss whether you should change your sales process with your staff. This is how the steps of the sales process normally look:
As soon as we receive feedback from the team, we’ll start drafting the proposal. Include all details that will assist the client in achieving the goal. Also, include milestones, expectation, assumptions, escalated matrix and scope of the project.
Identify the Project Team
Any project necessitates collaboration and cannot be successfully accomplished by a single individual. Several employees may be required to work on your IT project. However, if the team has too many members, there is a risk that each member’s productivity would decline as the team grows. The “Ringelmann Effect” or “Social Loafing” is the name given to this notion.
According to the Ringlemann effect, a corporation can do significantly more with a larger team, but individual members of the larger team are less productive than their counterparts in smaller teams. According to this hypothesis, as the workforce grows larger, the individual efforts of each group member decrease.
We’ve compiled a list of the most important factors to consider when determining the size of your software development team.
Complexity of the Project
The number of tasks, expertise, and resources required depends on the extent and complexity of the project. As a result, you must first examine the scope of your project before determining the team size required to complete each stage.
Having a Diverse Skill Set
How many employees will you need to fill the team’s various roles and responsibilities? You should ensure that your team does not have any talent gaps. On the other hand, having too many people in your team with the same skills may cause some people to slack off and be less productive. As a result, attempt to strike a balance between necessary talents and avoid duplication.
Project Timeframe
Work that must be performed fast necessitates a larger team with more hands on deck in order to complete all tasks on schedule. Smaller teams are better suited to longer-term projects because they are more cohesive and less prone to conflict.
Project Budget
In a small group setting, people are more likely to share their work-related pleasures and sorrows. Furthermore, such teams are the most active “rope-pullers” and are easier to observe.
The size of your software development team will likely be determined by your budget. If your project is on a tight budget, we propose focusing on alternate employment models rather than recruiting a smaller number of in-house specialists.
Conduct a Project Kick-Off Meeting
A kickoff meeting is the first official team meeting held at the commencement of a project, during which the key team members and leaders finalize a project completion strategy. Internal and external kickoff meetings are the two sorts of kickoff meetings. An internal kickoff meeting only includes members of your team, whereas an external kickoff meeting includes both members of your team and the client or customer with whom you’ve collaborated on the project. Determine which type of launch meeting to hold based on your team’s need for the client’s input and the client’s desire to participate.
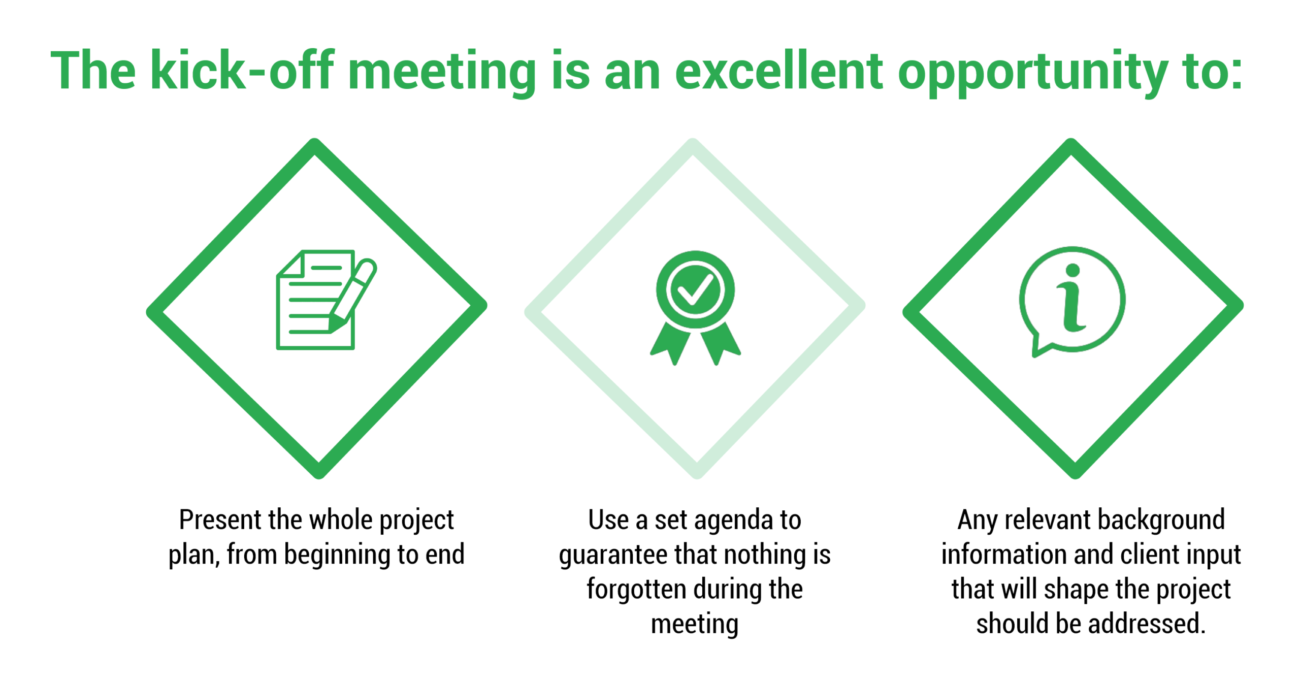
Consider the attendees, what information they already have, and what information you need to communicate as you prepare for your inaugural meeting. The following pointers can assist you in putting together a cohesive launch meeting agenda:
Prepare Your Team in Advance
Whether you’re conducting an internal or external kickoff meeting, it’s a good idea to give your team introductory information at least one day ahead of time. You might utilize digital resources like Google Docs or Dropbox to provide a brief statement on the project’s purpose, goals, and duties, depending on your team’s workflow. As a result, team members arrive at the meeting with identical expectations.
If you’re conducting an external launch meeting, it’s extremely crucial to share information with your team ahead of time. To ensure that your team appears prepared before the client enters the room, all team members should have the same understanding of the project. Before an external kickoff meeting, invite your team to come to you with questions so you can clear up any misunderstandings before the client joins the meeting.
Introduce All
Introductions are a great way to get everyone acquainted, make everyone feel at ease, and get the conversation started. If your project team members are unfamiliar with one another, this is a good moment for them to learn the names and duties of the people with whom they will be working soon. Start a round of introductions for the client’s benefit if the client is present.
A little ice breaker game at the start of the launch meeting may work well for team members who are previously acquainted. This can help increase team morale, especially if you have a long meeting or a big project ahead of you, so get everyone in a good mood before you start working.
Outline & Brief About the Project
It’s time to talk about the project now that everyone in the room knows each other and is paying attention. Begin by discussing the project’s overall goal, timeliness, and importance.
Next, determine the project’s various segments or sections. If the project has three phases, for example, talk about each one separately and how the work of one phase will lead to the work of the next. Alternatively, your project may have multiple components based on your team members’ specialities, such as creativity, marketing, and public outreach.
In any case, before moving on to the next item on the agenda, your team members should have a solid understanding of the project’s primary components.
Pay Attention to the Details
You can identify the small, granular tasks that make up each major phase or component of the project after everyone understands how the most critical aspects of the project relate to one another. Assign tasks with deadlines to particular team members and specify who will get the deliverables. This is an excellent opportunity to make sure everyone knows who they will be working with the most closely on their part of the project and who they should contact if they have any issues.
Follow Up
Thank your team for their attention and enthusiasm in an email after your start meeting. Instead of writing to the full team, if your team is working in small groups to address distinct aspects of the project, email each group. Take use of this opportunity to offer encouragement and to remind everyone of crucial deadlines and deliverables.
If your client was present at the meeting, you may want to send them a separate letter thanking them for entrusting your company with such a significant project and offering to answer any questions they may have.
Focus on Initial Project Planning
A project plan is a document that explains the scope and objectives of a project. It’s also known as a project management strategy. No two project plans are alike since each project is unique.
Documents, spreadsheets, and Gantt timelines are all examples of project plans. Gantt timelines make it simple for everyone on the team to understand the project’s schedule.
Three basic questions are answered by a project plan:
- What actions do you need to complete?
- Who will be in charge of these tasks?
- When will the activities begin and end?
If your project plan replies yes to these four questions, it’s working.
Plan Project Requirement through WBS
Subdividing project deliverables into smaller components is done using the Work Breakdown Structure (WBS). Basically, you divide the project into phases and list the tasks that must be completed for each phase to be completed.
Let’s walk through a procedure that will help ensure a strong, practical estimate before you go out and start generating a WBS (and on-point estimations).
Step 1: Make a list of the high-level deliverables for your project
Getting started on your task breakdown structure should be simple if you have a project scope.
What if you don’t have a scope? Turn around and discuss the scope with your clients or supervisor. Starting a project without a scope is risky since it establishes the parameters for what will be provided and when it will be delivered.
Step 2: Segregate each deliverable into tasks
After you’ve selected your project’s high-level deliverables, it’s time to go further into what has to be done within each specific deliverable.
This isn’t a straightforward exercise in which you ask, “Who will do this and how long will it take?” It goes far deeper than that, which is a good thing because it’ll help you build a more accurate estimate.
Step 3: Use subtasks to get more specific
You want to be as specific as possible with your work breakdown structure. The only way to do so is to go over each task you’ve identified and make a list of subtasks. It’s all about detailing effort and determining the work that will be required to execute the product successfully.
It’s a time-consuming and thought-provoking process, but if you put in the effort, you’ll discover there’s less opportunity for missed expectations and budget overruns in the long run. So, move on to the next phase and outline what will be required for each assignment.
Step 4: Create a work breakdown structure (WBS) and estimate the workload
Work breakdown structures are typically displayed in flowcharts that mimic website sitemaps. That format is useful since it depicts a job hierarchy and can be readily numbered and referred to.
However, other people prefer to write them down on whiteboards or in spreadsheets. What is important is the completeness and accuracy of the tasks included, not the format. You are free to construct your job breakdown structure in any format that suits you. (To get you started, we’ve given some samples below.)
After you’ve listed all of your tasks and subtasks in a logical order, go over it again to make sure you’ve included all of the available tasks and subtasks.
Do Agile Project Planning & Execution
The fundamental agile principles require doing things in tiny steps with minimum planning. Following a comprehensive SDLC, the iteration should have short time frames and time boxes, lasting up to two to four weeks. For larger development endeavors, team sizes are often modest to facilitate communication and collaboration.
Traditional project planning employs a ‘big bang’ strategy, in which all changes are coordinated and implemented at the same time. This usually happens near the end of a project, following a long period of meticulous planning, design, and testing up front.
A more iterative approach is provided by the agile planning method. Customers will see the benefits sooner if the project is delivered in smaller parts.
Agile software development is a collection of iterative development approaches based on the original Manifesto for Agile Software Development’s twelve principles.

Scrum and Kanban are two of the most well-known Agile project management approaches at the time of this writing. If you want to use Agile planning, learning the distinctions can help you understand how and when to use it (as well as what your role might look like within them).
If you’re joining an agile team that’s already up and running, getting started may be as simple as learning the exact methodology being used (if any) and determining your position and responsibilities. If, on the other hand, you’re leading a shift from traditional to agile planning, you’ll want to keep a few things in mind.
- To familiarize yourself with the distinctions between the various Agile project management approaches – such as Scrum, Kanban, and others – read up on them
- Assess your company’s agility and readiness. Are there any red flags that you think may stymie agile adoption?
- Choose a modest project to use as a proving ground for Agile planning
- Iterate your Agile adoption, just like agile is an iterative process
- Before deciding how to proceed, test it in modest increments and assess your outcomes
Each team has a customer representative who is responsible for responding to project changes. Without having to produce numerous documentation, frequent meetings with the representative and internal teams are held to review progress and difficulties, while still fulfilling the priority of client satisfaction and ongoing product delivery.
The fundamental agile principles demand that tasks be completed in small chunks with minimal planning. Iterations should have limited time frames and time boxes, lasting up to two to four weeks, and should follow a full SDLC. To simplify communication and collaboration, team sizes for larger development projects are frequently kept small.
A client representative is assigned to each team and is in charge of responding to project modifications. Frequent meetings with the representative and internal teams are held to assess progress and issues without having to produce a lot of documentation, all while maintaining the priority of client happiness and on-time product delivery.
However, it Depends upon the type of the Project to select the Agile or Waterfall method.
Conduct Post Development Unit Testing
This testing is performed to confirm that the developer’s source code fits the requirement and acts as intended.
The purpose of unit testing is to break down each piece of source code and ensure that it functions correctly. If any set of input is passed to a function or process, it should return the intended result.
Review the Project Code
The project code review is the stage in the development process in which you (as a developer) and your colleagues collaborate to find defects in a recently released piece of code. You can be either the code author or one of the reviewers at this point.
You might not know what you’re searching for when completing a code review. On the other hand, you might not know what to expect when submitting a code review. This lack of empathy and misaligned expectations on both sides can lead to terrible scenarios and hasten the process, resulting in a negative experience for both parties.
Keep in mind that
Following the right steps and adopting the best practices, instead of merely going through the motions, is crucial to ensure successful project completion.
Focusing on the optimum project setup needs to be top priority for those striving for successful projects most of the time. The strategies and practices outlined above will, in addition to ensuring project success, will enable resource optimization, industry-grade product development, and other competitive advantages.
In the second part of this blog, we will talk about more project setup best practices including UI testing, integration testing, and more.
To know more about the optimal setup approach for your project, don’t hesitate to get in touch with us at
? connect@walkingtree.tech