Blogs
Getting Started with Universal (Web + Mobile) Application in Angular 2

Overview
Angular 2 RC is out there and we, at Walking Tree, are excited about it. In case you are starting with Angular 2, you may want to go through Getting Started with Angular 2 & TypeScript article to get started with Angular 2 and get your first application up and running in 3 simple steps.
One major enhancement that we love about Angular 2 is that we have, now, a single framework to build mobile as well as web applications. This unification has given rise to a thought – “So, what does it take to create a universal application in Angular 2?” Typically, Universal Application is an application where both your mobile and web application development teams can work together on a single code-base and also share the code across mobile and web.
Unification within the framework is not the only thing that you require to create a universal application. It requires a well-rounded approach to enable team collaboration, code reusability and platform specific packaging. In this article we will talk about steps involved and what does it take to create a universal application.
Login being the most common scenario, we will take this as a case study for this article and discuss how to create a universal application for your login using Angular 2.
Application Overview
As part of this article, we will create Login Application and we will perform user login activity based on user input. We will also see code/resource sharing between Web and Mobile application, as depicted in the below image:

Pre-Requisites
- Node.js – the article assumes that you have a working setup of Node.js. In case you do not have one, please refer to this link to download and install Node.js
- Ionic 2
- Semantic UI
- Semantic UI is a modern front-end development framework, powered by LESS and jQuery. The goal of the framework is to empower designers and developers by creating a language for sharing UI.
Getting Ready
Following are the quick steps:
Step 1 : Installing Ionic 2.
Please refer Ionic 2 installation guidelines.
Step 2 : Creating Login Universal Application
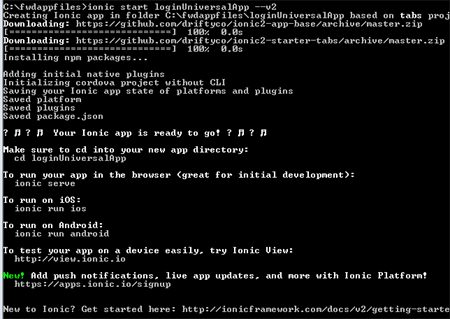
Run the following command to create a starter ionic application:
ionic start loginUniversalApp --v2
Once command is executed successfully you would see the following in command prompt and directory –
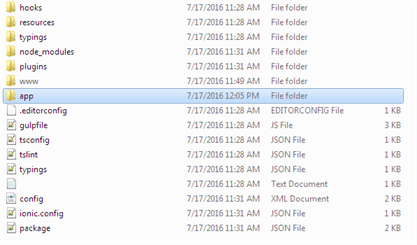
app is the main directory, which contains default pages and theme. Delete files and folders that are inside app directory. We will add our own directory structure for the application.
Step 3 : Create directory structure.
Under the app folder create the following folders and files:
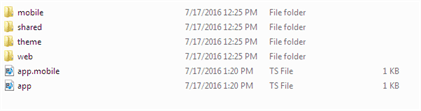
- mobile – Contains mobile related pages, assets and services.
- web – Contains web related pages, assets and services.
- shared – Contains shared pages, assets and services between web and mobile.
- app.ts – Contains the web application bootstrap code.
- app.mobile.ts – Contains the mobile application bootstrap code.
Creating login service.
Create login service under shared/services directory, which is common for web and mobile application login authentication functionality.
It has a function that validates userName and password and returns message accordingly.
Following is the service code:
import {Injectable} from "@angular/core";

@Injectable()
export class loginService {
 constructor() {
 }
 login(userName, password) {
 if(userName == 'wtc@walkingtree.in' && password=='wtc') {
 return 'Valid Credentail';
 } else {
 return 'Invalid Credentail';
 }
 }
}
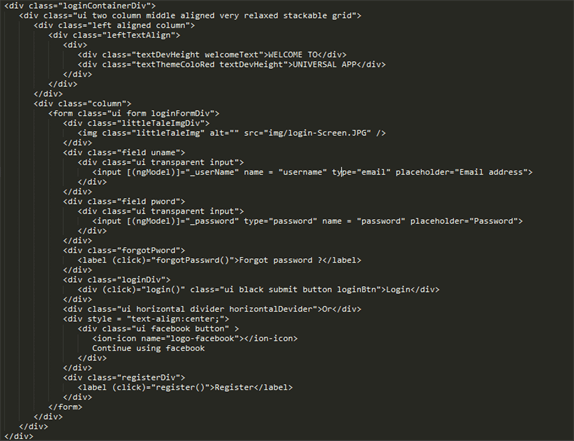
Creating login page and component for web application
Create login.html and login.ts file under web/pages/ directory and import login services in login.ts and and use as providers, as shown below:
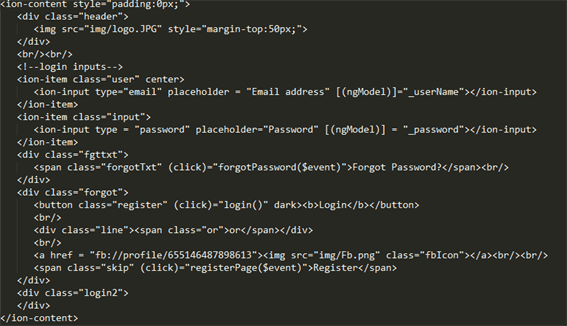
login.html
login.ts
import {Component} from "@angular/core";
import {NavController, Alert} from 'ionic-angular';
import {loginService} from '../../shared/services/login';
declare var $:any;
@Component({
templateUrl: (function(){
console.log(navigator.userAgent);
return 'build/web/pages/login.html';
}()),
providers:[loginService]
})
export class LoginPage {
public template:any;
public _userName:string;
public _password:string;
public msg:string;
constructor(private navController: NavController,public loginService:loginService) {
}
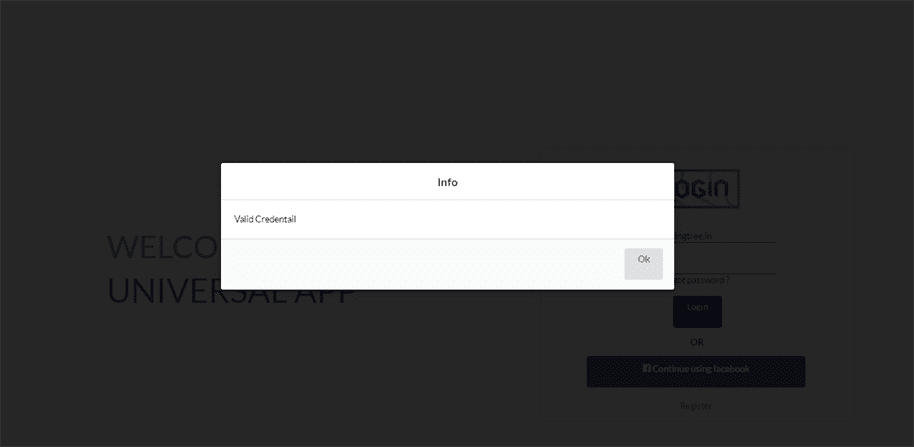
login(){
this.msg = this.loginService.login(this._userName,this._password);
this.showModal();
}
showModal(){
let updateModel: any = $('#loginModel');
updateModel.modal('show');
console.log('hello');
}
}
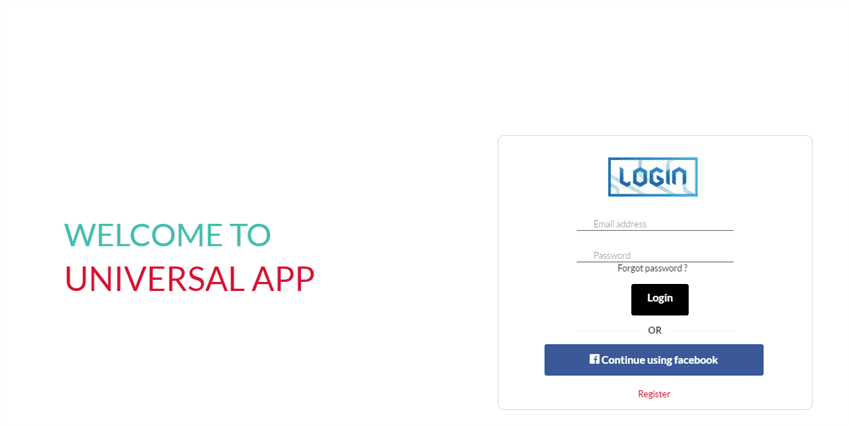
Running web application
Run the following command inside loginUniversalApp directory to run the application:
ionic serve
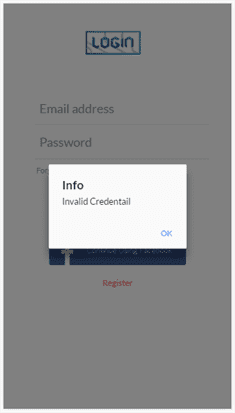
This will launch the application in a browser. You shall see the following output in your browser:
Creating login page and component for mobile application
Create login.html and login.ts file under mobile/pages/ directory and import login service in login.ts and and use as providers, as shown in the following code:
login.html
login.ts
import {Component} from "@angular/core";
import {NavController, Alert} from 'ionic-angular';
import {loginService} from '../../shared/services/login';
declare var $:any;
@Component({
 templateUrl: (function(){
 return 'build/mobile/pages/login.html'
 }()),
 providers:[loginService]
})
export class LoginPage {
 public template:any;
 public _userName:string;
 public _password:string;
 constructor(private navController: NavController, public loginService:loginService) {
 }
 login(){
 let msg: any = this.loginService.login(this._userName,this._password);
 let alert : any = Alert.create({
 title: 'Mobile Application',
 subTitle: msg,
 buttons: ['Ok']
 });
 this.navController.present(alert);
 }
}
Running mobile application
Rename app.ts to app.web.ts and app.mobile.ts to app.ts and run the following command:
ionic serve
Use Google Chrome’s Toggle Device option to switch to mobile view and you shall see the following output:

Click on the Login button without entering any input and you shall be prompted with ionicpopup, as shown below:
Note : We, manually, renamed files in this step as we haven’t discussed about build/packaging of universal app. In the forthcoming article I will be talking about automated build/packaging process to avoid manual steps. Also automated build/packaging process will help us to build the platform(web/mobile) specific code.
How to get the demo app?
You may download ng2_universal_app demo application from GitHub.
Summary
In this article we discussed how to create an Universal Application in Angular 2 by using Ionic 2 and Semantic UI. Give it a try and let me know how did it go.
If you are planning on building a Universal Application using Angular 2 and looking for professional help on planning, architecture, design, development, and testing, please drop your message and our professional services team will get in touch with you.