Blogs
Ext JS 6.6 and Open Tooling
Ext JS 6.6 and Open Tooling
Node.js and NPM have changed the face of front-end development. NPM, an online repository for a plethora of Node.js libraries and applications, is being used by developers for putting JavaScript together in their applications. Additionally, its easy-to-use command-line interface to interact with these repositories is aiding developers in package installation, dependency management, and version management. Put together, this has given way to create web applications on faster timelines, with improved quality and maintainability.
It was high time when Sencha Ext JS 6.6 announced support for open tooling. To make this possible, the Ext JS framework, toolkit components, core, charts, UX, font, locale, theme and other packages were added as npm packages to Sencha’s private repository, hosted at npm.sencha.com. You can have a look at this list of Ext JS NPM packages by logging in to this URL with your sencha support credentials or you can view them in this document also.
In this article, we’ll walk through the following points for creating an Ext JS 6.6 application using open tooling:
- Pre-requisites
- Getting Access to the Sencha NPM Repository
- Creating and Building an Ext JS 6.6 Application
- Starting the Server and Running the Application
- Using Ext JS Packages in the Application
- Using Third-Party Libraries in the Application
Pre-requisites
Getting Access to the Sencha NPM Repository
Though getting the Ext JS framework from Sencha Support Portal has not been disabled, but you can now easily access it by logging in to Sencha’s NPM registry by any of the two ways:
- If you have your support portal user id and password then you can use those, but make sure that your password has letters and numbers only. Due to some error in parsing characters, password with special characters isn’t working e.g. abra@dabra won’t get parsed. In such a case, please reset your support portal password first.
- Alternatively, you can sign up for the evaluation copy of Ext JS. After filling the form you’ll get user id and password, which you can use for logging in to the registry.
Once you have your credentials ready, you can authenticate by running this command in terminal window.
npm login --registry=http://npm.sencha.com --scope=@sencha
- You will be prompted for user id. Enter your user id, but replace the (at sign) “@” sign in your email address with (two dots) “..”. For example, replace “somemail@gmail.com” with “somemail..gmail.com“.
- Next, you will be prompted for the password. Enter the password. Characters will not show, so don’t worry about that.
- Lastly, you will be asked for your email id. Enter the one that you have given above without worrying about the dots. In this example, it will be “somemail@gmail.com”.
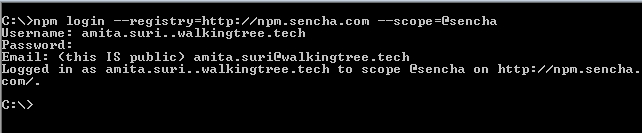
Logging in to Sencha’s NPM Registry
Creating and Building an Ext JS 6.6 Application
Sencha Cmd tool has been popular amongst developers for generating Ext JS application scaffold, build integration and package and workspace management. It can still be used but Ext JS 6.6 has introduced the following two cross-platform node based tools, which together provide a nice environment to generate and build Ext JS applications.
ExtGen:
The ExtGen tool is similar to “sencha generate app” command. It creates an application scaffold for Ext JS npm project. So first go ahead and install it globally by this command.
npm install -g @sencha/ext-gen
Once this tool is installed, you can use it to create application using any of the following built-in templates. This is similar to “classic”, “modern” and “universal” choice of applications with “sencha generate app” command.
- classicdesktop – uses the classic toolkit to generate a desktop application. This is a default.
- moderndesktop – uses the modern toolkit to create desktop application
- universalclassicmodern – uses both toolkits to create 2 profiles – the classic toolkit for desktop profile and modern toolkit for phone profile
- universalmodern – uses the only modern toolkit to generate 2 profiles – 1 for desktop and 1 for mobile
Once you have chosen a template, you can create an application in any of the two given modes:
- auto: This is default mode. It generates a starter application with certain defaults but you can change them by passing certain flags. Here are a few examples:
ext-gen app -a // "a" is the auto mode - it creates a classic app with default name MyApp

OR

ext-gen app -a MyFirstApp // Creates a classic app with name MyFirstApp

OR
ext-gen app -a
-t universalclassicmodern
-c theme-graphite
-m theme-material
-n MyFirstUniversalApp // Generates a universal app with both classic and modern toolkits
- interactive: This mode asks few questions, which allow you to modify application defaults, like application name, template, author name, etc.
ext-gen app -i // "i" is for interactive mode
All ext-gen tool options can be seen with command “ext-gen –help“.

ext-gen –help
ExtBuild:
The ExtBuild tool simplifies building complex applications with multiple dependencies. It currently uses Sencha Cmd and Google Closure compiler for building and transpiling Ext JS applications. Currently, it does not have all the functionality of Sencha Cmd, so in most of the cases, it forwards commands to Sencha Cmd. But, according to their webinar, it’s expected that in later releases it will be given all the capabilities of Cmd and will become its complete node replacement.
To use ExtBuild, you don’t have to explicitly install Sencha Cmd. Sencha Cmd is also a package now and is installed locally to your project as an ExtBuild dependency.
Starting the Server and Running the Application
Once your application is ready, run the following command to build your application, start the server and launch it in the browser.
npm start
Ext JS 6.6. applications are build using webpack but actually ExtBuild works under the hood.
Files are served using webpack development server with live updates; similar to “sencha app watch” command.
By default, the applications are built in a development environment but you can execute an appropriate build command from the following:
npm run build-desktop-testing

npm run build-desktop-production

npm run build-phone-testing

npm run build-phone-production
The above scripts are given in the scripts object of “package.json”.
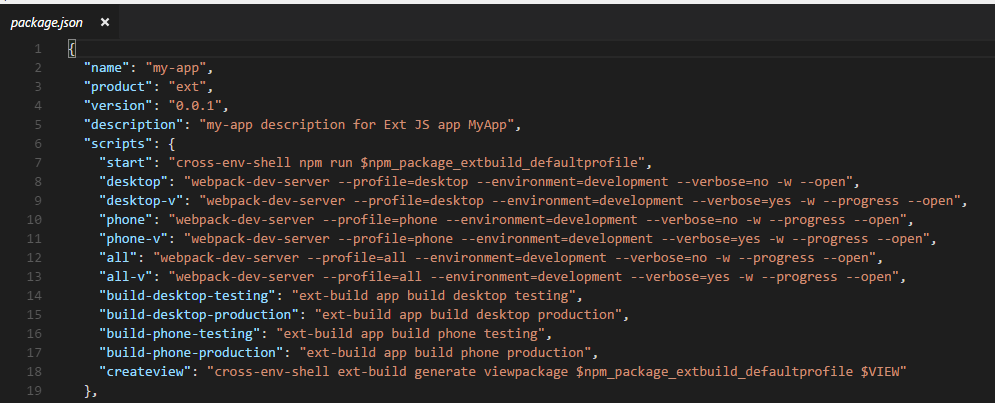
Different build scripts in package.json
Adding Ext JS NPM Packages to Application
Adding premium or other packages to an Ext JS application is a three-step process. For example, to add a charts package to your project:
- Run this command from the project root folder. It will download charts package from sencha npm repository and install it in “node_modules/@sencha folder”.
npm i --save @sencha/ext-charts
- Edit “workspace.json” and append “dir” variable under “packages” with the path of the newly installed package.
"packages": {

"dir": "${workspace.dir}/packages,${framework.dir}/../",

"extract": "${workspace.dir}/packages/remote"

}
- Edit “app.json” to require the “charts” package.
"requires": [

"font-awesome",

"charts"

],
- After above changes are executed, webpack development server will automatically compile the changes and refresh application in the browser. Charts package will get loaded and you’ll be ready to use it in the application.
Adding 3rd Party Libraries to Application
You can easily add any 3rd party JavaScript library from the npm public repository to your Ext JS project. For example, follow these steps to add JavaScript Moment date library:
- Download and install the library. It gets installed in “node_modules” folder.
npm i moment --save
- Add it’s path to “js: []” array of app.json
"js": [

{

"path": "app.js",

"bundle": true

},

{

"path": "node_modules/moment"

 }

],
- Wait for the application to build and refresh. It’ll be loaded, and you’ll be ready to use it in your application.
Summary
This article explained the semantics of open tooling introduced in the latest release of Ext JS. In continuation to this, is a follow-up article “Create Ext JS 6.6 Applications Using Templates and Open Tooling,” in which we create an Ext JS 6.6 node project to get a holistic approach of the new way of writing Ext JS applications.