Blogs
Xamarin Mobile Apps Authentication using Xamarin.Auth – Twitter

 Overview
This article is a continuation of the article on the topic Xamarin.Auth Mobile Apps Authentication With Facebook. In this article, we will cover how to authenticate users with one of the most popular social accounts called Twitter.
If you have not read the previous series you can always read them by clicking on below links:
Registering on Twitter Developer portal
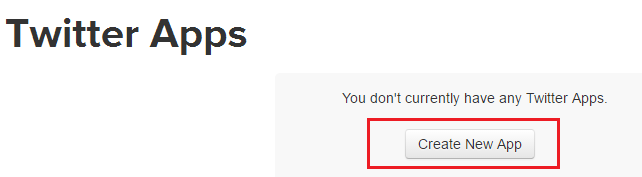
As a first step, we should register an app in the Twitter Developer Console. And, that can be achieved with the following steps:
- Sign into Twitter Developer Console and then click on Create New App.
- Fill the required fields in Application Details (Give the website as any valid Uri and give Callback URL as http://mobile.twitter.com). And then click on create a Twitter Application.

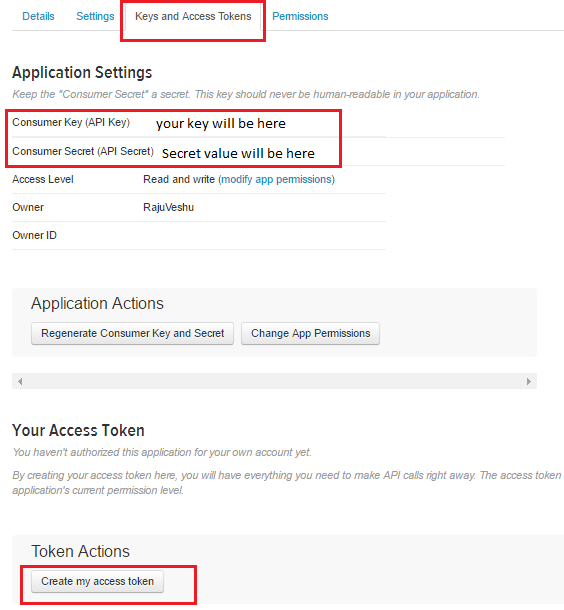
- Thus we have integrated our app with Twitter and we can find our API Key and secrets by clicking on Keys and Access Tokens.
- And we should create an access token in order to make API calls to get the requested user data from the server, which can be done by clicking on create my access token button at the bottom of the window as shown below.
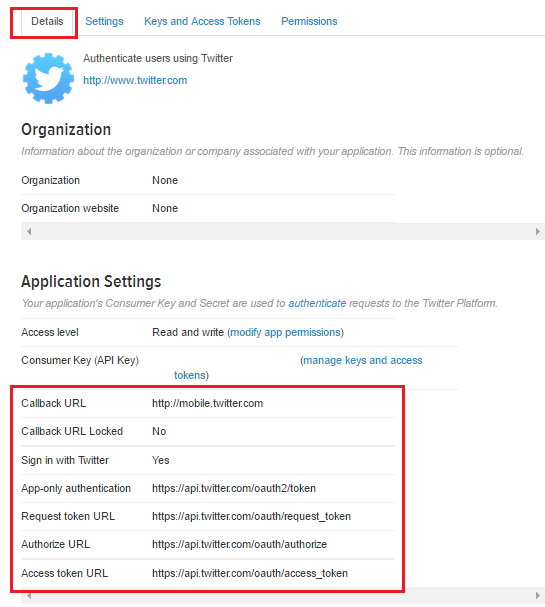
- Now we can see Api Key and Api Secret values in the keys and access token section which is shown in the above step. And we can also find Authorize URL, Request token URL, Callback URL and Access Token URL by clicking on Details section as shown below.
- Great! Our app is successfully integrated with a Twitter developer account. Now we can use the above parameters to authenticate the users with Twitter.
Gathering user information from Twitter
Let us make use of those parameters in our application and implement the following code in MainActivity.cs:
- Add below line of code to LinearLayout inside the Mail.axml to implement the button for Twitter.
 <Button
               android:id="@+id/TwitterButton"
               android:text="Login using Twitter"
               android:layout_width="wrap_content"
               android:layout_height="wrap_content" />
- Add below code to find a button from the view by using the Id attribute and assign it to the variable inside OnCreate().
twitterBtn = FindViewById<Button>(Resource.Id.TwitterButton);
- The application uses the OAuth1Authenticator and OAuth1Request classes, provided by Xamarin.Auth, to implement the application side of the authentication flow with Twitter.
- Implement an authentication inside the click event handler for the button.
// We can find following readonly strings in Constants.cs file in the
//github project
// Pasted it here for ease of reference with the code
public static readonly string TWITTER_KEY =
                          "<Enter Twitter key here>";
public static readonly string TWITTER_SECRET =
                         "<Enter Twitter secret here>";
public static readonly string TWITTER_REQTOKEN_URL =
                           "https://api.twitter.com/oauth/request_token";
public static readonly string TWITTER_AUTH =
                          "https://api.twitter.com/oauth/authorize";
public static readonly string TWITTER_ACCESSTOKEN_URL =
                          "https://api.twitter.com/oauth/access_token";
public static readonly string TWITTER_CALLBACK_URL=
                          "http://mobile.twitter.com";
public static readonly string TWITTER_GRAPH_URL =
"https://api.twitter.com/1.1/account/verify_credentials.json"

twitterBtn.Click += TwitterAuthentication;

private void TwitterAuthentication(object sender, EventArgs e)
{
           var auth = new OAuth1Authenticator(
                             TWITTER_KEY,
                             TWITTER_SECRET,
                             new Uri(TWITTER_REQTOKEN_URL),
                             new Uri(TWITTER_AUTH),
                             new Uri(TWITTER_ACCESSTOKEN_URL),
                             new Uri(TWITTER_CALLBACK_URL));

           auth.AllowCancel = true;
           StartActivity(auth.GetUI(this));

           auth.Completed += async (sender, e) =>
           {
             //Fires when authentication is cancelled
             if (!e.IsAuthenticated)
             {
                 //Authentication failed Do something
                 return;
             }

             //Make request to get the parameters access
             var request = new OAuth1Request("GET",
                               new Uri(TWITTER_GRAPH_URL ),
                               null,
                               e.Account);

             //Get response here
             var response = await request.GetResponseAsync();
             if (response != null)
             {
                 //Get the user data here
                 var userData = response.GetResponseText();
             }
         };

}
- With the above code in place, we can authenticate the user with the Twitter account and we can also get their user information.
OAuth1Authenticator
Unlike Gmail and Facebook, where we primarily used oAuth2Authenticator, for registering the user with Twitter we will use oAuth1Authenticator. Twitter provides us with two different unique parameters such as Key and Secret for identifying the user, whereas oAuth2Authenticator provides only one parameter i.e. ClientId.
And, it takes different parameters for authenticating the user, as listed below:.
public OAuth1Authenticator(string consumerKey, string consumerSecret,
                           Uri requestTokenUrl, Uri authorizeUrl,
                           Uri accessTokenUrl, Uri callbackUrl);
| Parameter Name | Explanation | A value used in Above Code |
| consumerKey | This identifies the client that is making the request. | “Give Twitter key here“ |
| consumerSecret | This identifies the client with this unique secret value and we can find this value in keys and Access Tokens section | “Give Twitter secret here“ |
| requestTokenUrl | We can find this value in details section in the developer console. (Reserved) | new Uri(TWITTER_REQTOKEN_URL) |
| authorizeUrl | We can find this value in details section in the developer console. (Reserved) | new Uri(TWITTER_AUTH) |
| accessTokenUrl | We can find this value in details section in the developer console. (Reserved) | new Uri(TWITTER_ACCESSTOKEN_URL) |
| callbackUrl | This is nothing but a redirect Uri(We saw in oAuth2) which helps us to navigate to our app after successful authentication. We can find this value in details section in the developer console. | new Uri(TWITTER_CALLBACK_URL) |
oAuth1Request
Once the user authenticated successfully by using oAuth1Authenticator class with the Twitter login page, the application requests for accessing the user information and this request is made with OAuth1Request.
And it takes the following parameters for requesting the user information.
public OAuth1Request(string method, Uri url,IDictionary<string, string>
                     parameters,Account account);
| Parameter Name | Explanation | Value used in Above Code |
| method | It is used for get the required parameters from authorization service. | GET |
| url | It is the Graph Uri and it will request the required parameters through this url. | new Uri(TWITTER_GRAPH_URL) |
| parameters | Reserved | null |
| account | The account which we are authenticating. | e.Account |
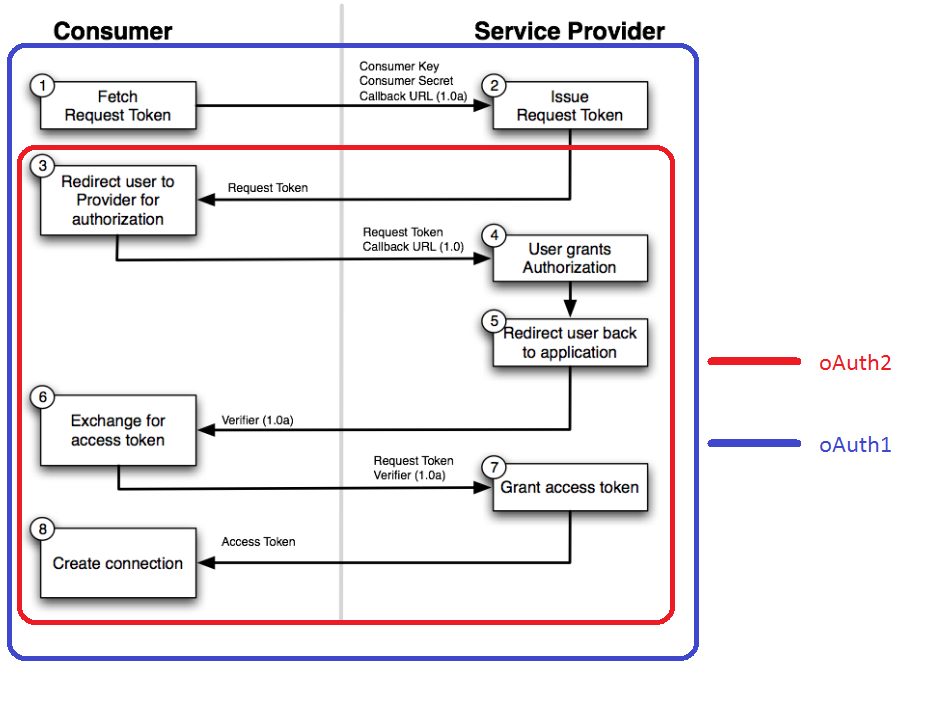
oAuth1 and oAuth2 Difference
We have couple of extra steps when we authenticate using oAuth1 in comparison with oAuth2. We can find the difference between oAuth1 and oAuth2 as shown in the below picture.
Summary
In this article, we have gone through various steps involved in authenticating users with Twitter account by using Xamarin.Auth component.
In the whole series of articles, we’ve learned how to make use of Xamarin.Auth Component to avail registration facility by linking to social accounts such as Gmail, Facebook using OAuth2Authenticator and Twitter using OAuth1Authenticator. We have also understood how to make use of caching mechanism ( storing user details ), so that users will login only once into the application (using their social account details such as facebook, gmail and twitter). Subsequent logins will be authenticated using cached user details. And Xamarin.Auth also supports some more platforms like GitHub, LinkedIn and Foursquare etc.,
At Walking Tree, we help you take advantage of Xamarin to build amazing enterprise-level mobile applications. We will be happy to assist you to leverage this awesome framework!
References
- For information on OAuth1Authenticator API refer to this link
- For information on differences between OAuth1 and OAuth2 refer to this link
- Xamarin Mobile Apps Authentication using Xamarin.Auth – Gmail
- Xamarin Mobile Apps Authentication using Xamarin.Auth – Facebook
![]()