Blogs
Testing Sencha Applications using Sencha Test


Problem Statement
Automating Ext JS Application testing is often tricky because of the dynamically generated HTML elements. For example, a combo box in Ext JS is not simply an <select> element, but a text input with a detached drop down list.
When you think about a tool, which can handle dynamically generated HTML Elements, Unit Testing and End-to-End Testing on multiple browsers, simultaneously; Sencha Test looks like an obvious choice. Sencha Test is extensively used for testing Ext JS Single Page Applications and it leverages powerful Jasmine testing framework, which is used to test Javascript and has rich APIs to handle HTML elements.
Overview
Sencha Test is an automation tool that is used for testing Ext JS applications. This tool consists of two applications :
- Sencha Studio (GUI), which uses a Workspace to organise tests and has a default test suite as ‘jasmine’ for writing tests.
- Sencha Test command or STC (for Command line)
As of now, Sencha Test supports
- Running scripts on remote browsers using browser farms
- Event Recorder and
- Code Coverage
This article explains the Sencha Test Studio setup and a quick test for verifying the login feature in SenchaTutorials application.
In this article, we will talk about:
- How to create a workspace and configure tests in Sencha Studio?
- How to create a Jasmine test suite for writing tests?
- Test script for login screen for Sencha application
- How to run the scripts and see the results?
Pre-requisites:
- Javascript knowledge to write tests
- Jasmine knowledge is required
- Basic knowledge of Sencha Ext JS
Getting Ready
- Sencha Test can be downloaded from Sencha website https://www.sencha.com/products/test/#overview
- You need to sign up with your Email ID to activate your licence.
- Start the Sencha Test after it is activated.
Creating a Workspace and configuring tests in Sencha Studio
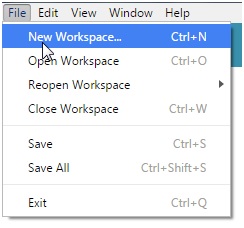
- Click on File New Workspace… menu
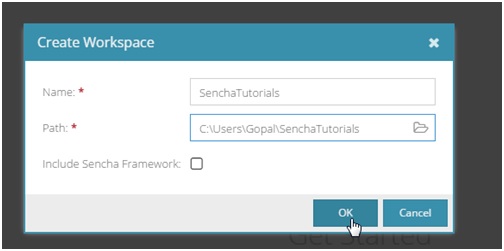
2. Give the name and destination path for the workspace and click on the OK button, as shown below :
3. Sencha Studio displays its content in its project navigation tree as shown in the below diagram.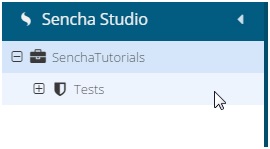
4. Configure the test project by selecting Tests node as shown below :
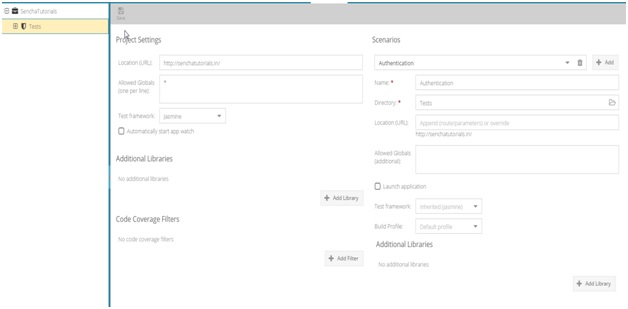
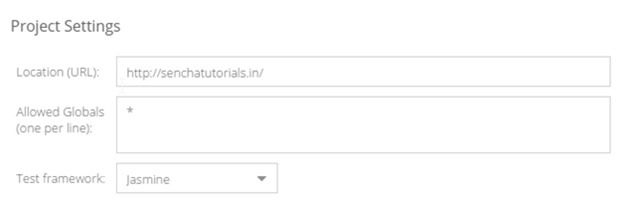
5. To launch the application from Sencha Studio, In Project Settings, specify (URL). We will disable global leak detection by setting * as Allowed Globals and default test framework as Jasmine. Refer to Sencha Test Docs for more information.
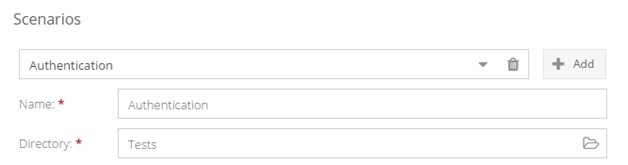
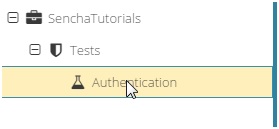
6. Nodes under the Tests node in the tree are called the Scenarios. By default, a new test project is given a “Unit Tests” scenario, where we have changed it to Authentication as we would be using it to test the SenchaTutorials authentication
The same is reflected in the Studio:
Creating a Jasmine test suite for writing tests
1. Right click on the scenario under Tests node and create a new Jasmine Test Suite, as shown below :
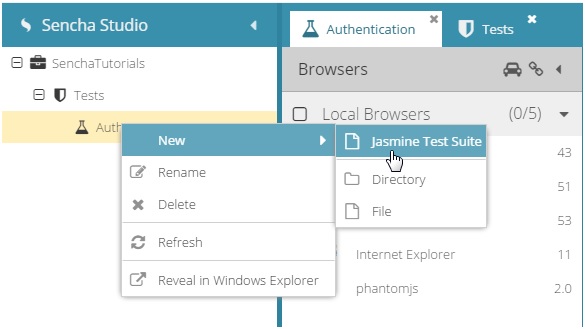
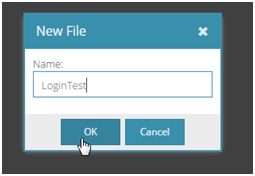
2. Specify a name for your test suite, say, LoginTest and click on OK button.
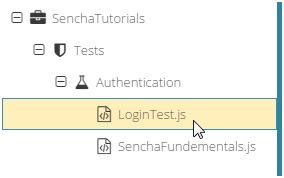
3. Observe that a new node is added under the scenarios as shown below:
Script for validating login screen
- Below is the Jasmine code to test the login feature for SenchaTutorials application:
describe("LoginTest", function () {
   var expected = 'Username and password do not match or you do not have an account yet.<br> If the problem persists, write to  <a href="mailto:support@walkingtree.in">Support Team</a>';

   it("InvalidCredentials and validate failure message", function () {
       // Giving invalid credentials
       ST.element("//input[@name='username']") // Get username field element reference using locator
           .type("testing@walkingtree.tech"); // Enter userid in the username field
       ST.element("//input[@name='password']")
           .type("esting"); //Get password field element reference using locator and enter password

       // Firing click event on sign in button component
       ST.component("//a[contains(@class,'x-btn signintext')]/span")
           .click(10, 10).wait(2000).and(function () {
               // Get Error message text
               var text = ST.find("//span[contains(text(),'Username and password')]").innerHTML;
               // Compare it with the expected
               expect(text).toMatch(expected);
           });
   });

   it("ValidCredentials", function () {
       // Giving invalid credentials
       ST.field("//input[@name='username']").type("testing@walkingtree.tech"); //Get Username field element reference using locator and enter Username
       ST.field("//input[@name='password']").type("testing"); // Get password field element reference using locator and enter password

       // Firing click event on sign in button component
       ST.component("//a[contains(@class,'x-btn signintext')]/span")
           .click(10, 10).wait(6000).and(function () {
               // Get Error message text
               var elementRating = document.getElementsByClassName('forum faq');
               // Compare it with the expected
               expect(elementRating.length).toBeGreaterThan(0);
           });
   });
});
Running tests and seeing the results
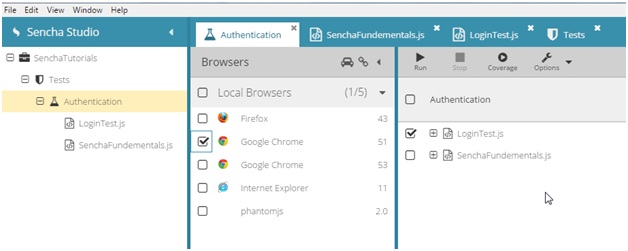
1. To run our tests, click on the scenario (Authentication) in the tree node.
2. An interactive Test Runner is launched, which consists of all the local browsers and test suites.
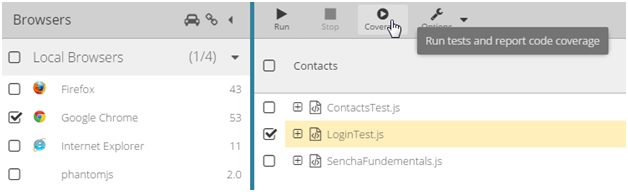
3. Select a test suite, the list of browser and click on Run button.
4. The below image shows how the results of the tests are displayed in the test runner.
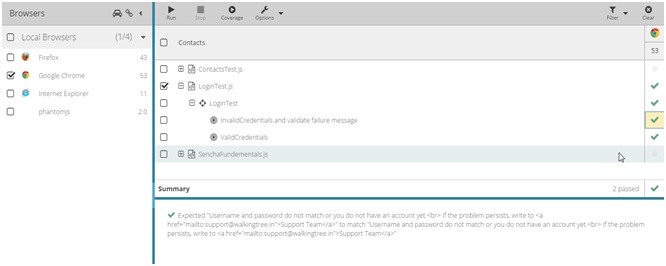
On successful execution of the test script, a user will be logged into SenchaTutorials and shall see the tutorials, as shown below:
5. The test runner allows to select specific tests, execute them in parallel against multiple browsers and see the results in real-time.
6. To verify the code coverage, select a test suite, the browser and click on Coverage.
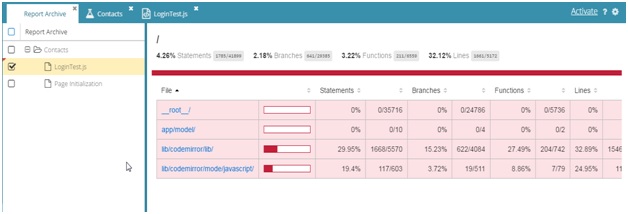
7. Sencha Test uses Istanbul for code coverage to determine how much of our code has been tested as part of a test script. HTML reports showing a detailed coverage are generated as shown below:
Summary
In this article, we discussed setting up Sencha Test tool. We also looked at writing tests in Jasmine suite, generating reports post test execution, code coverage and view results in Sencha Studio. Hope this will get you started with Sencha Test and do reach out to us for any question/suggestion.
WalkingTree’s Professional Services team have in-depth experience in developing and managing enterprise applications built using frameworks like Ext JS and Angular. We also helped a number of our customer in migrating their applications from an older version of Sencha to the latest version. We would love to connect with you and help you make effective use of the awesome framework!