


Blogs
Xamarin Mobile Apps Authentication using Xamarin.Auth -Facebook
 Overview
In the article, Xamarin Mobile Apps Authentication using Xamarin.Auth – Gmail, we explored how to authenticate users with Gmail. In this article, we’ll discuss on how to authenticate user with Facebook using Xamarin.Auth component.
In order to integrate Xamarin.Auth component into our application, we need to follow the below steps.
- App needs to be registered with social account server to get Access token.
- Authenticating users by making use of Access Token and retrieve basic user information like email id, name, and profile pic etc.
Registering on Facebook Developer portal
So as a first step, we should register an app in Facebook developer to get the permission from the facebook server and which can be achieved by the following steps.
- Sign into Facebook Developer portal. Click on the Register button.

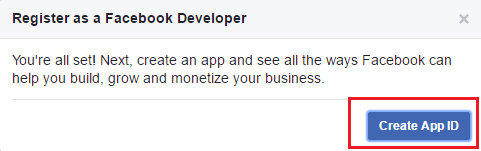
- Now we can see a popup appears and ask you for accepting the terms and conditions, switch to Yes and then click on Register.
- And then again a new popup will be appear, asking you for Creating an App Id, as shown below. Click on Create App ID.
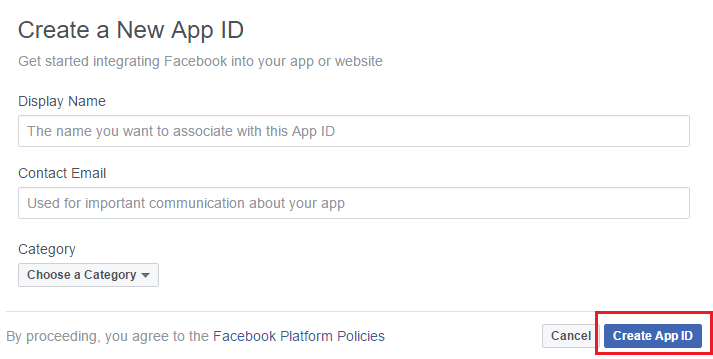
- After that, it asks to provide some basic details about app in the new popup as shown below. Give the app name and your Email ID in the corresponding fields and select the category of your app (For the sample application we can choose any category.) and then click on Create App ID.
- If you are using an application only for development purpose there is NO need to make the application public. Generally, Facebook operates in a sandbox environment in which you can still authenticate the registered test user(admin) without making the application public so that you can test you application with the registered user credentials.
-
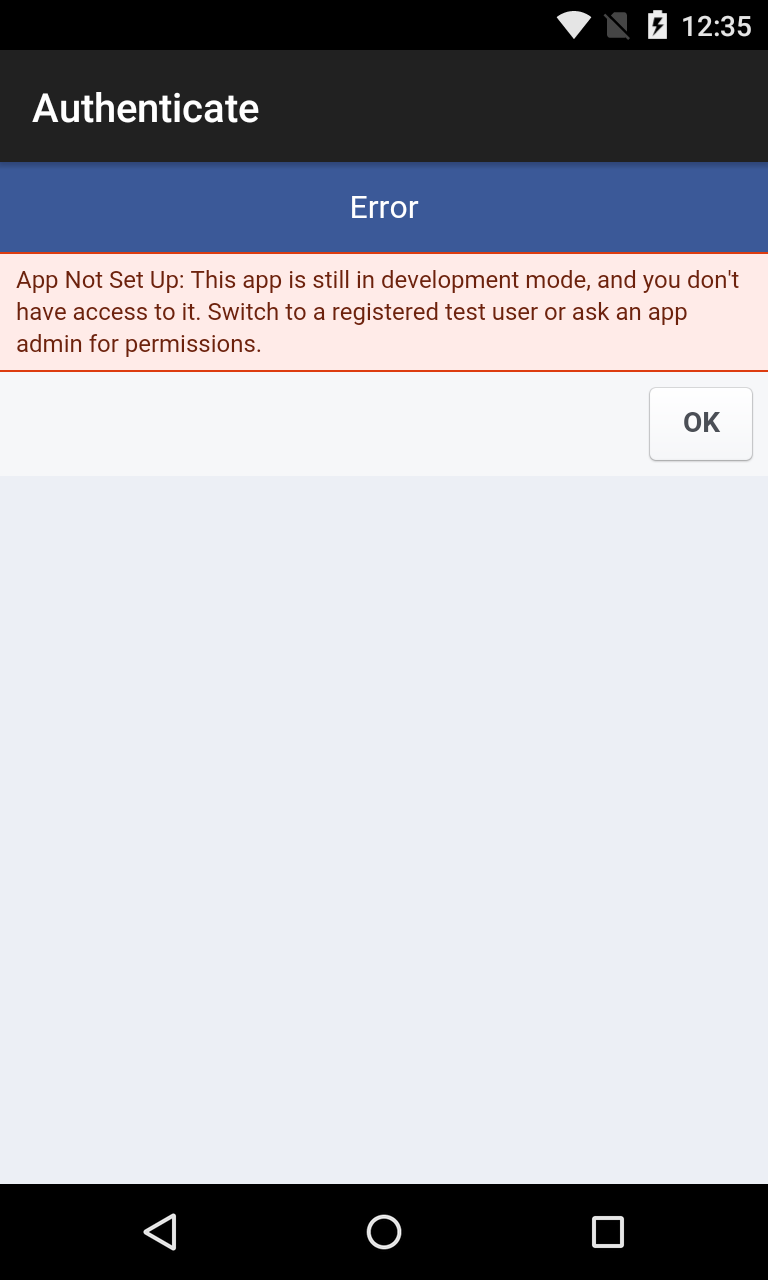
- If you are ready to go to production then you should make your app public so that any Facebook user can log into the application.
- And if you do not make the application public in production mode and when a user tries to log in they will get the below error.
- To make your app public in production, click on App review on the left sidebar menu and make your app public, by switching the Make Test app public to Yes.

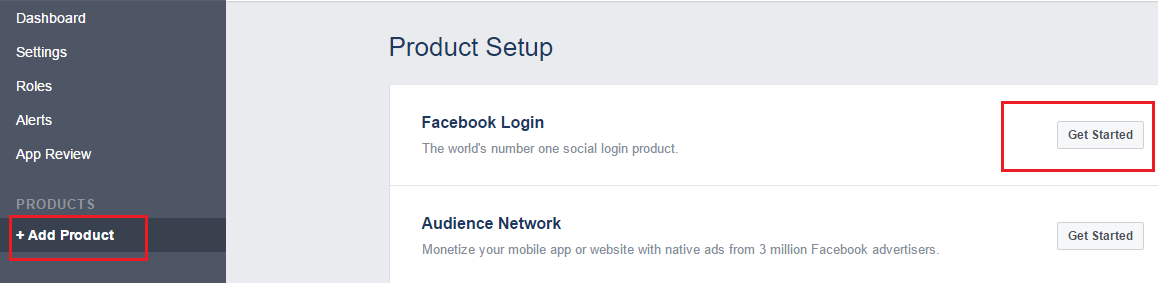
- You have successfully created an app in Facebook Console and you can also see your AppID at the top of the screen. Now Click on Add Product on the left sidebar menu. It will open a Product setup window. Select Facebook Login by clicking on Get Started as shown below.
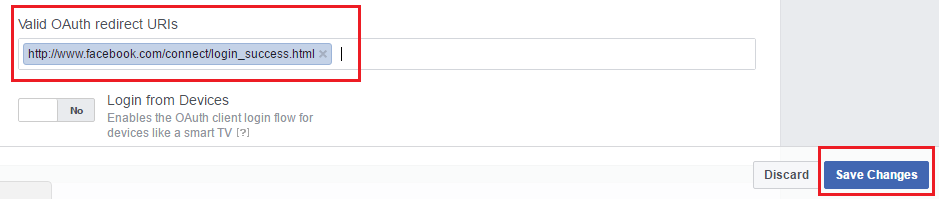
- In that product window you can see the field Valid OAuth redirect URIs, that could be any valid Uri and should match with Redirect Uri in the oAuth2Authenticator class redirect URI parameter. (We recommend redirect uri as http://www.facebook.com/connect/login_success.html). And then click on save changes.
- Your app is successfully integrated with a Facebook developer now you can use this App Id to fetch the data of different users.
Gathering user info from Facebook
Let us make use of the App Id in our application and implement the following code in MainActivity.cs (The process would be same as Gmail but we will use the different parameters for the OAuth2Authenticator class.):
- In the previous blog we have implemented a button for Gmail. Now add the following AXML code to LinearLayout inside Main.axml to implement the button for Facebook.
<Button
          android:id="@+id/FacebookButton"
          android:text="Login using Facebook"
          android:layout_width="wrap_content"
          android:layout_height="wrap_content" />
- Add below the line of code to find a button from the view by using the Id attribute and assign it to the variable inside OnCreate().
Button facebookBtn=FindViewById <Button >(Resource.Id.FacebookButton);
- Here we use OAuth2Authenticator and OAuth2Request classes, provided by Xamarin.Auth, to implement the application side of the authentication flow with Facebook.
- Implement an authentication inside the click event handler for the button.
// you can find following readonly strings in Constants.cs file in the
//github project
// Pasted it here for ease of reference with the code
public static readonly string FACEBOOK_ID =
                             "";
public static readonly string FACEBOOK_SCOPE = "";
public static readonly string FACEBOOK_AUTH =
                           "https://m.facebook.com/dialog/oauth/";
public static readonly string FACEBOOK_REDIRECTURL =
                      "http://www.facebook.com/connect/login_success.html";
public static readonly string FACEBOOK_REQUESTURL =
        "https://graph.facebook.com/me?fields=id,name,email,picture.type(large)";

facebookBtn.Click += FbAuthentication;

private void FbAuthentication(object sender, EventArgs e)
{
         var auth = new OAuth2Authenticator(
                                     FACEBOOK_ID,
                                     FACEBOOK_SCOPE,
                                     new Uri(FACEBOOK_AUTH),
                                     new Uri(FACEBOOK_REDIRECTURL)
                                   );
         auth.AllowCancel = true;
         StartActivity(auth.GetUI(this));
         //It will fire Once we are done with authentication
         auth.Completed += async (sender, e) =>
         {
            //Fires when authentication is cancelled
             if (!e.IsAuthenticated)
             {
                 //Authentication failed Do something
                 return;
              }
             //Make request to get the parameters access
             var request = new OAuth2Request(
                                             "GET",
                                             new Uri(FACEBOOK_REQUESTURL),
                                             null,
                                             e.Account);
             //Get response here
             var response = await request.GetResponseAsync();
             if (response != null)
             {
                 //Get the user data here
                 var userData = response.GetResponseText();
             }
         };
}
- With the above code in place, we can authenticate the user with Facebook account and we can also get the user information.
Summary
This article explained how to enable a user to login to a mobile app with their Facebook credentials without signing up for the app. We also discussed accessing the basic user info from the Facebook server using Xamarin.Auth component. And in the subsequent article, we’ll explore how to authenticate users with Twitter using Xamarin.Auth component.
WalkingTree is a pioneer in building enterprise mobile and web applications. Being a Xamarin Consulting Partner, we pride ourselves in providing a native solution to our customers. Do reach out to us with your questions and we will be happy to assist!
References
- OAuth2Authenticator & OAuth2Request APIs
- Scope parameter of OAuth2Authenticator API
- Xamarin Mobile Apps Authentication using Xamarin.Auth – Gmail


Very useful article, Thanks a lot 😀