


Blogs
First Ext Angular Application
Introduction
There are a significant number of Javascript front-end frameworks available in the market today. Each one of them has their own pros and cons. Out of these, ExtJS, Angular, and React are the more popular ones currently.
ExtJS is popular because of the following features it supports:
- 115+ Rich components
- Rich Data visualization
- Desktop/Tablet/Mobile support
- Pre-built and customizable theming
- Back end agnostic data package
- Tooling
Angular gains its popularity because of the following features:
- Desktop/Tablet/Mobile support
- Performance
- Tooling
- smaller footprint
Angular as a framework though does not contain out-of-the-box UI components. The Angular Material fills that gap with a lesser number of UI components. Sencha has come up with ExtAngular to provide ExtJS-rich and UI Component capabilities to Angular.
Call WalkingTree Technologies today to know more about our services in Sencha and Angular.
Sencha announced the ExtAngular early access recently. With ExtAngular, we can build Rich UI Applications in Angular effortlessly.
In this article, we try to create our First ExtAngular Application with the early access feature using the following steps:
Get ExtAngular Early Access Trail
Get early access to ExtAngular by filling out the ExtAngular early access form.
You will receive an email from Sencha with access to the sencha.myget npm repository.
Login to Sencha.myget npm Repository
Login to the Sencha.myget npm repository with @sencha scope, so that your node will point to the sencha.myget repository in order to get the ExtAngular packages:
npm login --registry=https://sencha.myget.org/F/early-adopter/npm/ --scope=@senchaYou will be prompted to key in the username and password. Enter the credentials you receive in the Early Access Grant email.
Note: Do remember to enter your registered email id by replacing @ with .. (two dots)
Install the ExtAngular App Generator
The CLI tool ext-angular-gen helps to create the ExtAngular application quickly.
Run the command below for installation:
Run below command to install
npm install -g @sencha/ext-angular-genYou will need to run this command as the admin user.
Create Application
Run the following command to create the ExtAngular application scaffolding with the sample components.
ext-angular-gen app --name FirstExtAngFirstExtAng is the name of the project.
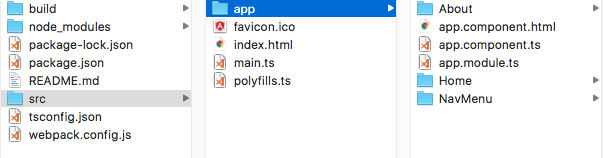
The Generated project folder structure will look like the one in the snapshot below:
ext-angular-gen cli has an interactive mode of application generation which can be done by executing the command below:
ext-angular-gen app --interactiveNote that this interactive mode may not work completely.
Run the application
Running the npm start command from the project root directory would bring up the server with the compiled code and open the browser with the serving URL.
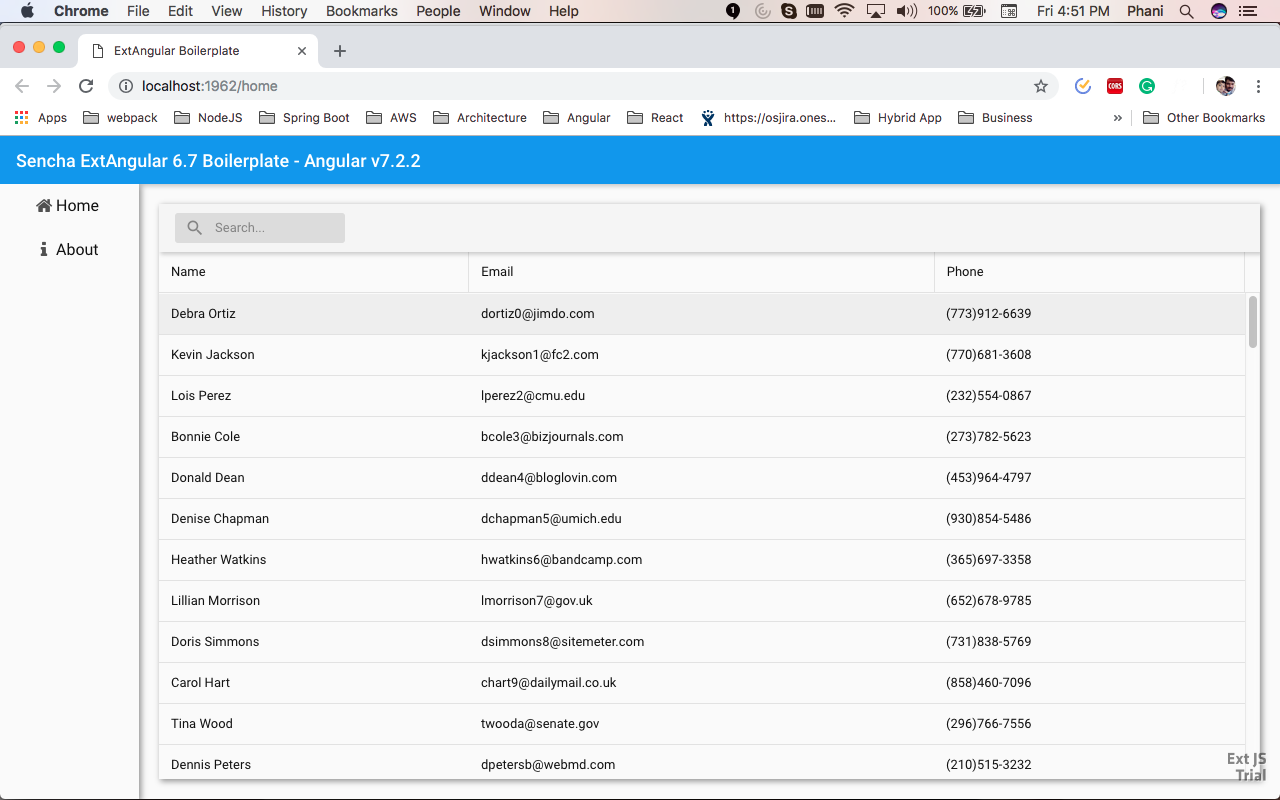
This is the sample app that the application generated by ext-angular-gen has. Here on, we can modify the code and build our own application.
Summary
This article lets us understand the important aspects of ExtAngular through the sample application illustrated above. In the next article, we will try to develop/modify the application in order to implement a small use case while giving an understanding of the practical applications of ExtAngular.
For a better understanding of the ins and outs of an Ext Angular Application, get in touch with our technology experts today.
You may also be interested in reading other interesting blogs on Ext ANGULAR from our technology experts.
References:
- https://docs.sencha.com/extangular/6.7.0/guides/getting_started.html


Thanks for your valuable information,you have given very useful and important information.