Blogs
A Step by Step Guide to Create Chatbots with Botpress
Conversational AI is being adopted by customer support chatbots across industries for the express benefits of addressing customer queries in natural language. While chatbots earlier were adopted to automate customer service and support without human intervention, the ability to adjust communication to domain-specific and natural language is pushing the boundary of Chatbot capabilities to the next level.
In complete coherence to the increasing popularity of conversational AI we now have several new technologies ranging from NLP-based data models such as GPT-3, comprehensive chatbot development platforms like Botpress and several others, for example, tools like Markov’s Gen AI App Builder facilitate the creation of tailored AI applications, enhancing the adaptability of chatbot solutions.
Botpress comes as a complete stack for developing, deploying and improving conversational AI applications for different domain niches. Botpress uses Natural Language Understanding (NLU) and allows the developers to incorporate several third-party NLU based projects as per the requirement. Support for multiple channels and ability to incorporate different CI/CD pipelines including custom DevOps, add to the flexibility of custom development capabilities of Botpress.
Among the different technology stacks available for Conversational AI chatbot development, Botpress offers several unique value propositions ranging from open-source nature and zero licensing fee and a rich repository of tools one need from end-to-end Chatbot development.
A few simple steps will help you get going with your first chatbot that you can embed in your website for proactive messaging or for addressing user queries.
Preparatory steps to follow
To begin with, you have to install Botpress following the installation instructions as per your operating system. As soon as you finish downloading it is time to connect to the local development server of Botpress.
After this process is over, the Botpress tool becomes accessible at http://localhost:3000/
Following this, you need to create the admin account from this page.
Ready, steady, go to develop your first bot…
Now when you have logged in with the admin account credentials, you have a fully-fledged Bot studio where from you can select your preferred options to create your first bot. This is also the place where you can import your existing bot and make improvements as per your requirements. You can also take backups of the existing bots here. It is time for naming the bot with something unique, relevant and fit to the purpose. After naming it, you can open it in the studio to develop it. You can find several menu options in the left of the Studio. Let’s have a look at the different menu options in detail below.
- Content for bot responses: In the Content section you need to determine the bot responses. The bot responses can also be determined right from the Flow editor.
- Flow section: You need to design the flow of chat conversation here in this section. It works like a graphic interface representing workflow and allows you to create the flow with simple drag and drop actions. Each point of the decision tree represents an editable node. The AI engine in the background will determine automatically the path of responses based upon the user inputs or queries and their underlying intents.
- NLU: NLU or Natural Language Understanding is the AI-based model that allows understanding of a user’s natural language inputs to facilitate befitting responses. You can determine the different discussion topics termed as ‘intents’. As per the discussion topic or intent, you can train the model with appropriate phrases. With this training through a variety of phrases the NLU model becomes capable of detecting the precise intent and context and giving responses on that basis. Based upon your initial training phrases the NLU model over time starts learning variations of different related phrases for defining the intent and context for more precise response. The bot studio offers you a dedicated button in the bottom right that you can tap on for providing different phrases to train the bot.
- Q&A: This area is dedicated for evaluating the basic bot responses and its responsiveness to user inputs. Apart from responses to greetings you can evaluate here the responses to basic knowledge-based or informative queries.
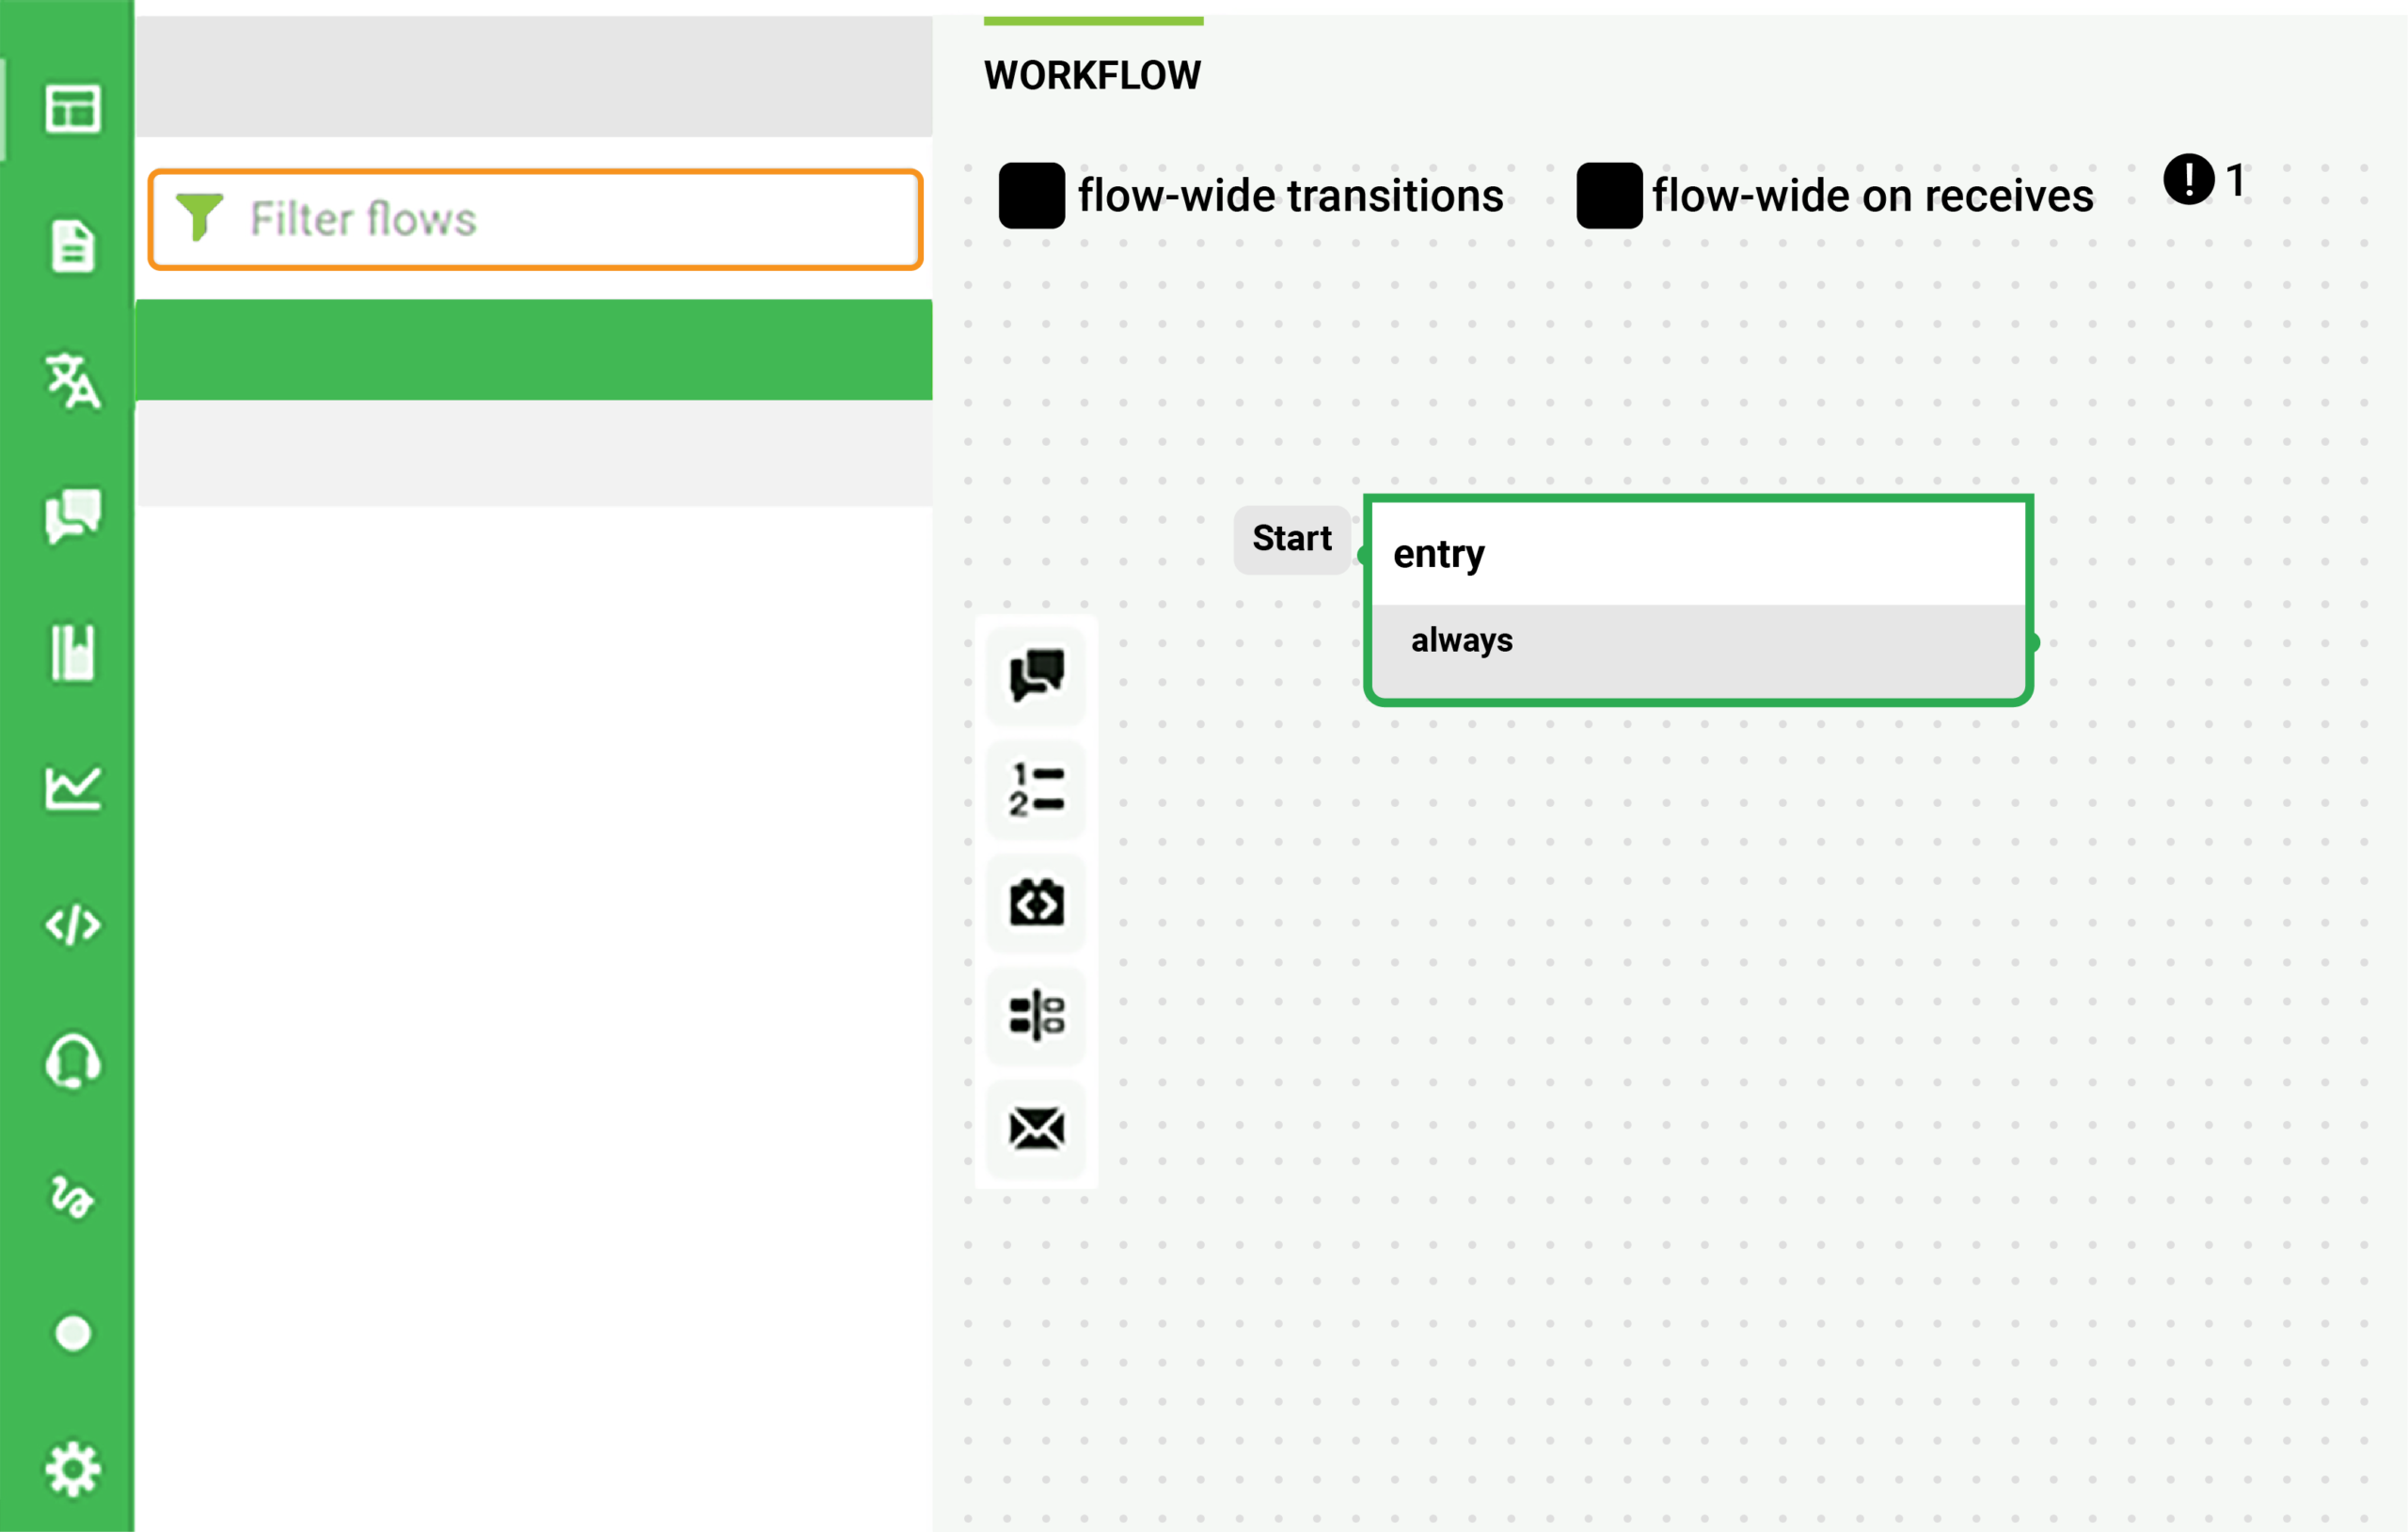
One step further: creating the detailed workflow
Now let us give attention to the creation of the bot workflow with multiple details. Begin by opening the left-hand side window for Workflow dialog. Here you have icons representing Node, Choice, Call API, Slot Filling, and Send Email. Let’s discuss each one of them in detail.
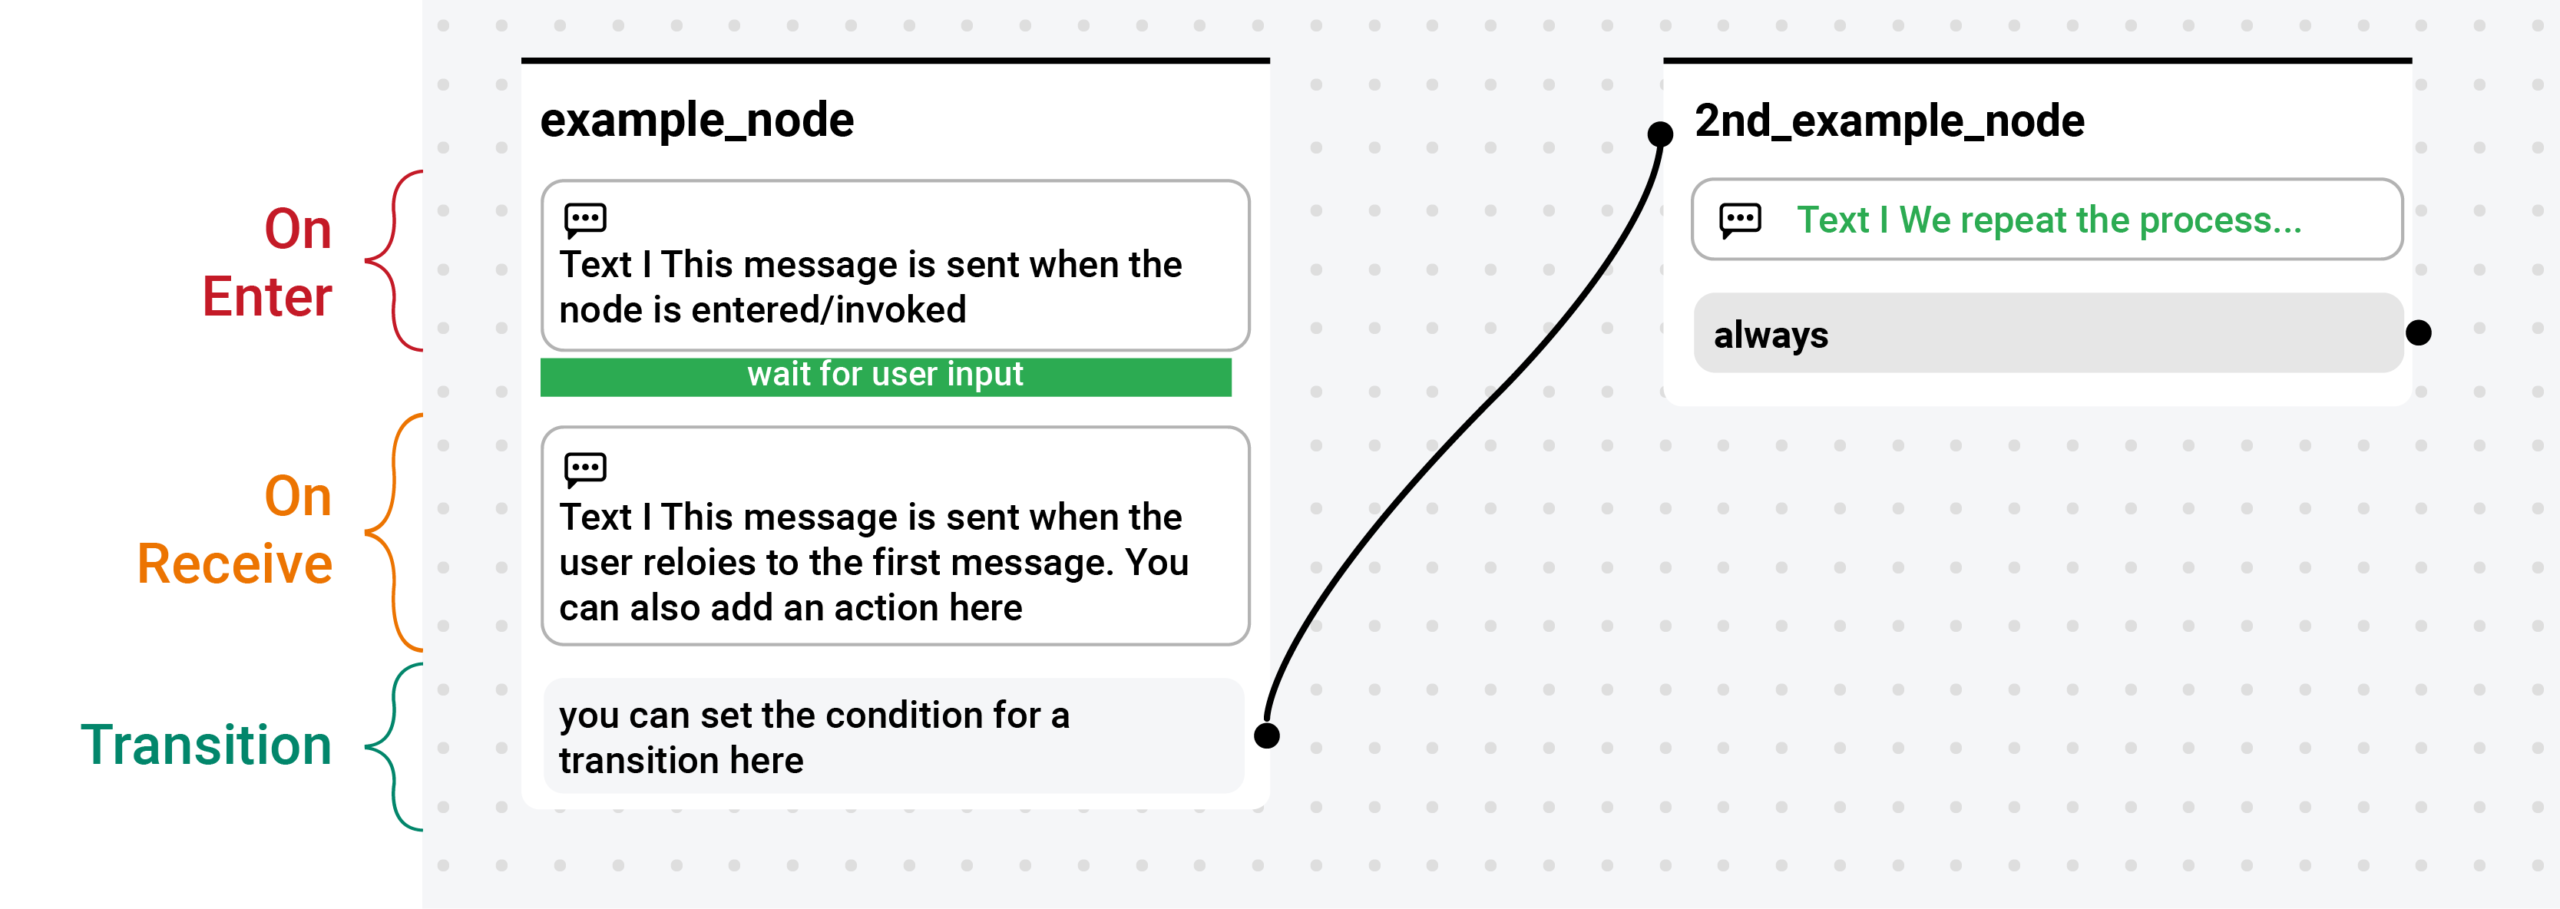
Nodes
Nodes represent the basic units of the logical flow of bot conversation. By this definition, any active bot conversation, often called interchangeably as “session” will always have just a single active node. As the conversation moves on, the transition from one node to another takes place and this creates the flow. When this transition does not take place, the bot conversation or the flow comes to an end.
Any new user message after the logical conclusion of this flow will automatically start a fresh new session. Now, every node can be segregated into 3 separate stages such as onEnter (A), onReceive (B) and onNext (C).
Here’s how you create the first Flow
The menu on the left side of the bot studio offers access to NLU with Intent or discussion topics and their subsequent attributes. It is widely known that detecting the intent can be easier but accurately classifying them can involve some complexities. Let’s begin by creating the intent.
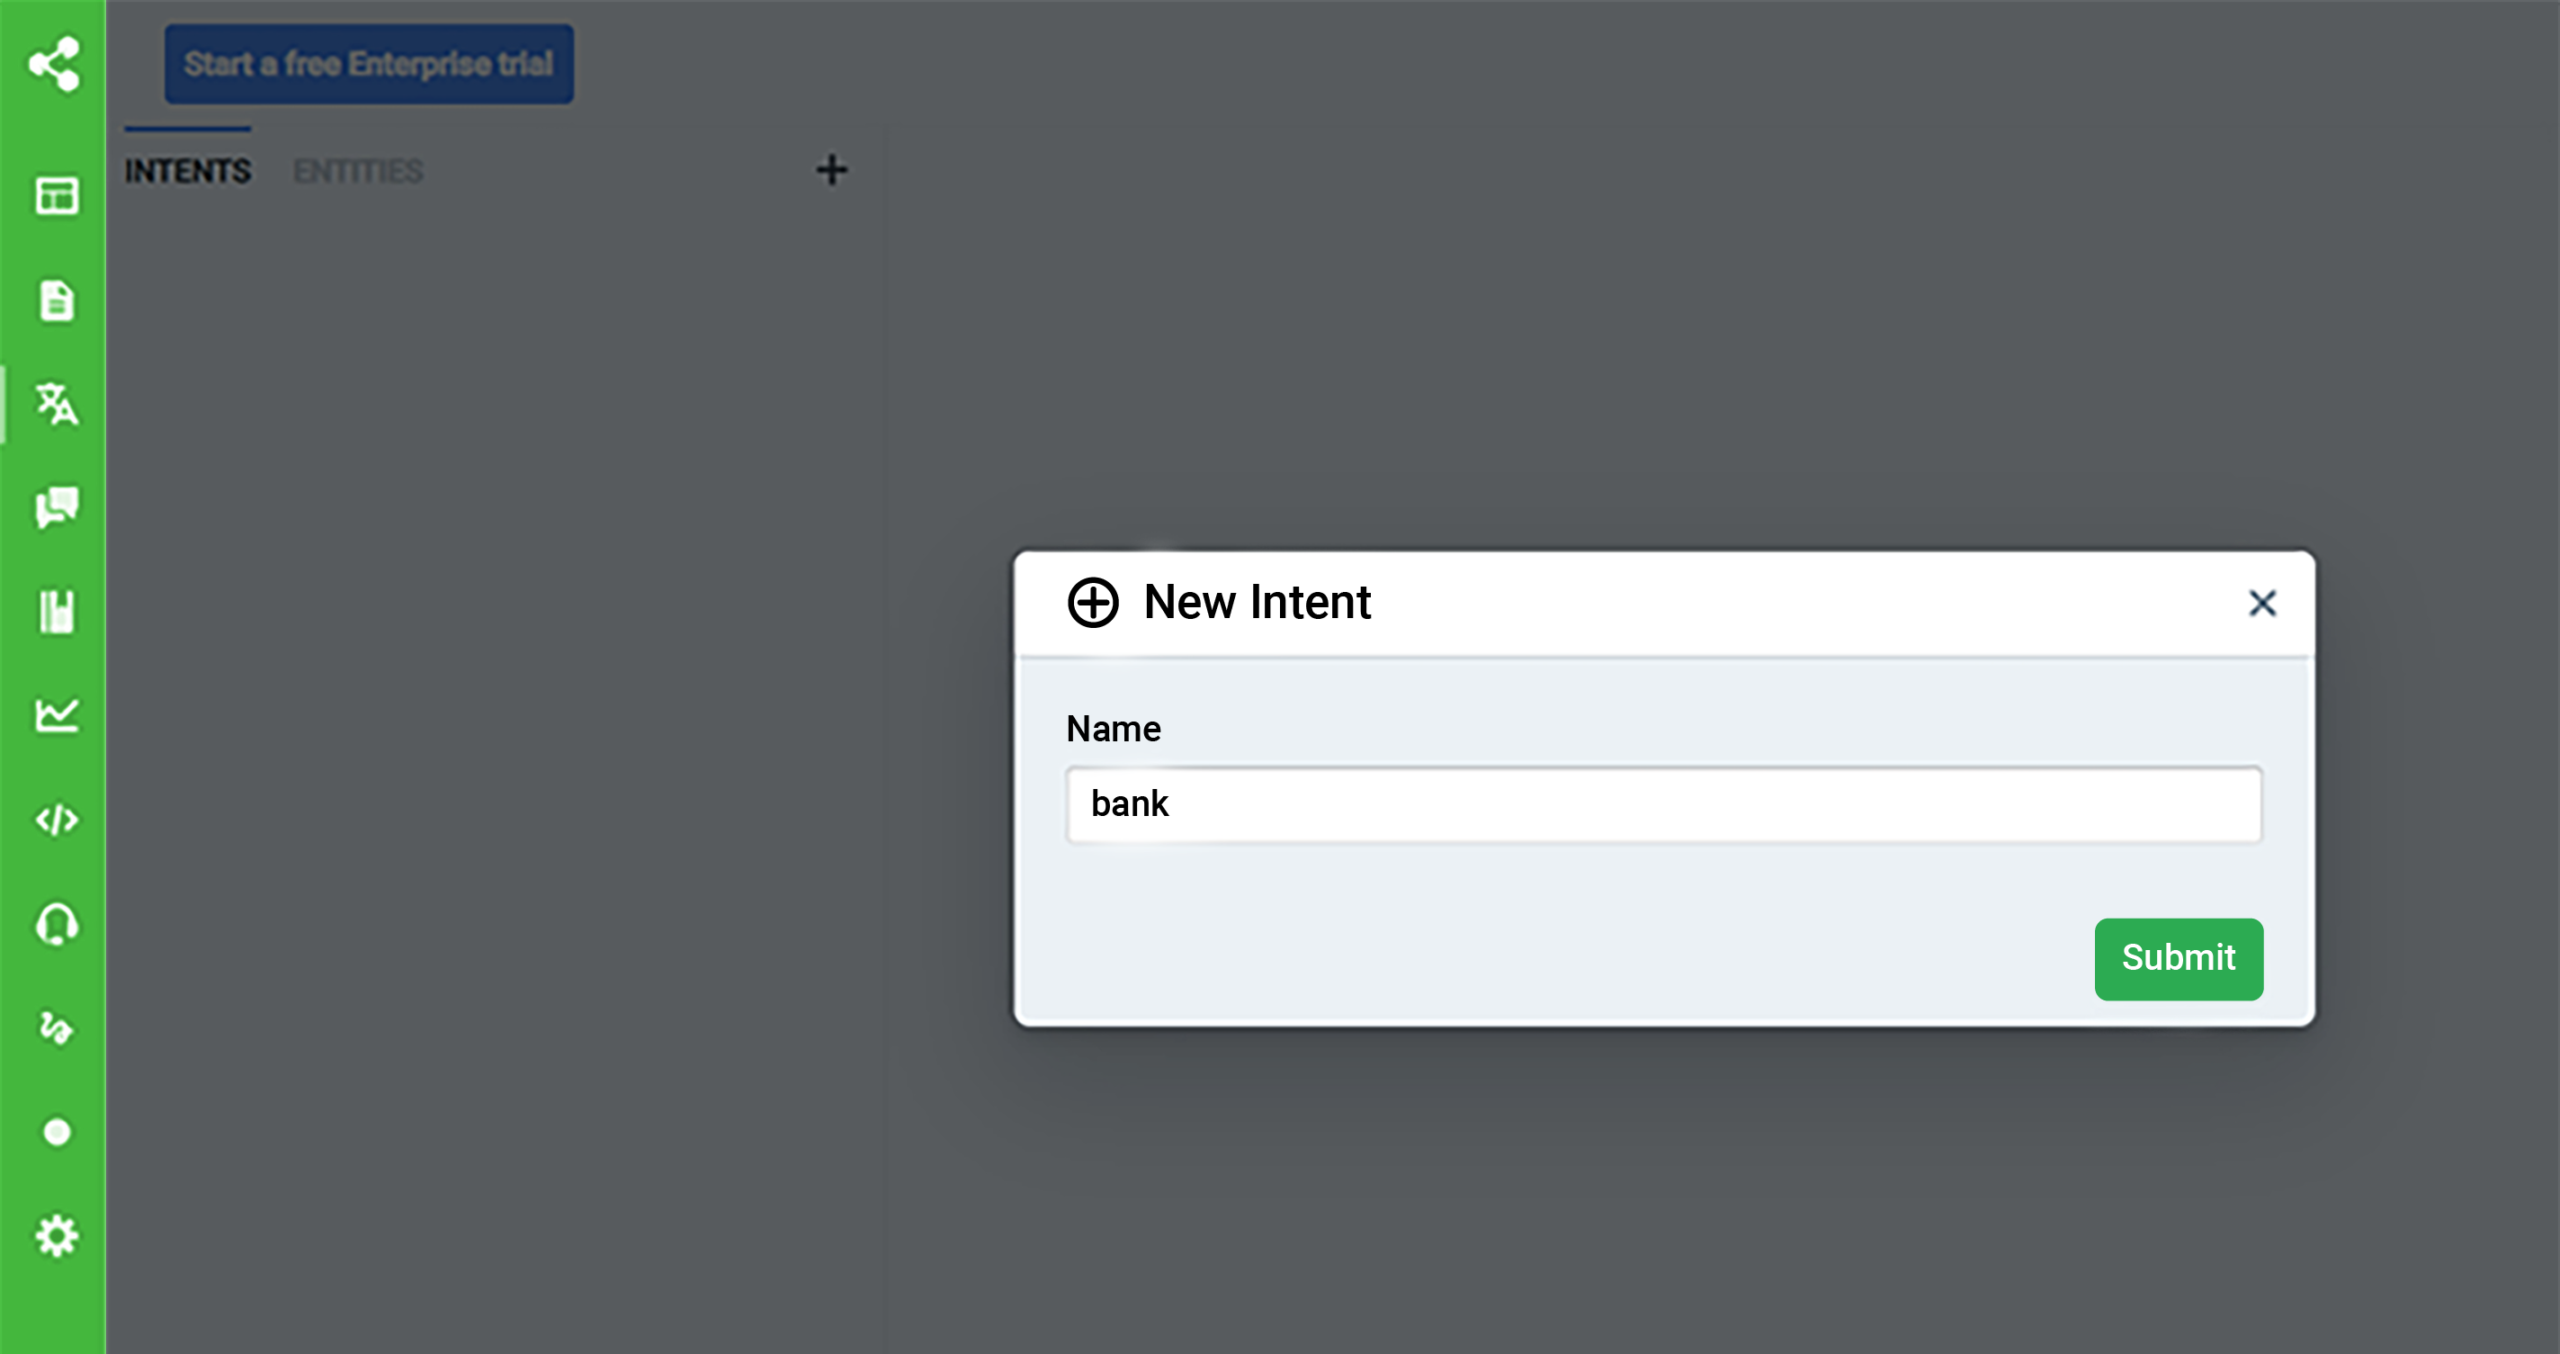
Based upon this intent, you need to come up with several possibilities of related queries. For example, with the “restaurant” intent, “food menu” can be one of the closely related possibilities for user query.
Apart from extending your intent specific possibilities across a multitude of related queries, you also need to come up with a wide range of variations for each question.
When you have finished covering all possible variations of a question, you need to list all possible entities or recognisable proper nouns for people, places, objects and living beings related to a particular intent.
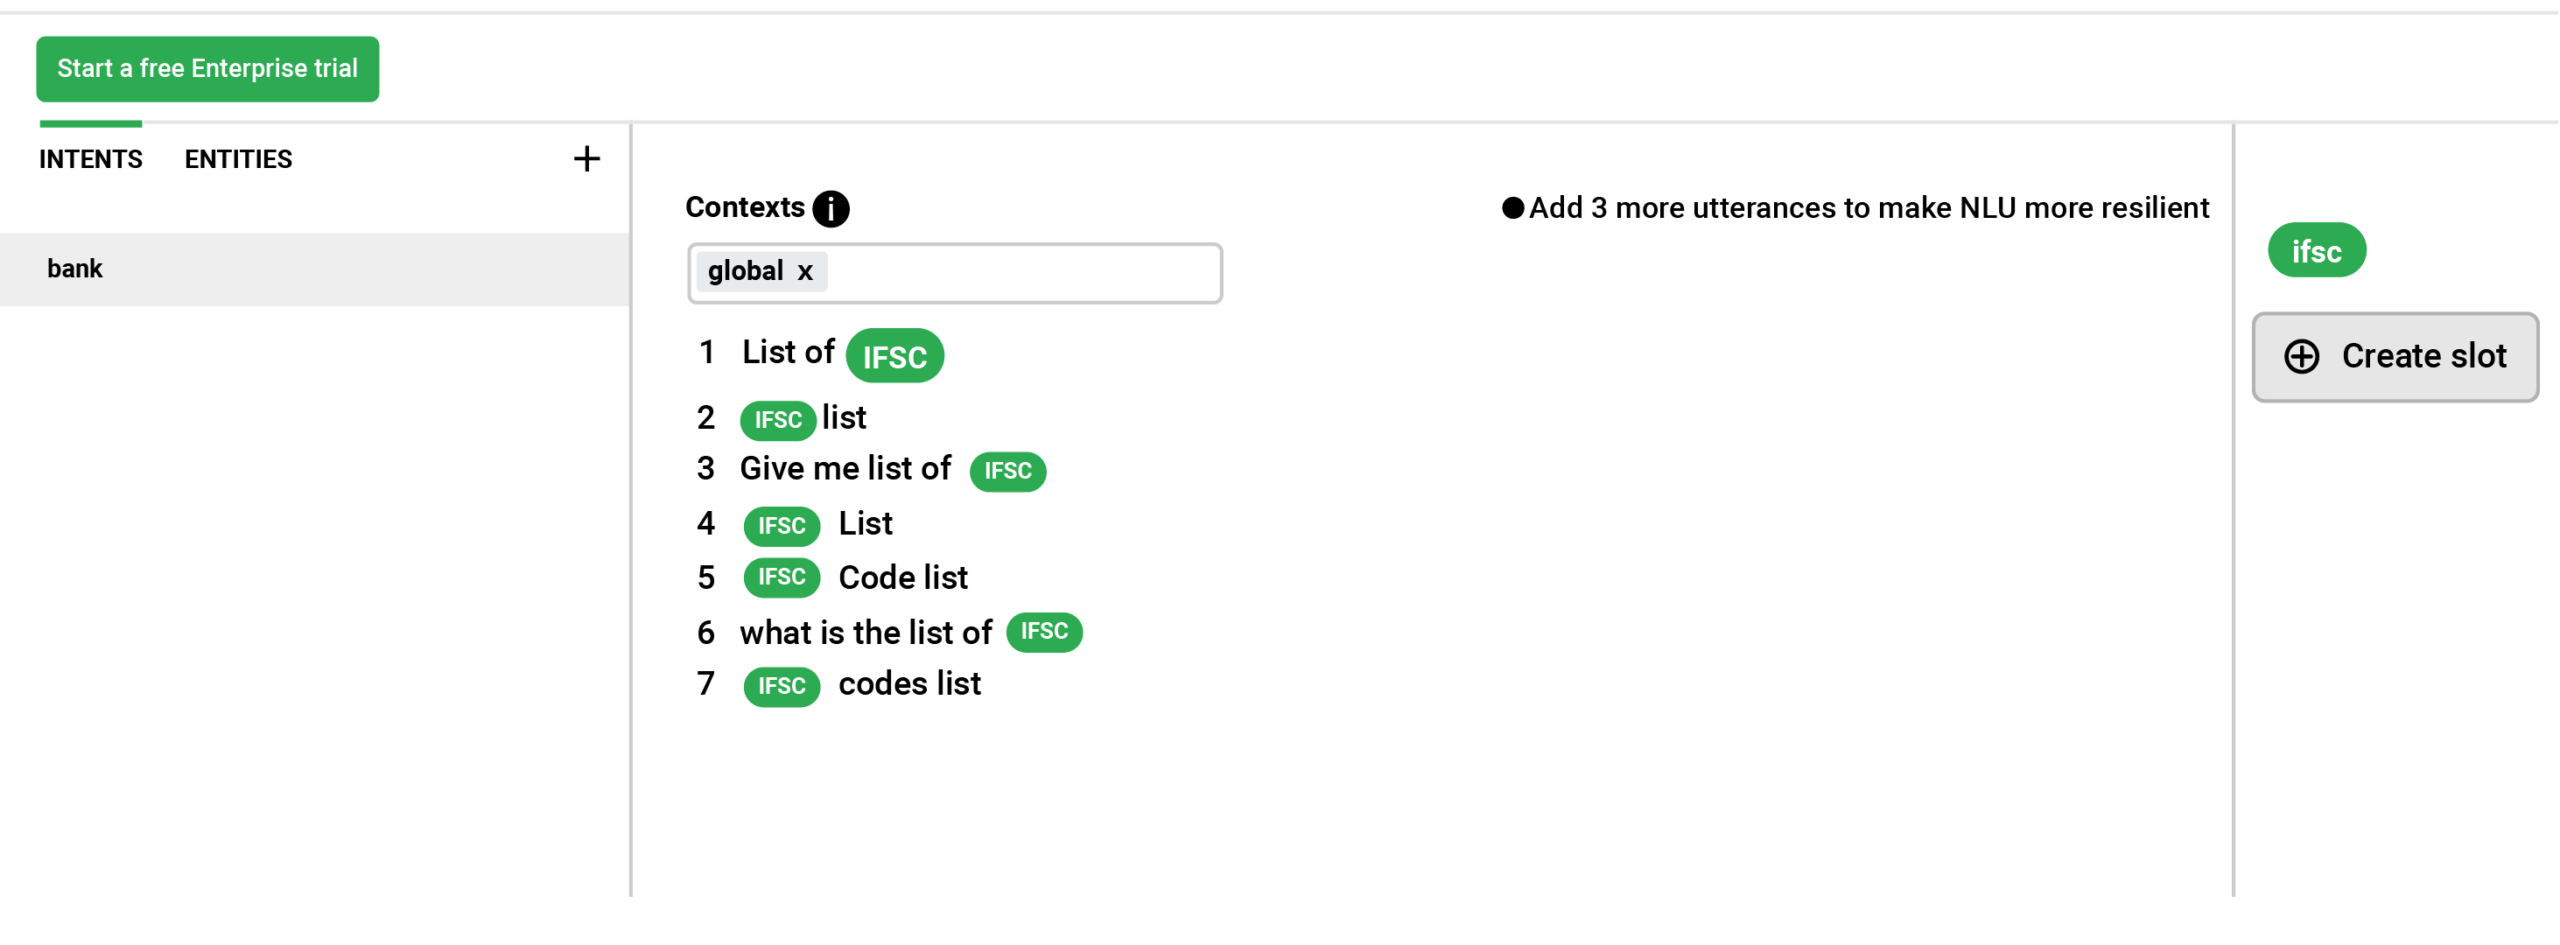
At the very next step you have to build the slot for each intent and link all the corresponding questions with this.
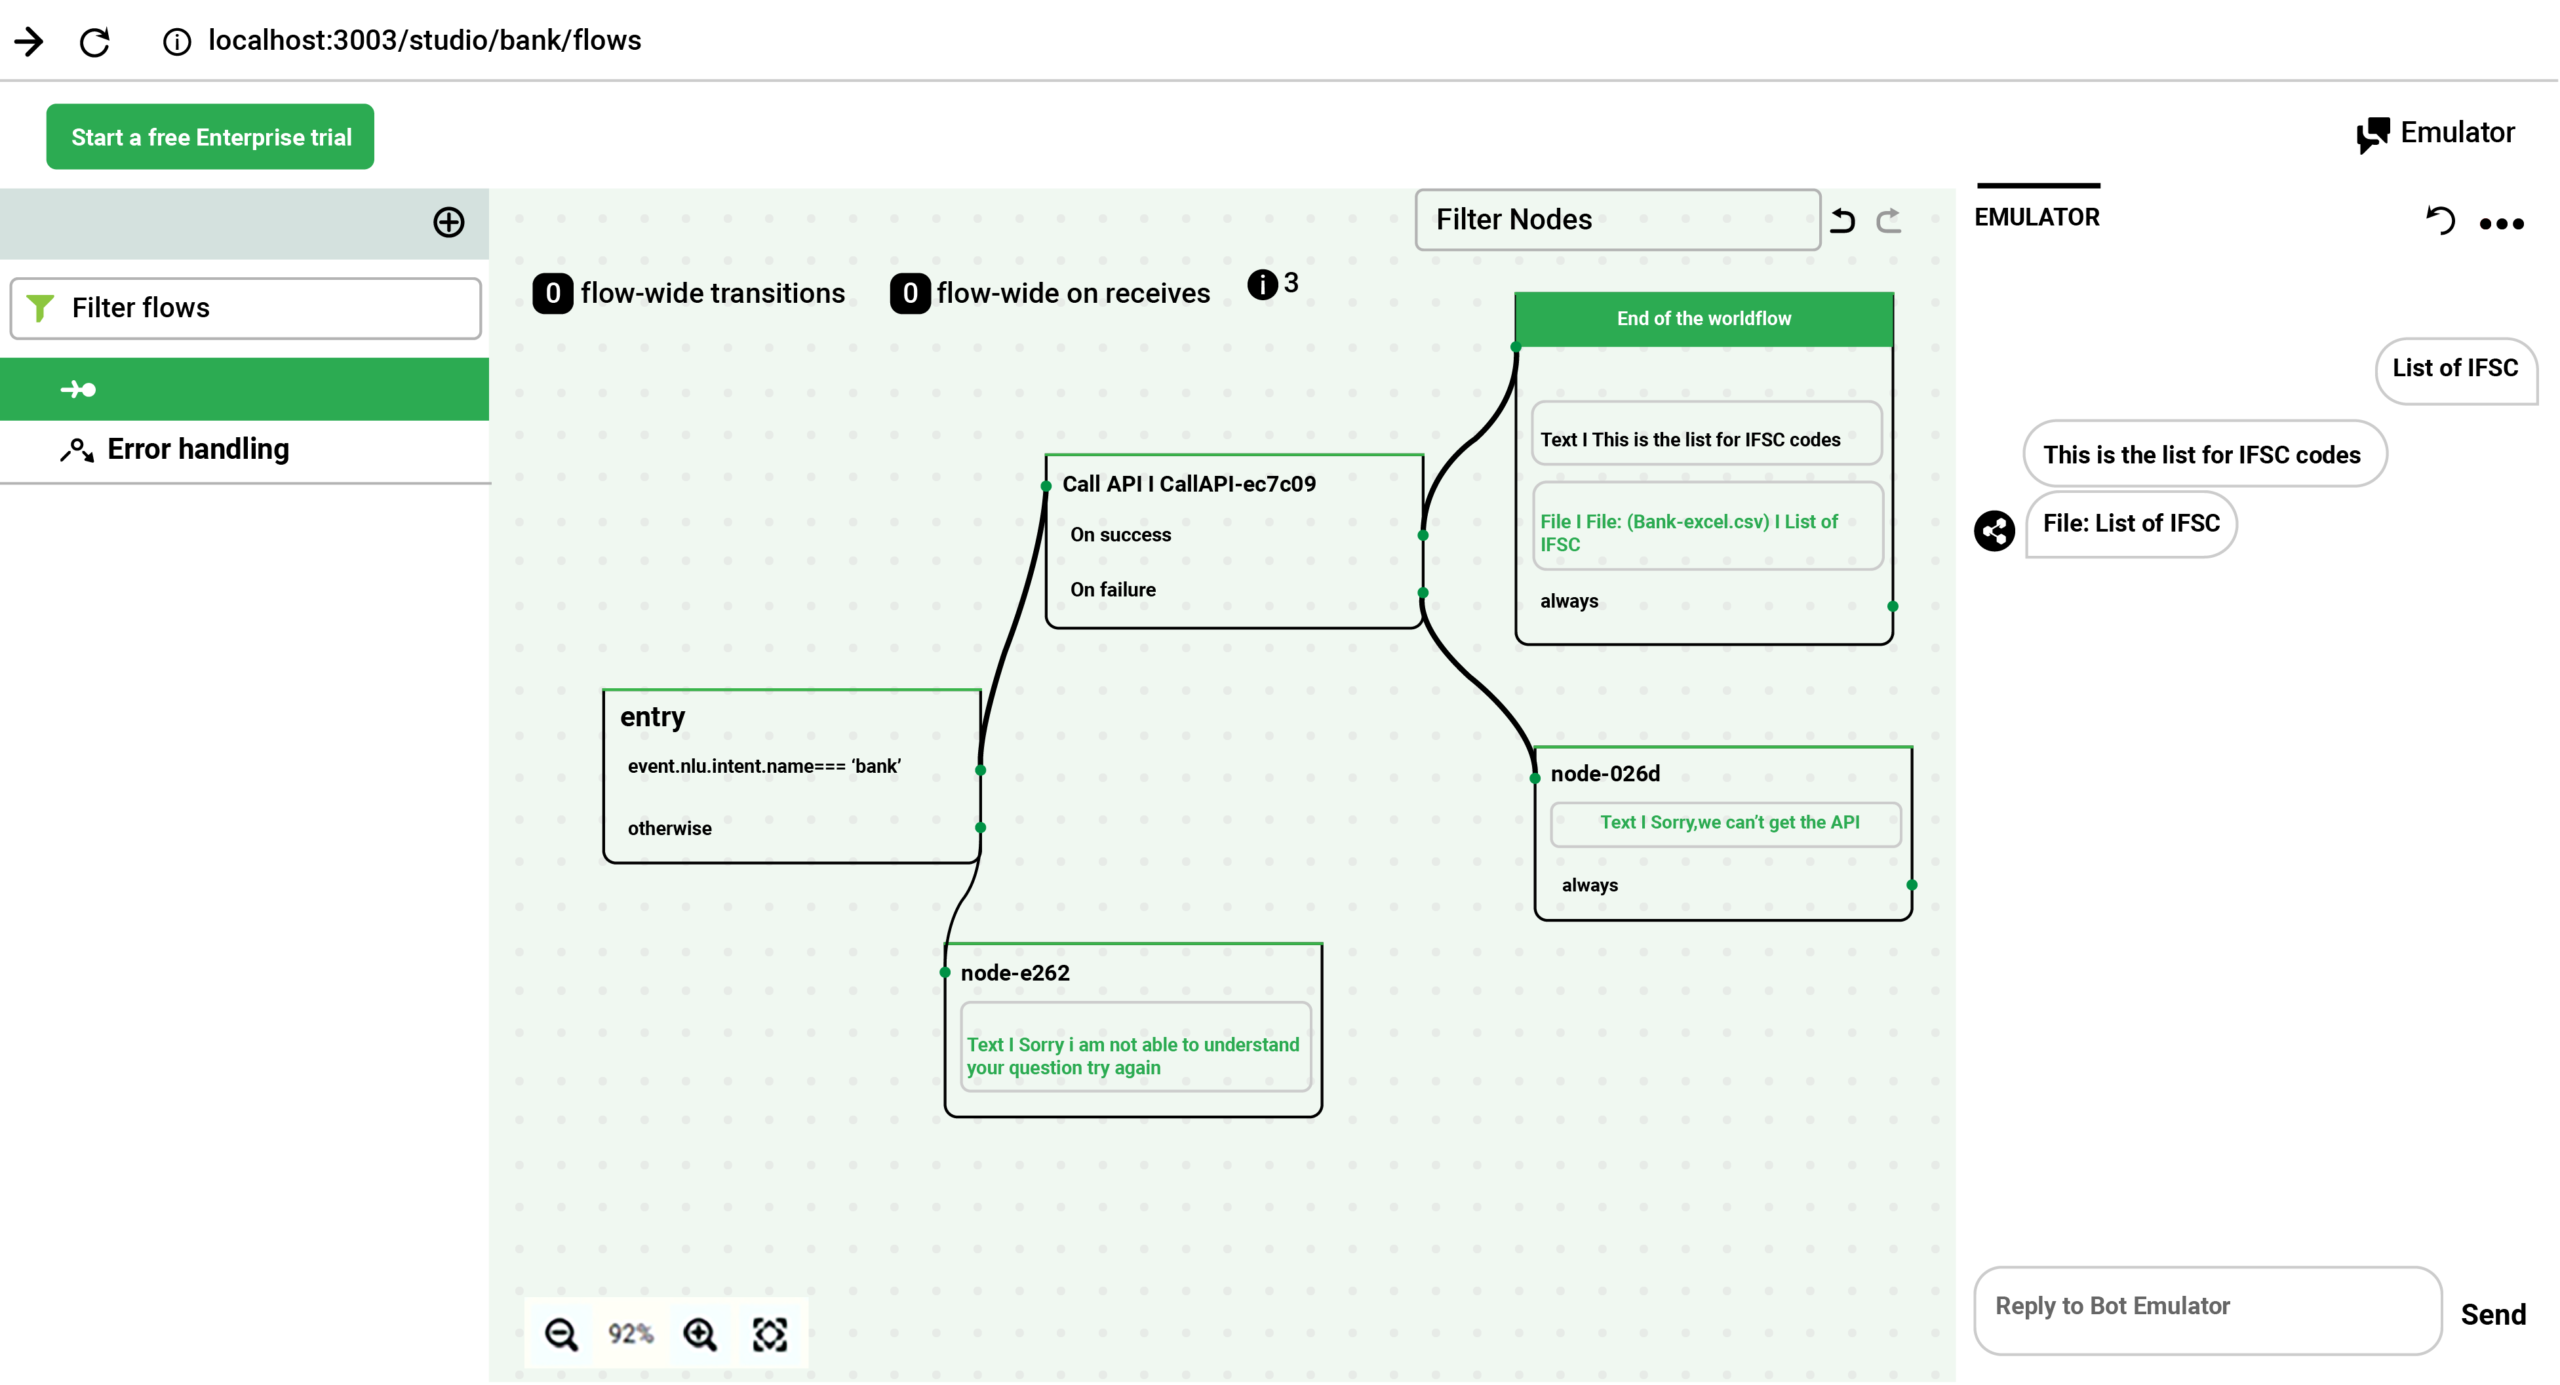
In the below screenshot, you can see the ifsc defined as a slot for the banking chatbot which will handle questions related to IFSC code listing.
Finally, you are all set to create the flow. You first need to specify response actions for 3 stages such as On Enter, On Receive and Transitions. Each action corresponding to these stages is triggered based upon which stage the bot response belongs to. The responses can vary from simple text to speech to visuals to more complicated code script.
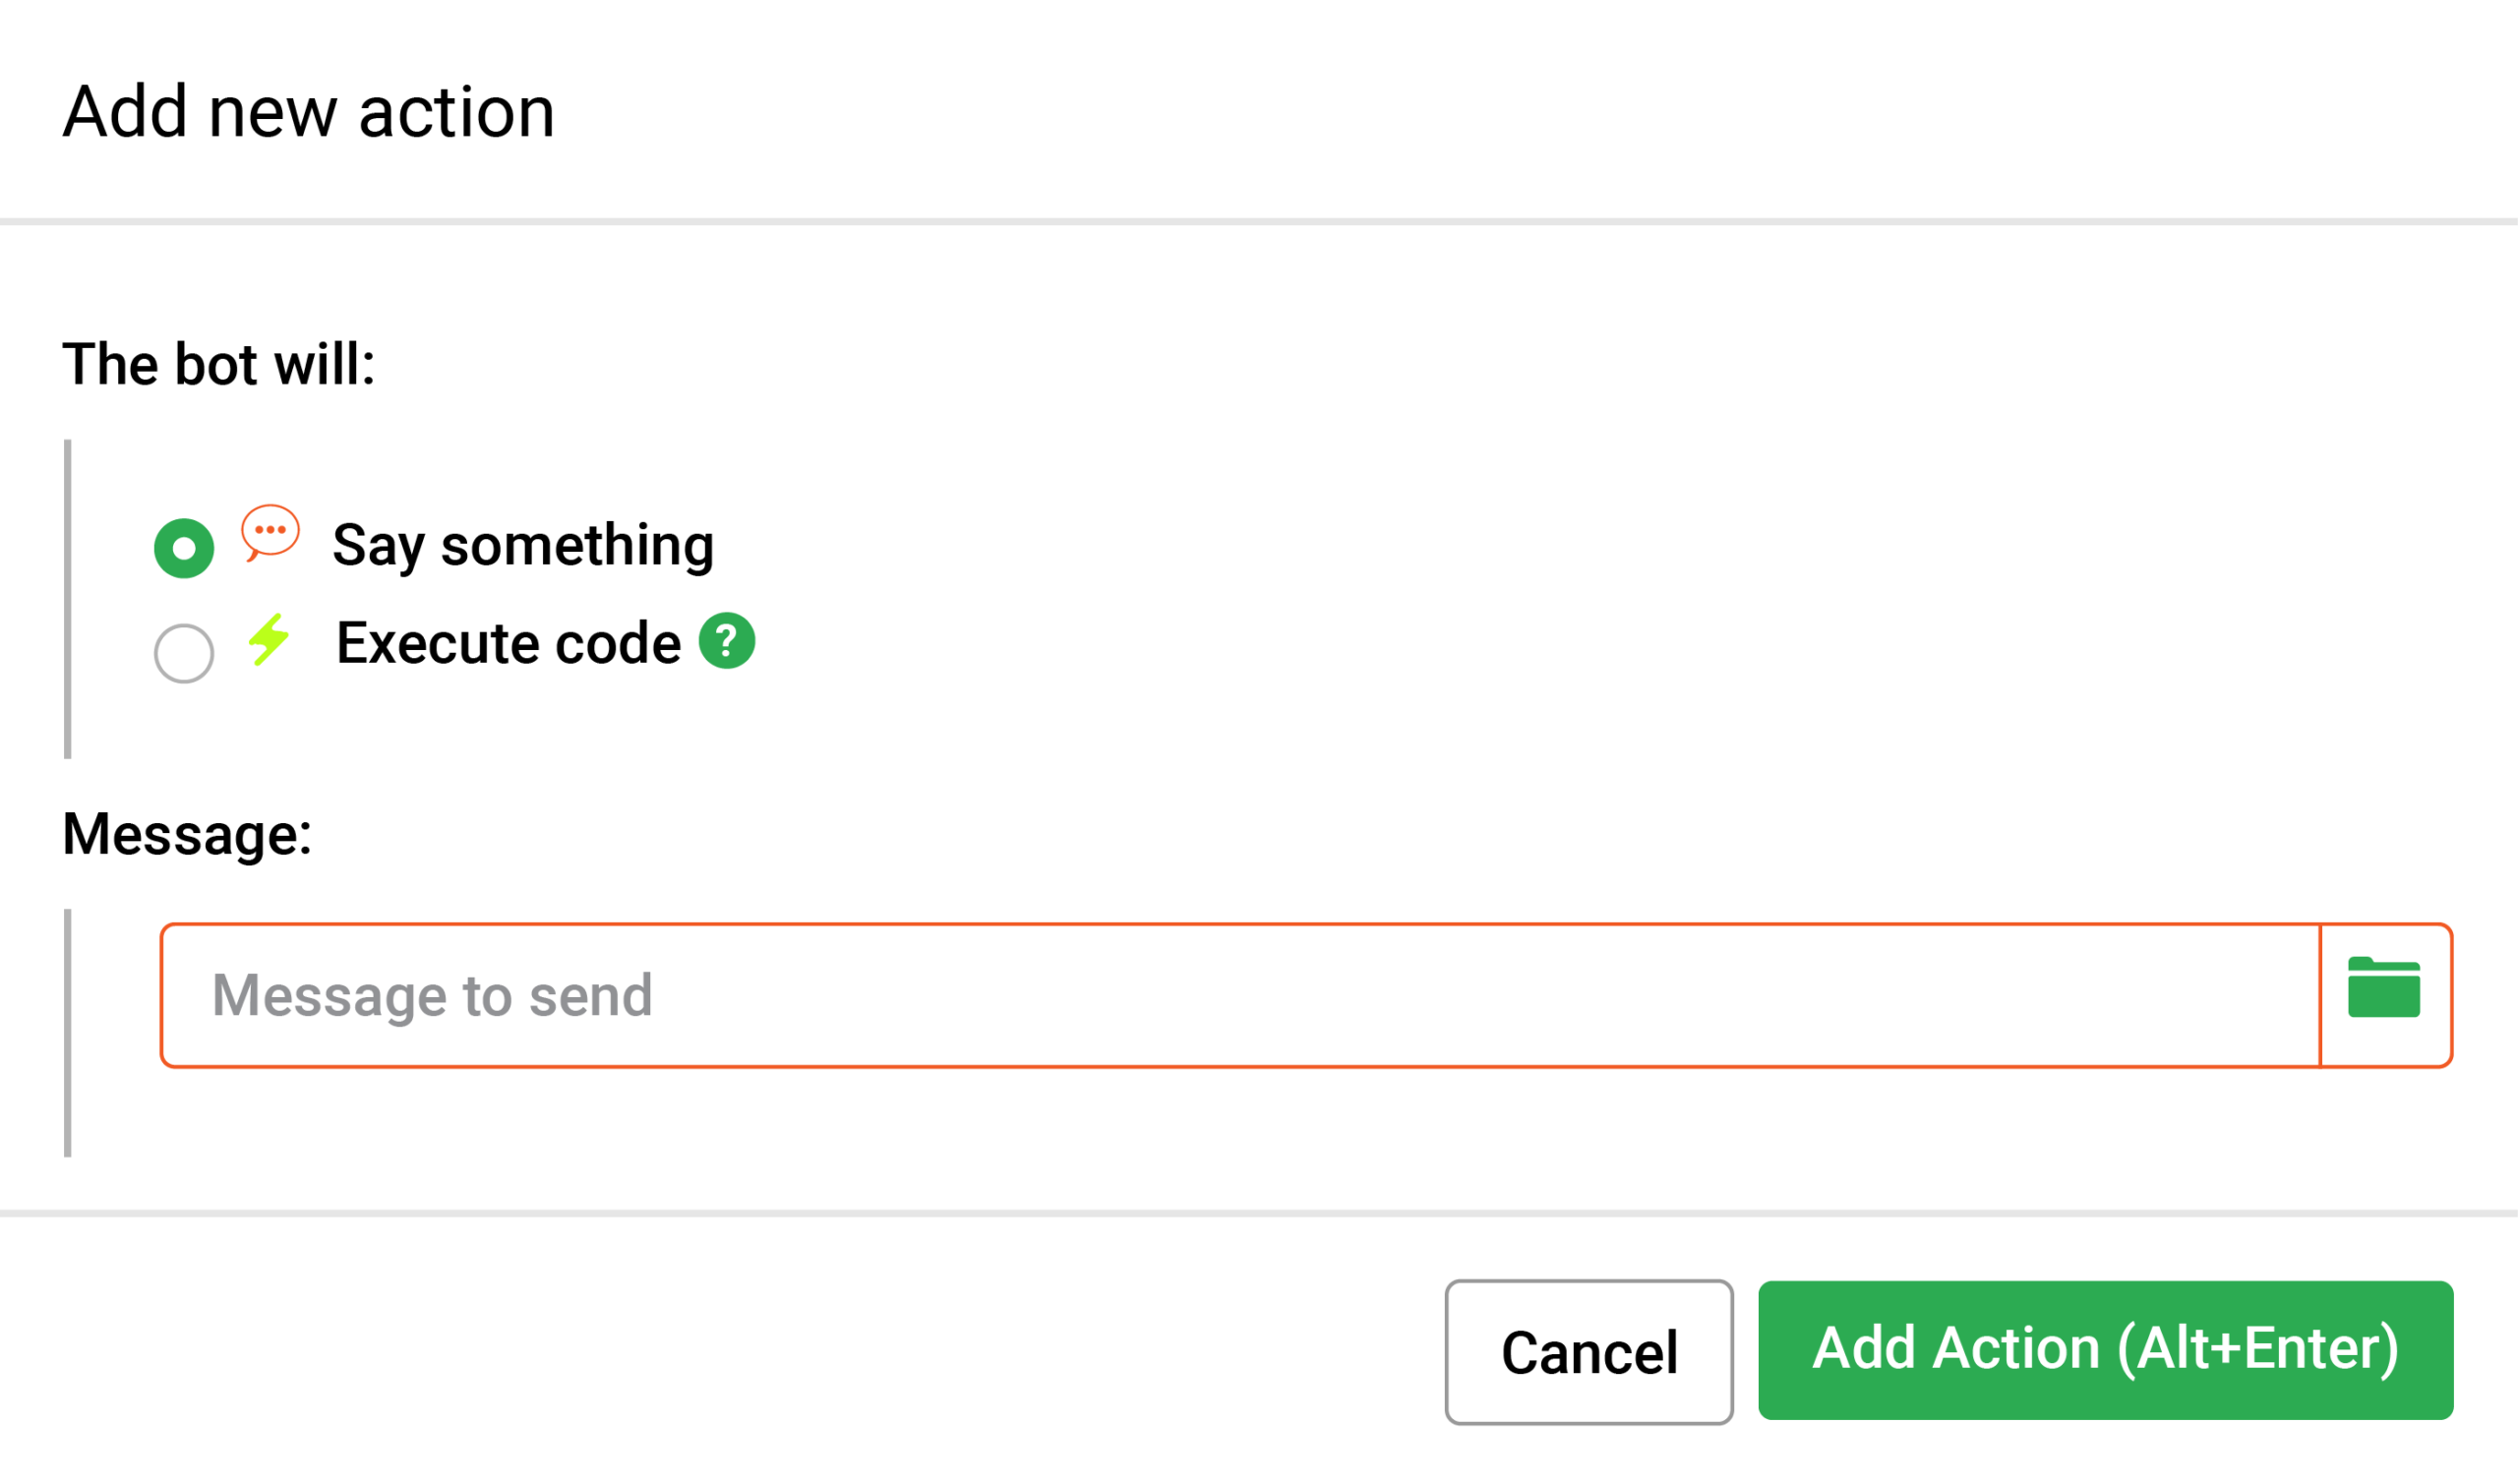
Let’s understand how to create basic bot responses. For creating a new action by the bot you have to click + button in the On Enter tab first. Now a Message field comes up that you need to fill up. The field is blank when you have skipped creating responses in the Content section. Though separately you can just type the message in the blank field and click on the folder icon just beside the message field. Now, you have known the basics of creating a Flow.
Next step is to create a Transition
Transitions refer to the conversational links between the nodes. For example, in an e-commerce bot you can add a new node like “Not Enough Stock” to the start node. After clicking twice on the start node you need to add the transition node.

After you have finished creating Intents, Entities, Slots, and learned to create flow and transition, you can also provide a link to get the server data with the bot by using an API.
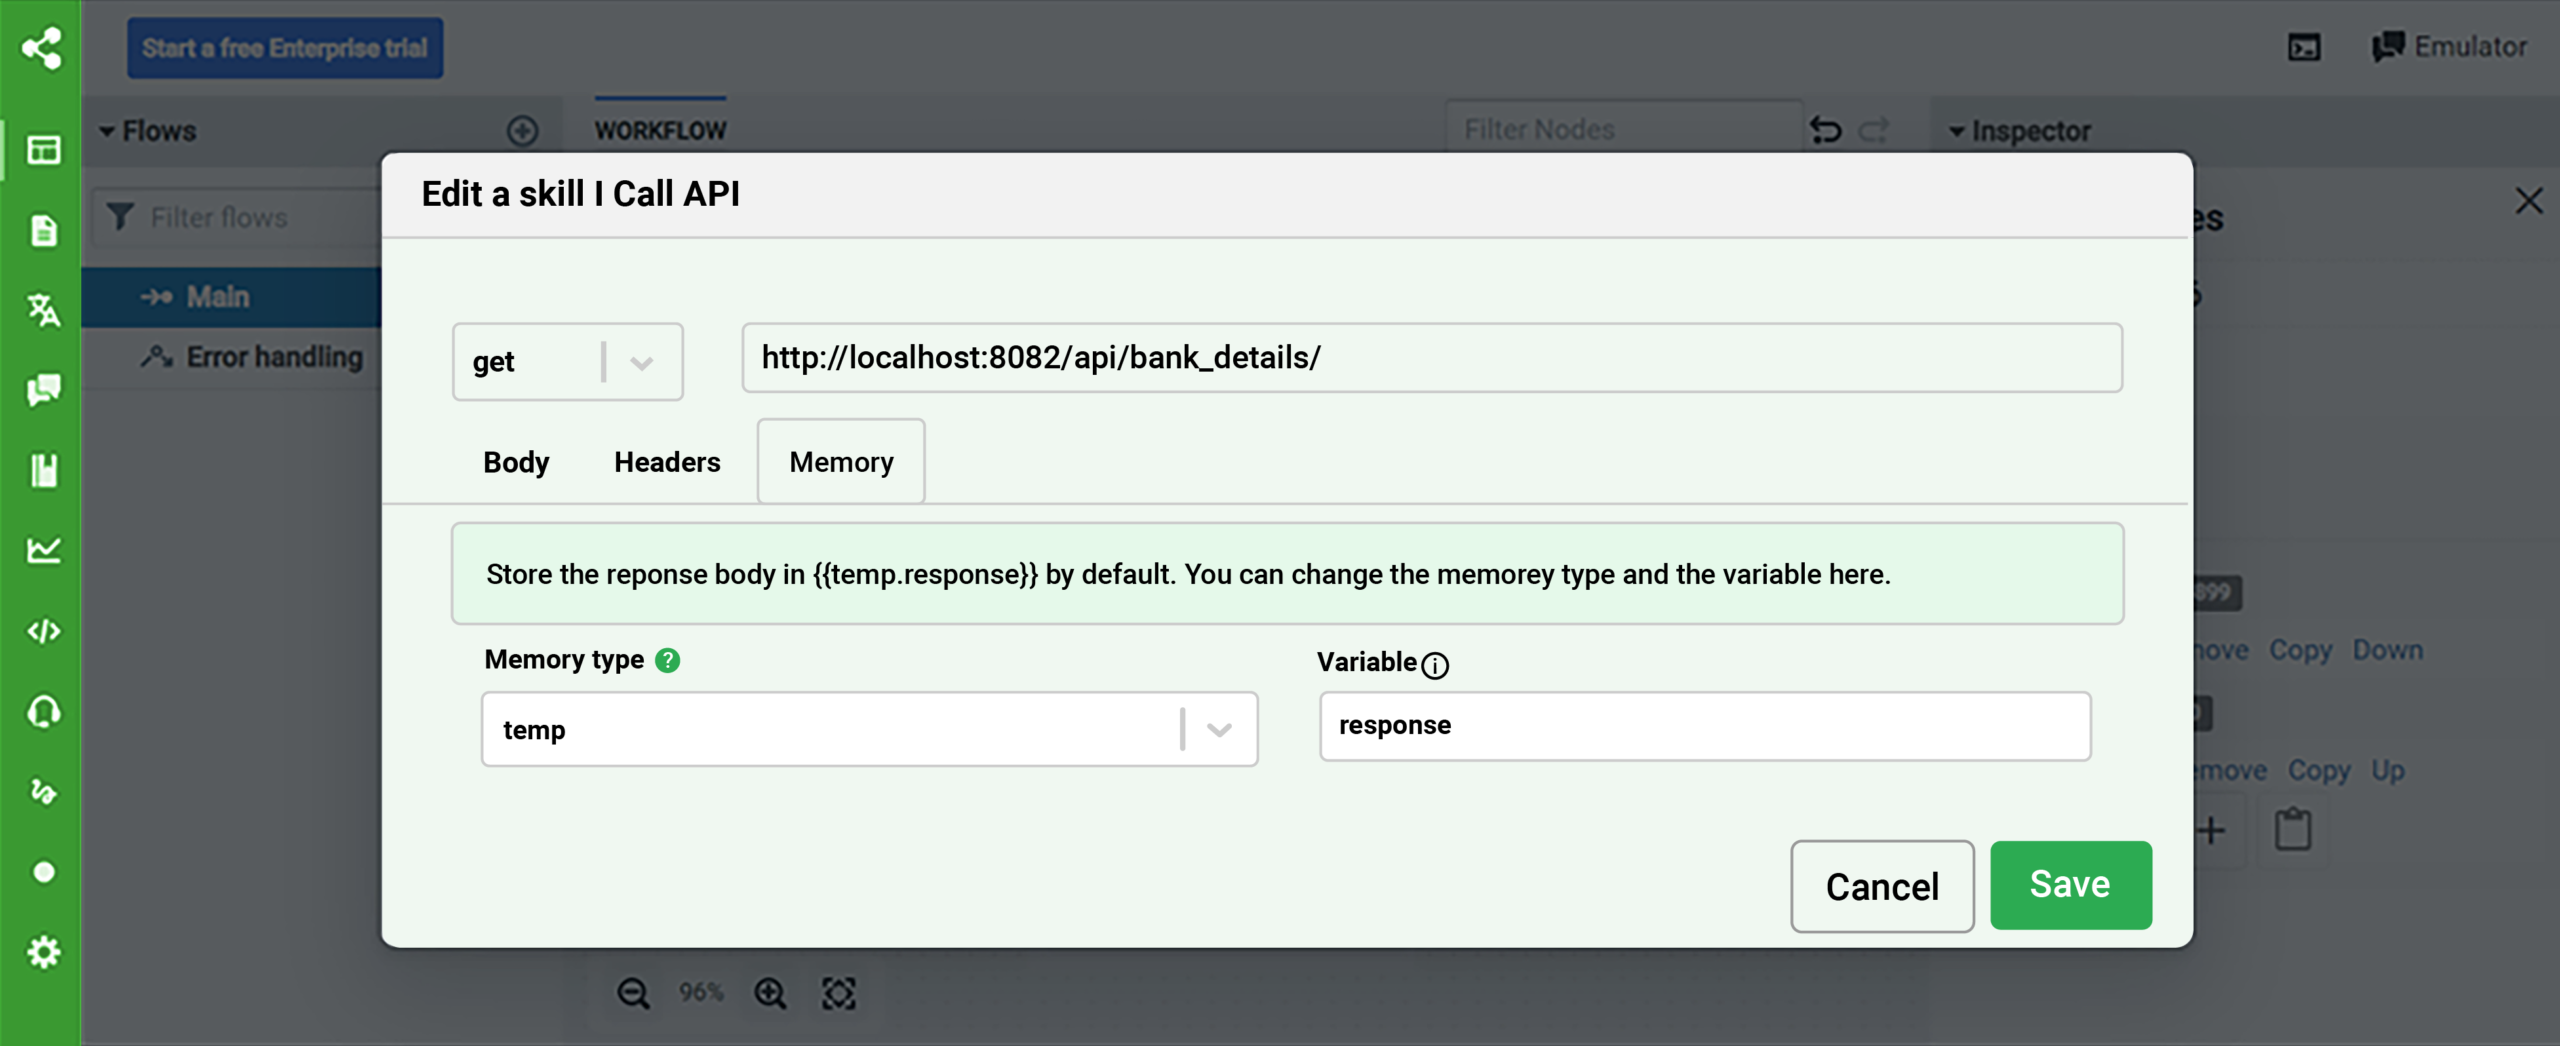
Test Your Chatbot
Now you have finally created the Chatbot and it can be tested in the bot studio. To test your bot just open the Emulator by clicking the button on the top right and start testing the bot.
How to embed the bot in your website?
Now it is time to embed the chatbot in a website. If your website uses ReactJS for frontend you can access the bot through an URL after successfully deploying it in the web server. When the bot is made accessible through URL, you can incorporate the corresponding script tag in the fag end of the index.html page of your website. All you need to do is to place the URL in this space: <your-url-here>
<script src=“<your-url-here>/assets/modules/channel-web/inject.js”></script>
Here is the code:
<script src="http://localhost:3000/assets/modules/channel-web/inject.js"></script>
Once importing of the code is done, it is time to initialize the bot. With the below-mentioned script initialize it to the ‘window’ object:
<script>
    window.botpressWebChat.init({
        host: 'http://localhost:3000',
        botId: 'bank',
        hideWidget: false
      })
</script>
Still, miles to go…
Now you have finished creating your first Chatbot by using Botpress. After following the above steps the bot will be functional with the visible bot button. Remember you are still not done with the improvement of the bot for learning from user inputs and adjusting to different contexts. Botpress allows you to train the data model by following a concise path.
Botpress makes it easier to send new events, create new intents and corresponding queries and train the bot with more relevant phrases from time to time. The realization of Botpress capabilities mainly depend upon how well you add the layers of data to train and extend the scope of natural and intuitive conversation further.