
Blogs
Xamarin Mobile Apps Authentication using Xamarin.Auth – Gmail
 Overview
In almost every Mobile App, you would find a user login (or Sign In) and registration (or Sign Up) as a key feature. Registration can be achieved by prompting the user to enter his/her personal details (for example name, phone number, email, etc.) in a simple form by storing them in the custom Database. Depending on the need, sometimes filling up the form could be a reason why someone may like to defer on boarding with you. And hence providing an alternate option by making use of third party authentications like Google, Facebook, etc., for the user registration is an excellent choice.
Mobile Applications developed, using Xamarin, can take advantage of Xamarin.Auth component to avail registration facility by linking to social accounts such as Gmail, Facebook, Microsoft, and Twitter. Since the user is already authenticated using Xamarin.Auth authentication they can easily share or post applications related contents in the corresponding social media.
This article will provide you steps to build an application where a user can login with their Gmail Account and how to cache user login details so that subsequent logins can refer to cached data for authentication.
Prerequisites
Before we dive into creating an application we need to have the following prerequisites in place:
- Visual studio with Xamarin Components / Xamarin Studio
- Android SDK and
- Emulator/ Android player
What is oAuth?
oAuth 2.0 is an open standard for authentication, commonly used as a way to authorize applications to access user information on other application/website without sharing the passwords. For example, Facebook, Google, LinkedIn, Twitter, etc. allows the user to authorize an application to access the data of this user stored on their respective servers.
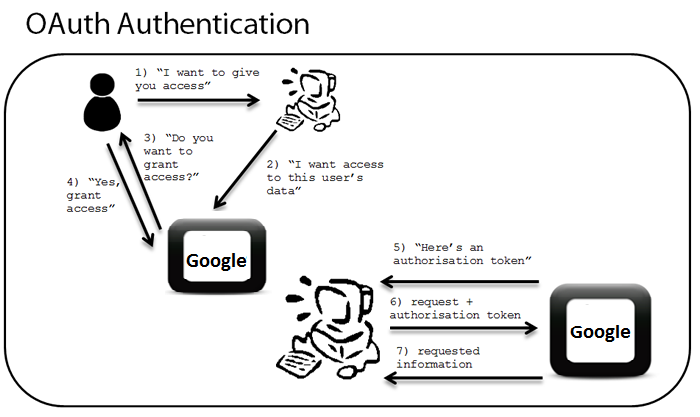
The below diagram depicts the oAuth authentication process
 Credit: http://www.nawrastech.com/wp-content/uploads/2013/03/oauth-authentication.png
Describing the above Diagram
Let’s briefly discuss the above diagram.
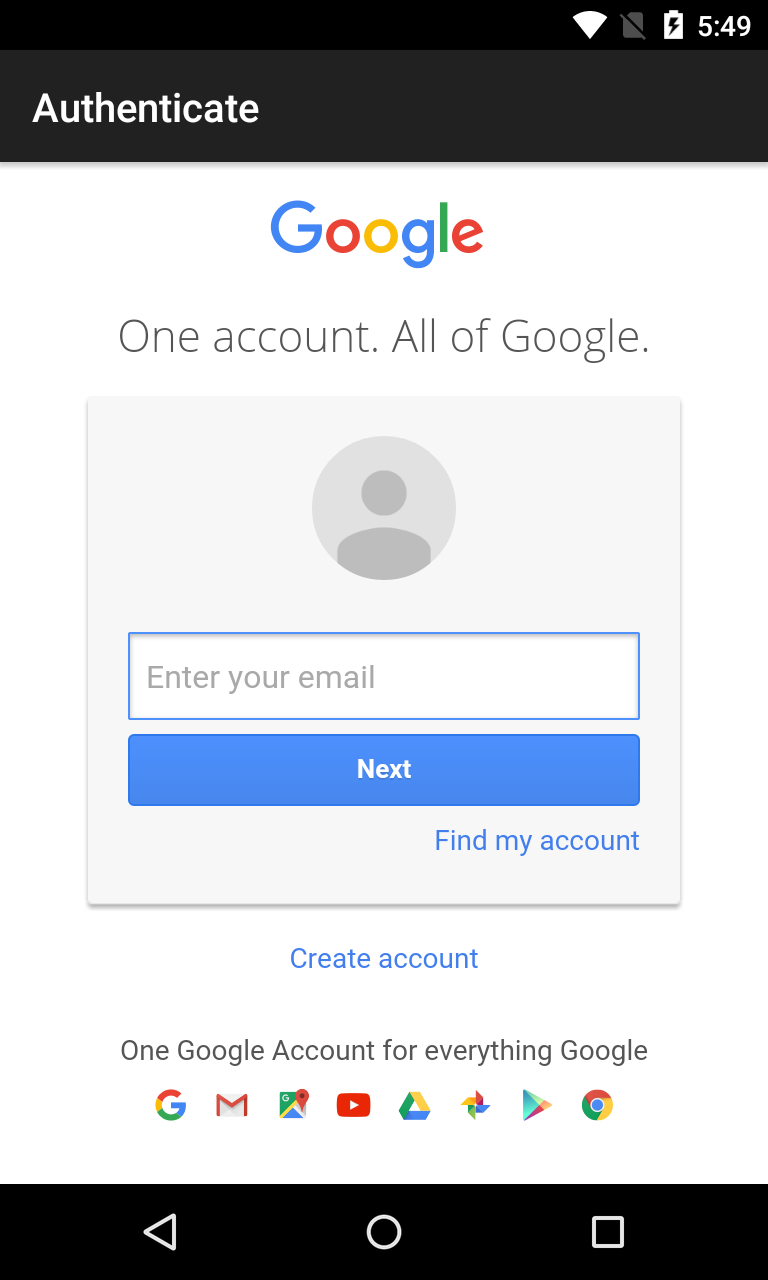
- When the user enters their credentials in the corresponding login page(shown in below screen), user would give access to their data to the application.
- The application will request the Resource owner (for example Gmail server) to give access to the corresponding user data once the user is logged in.
- In this step, Resource owner prompt the user with below dialog seeking their approval whether they are OK to give access to the application or not?
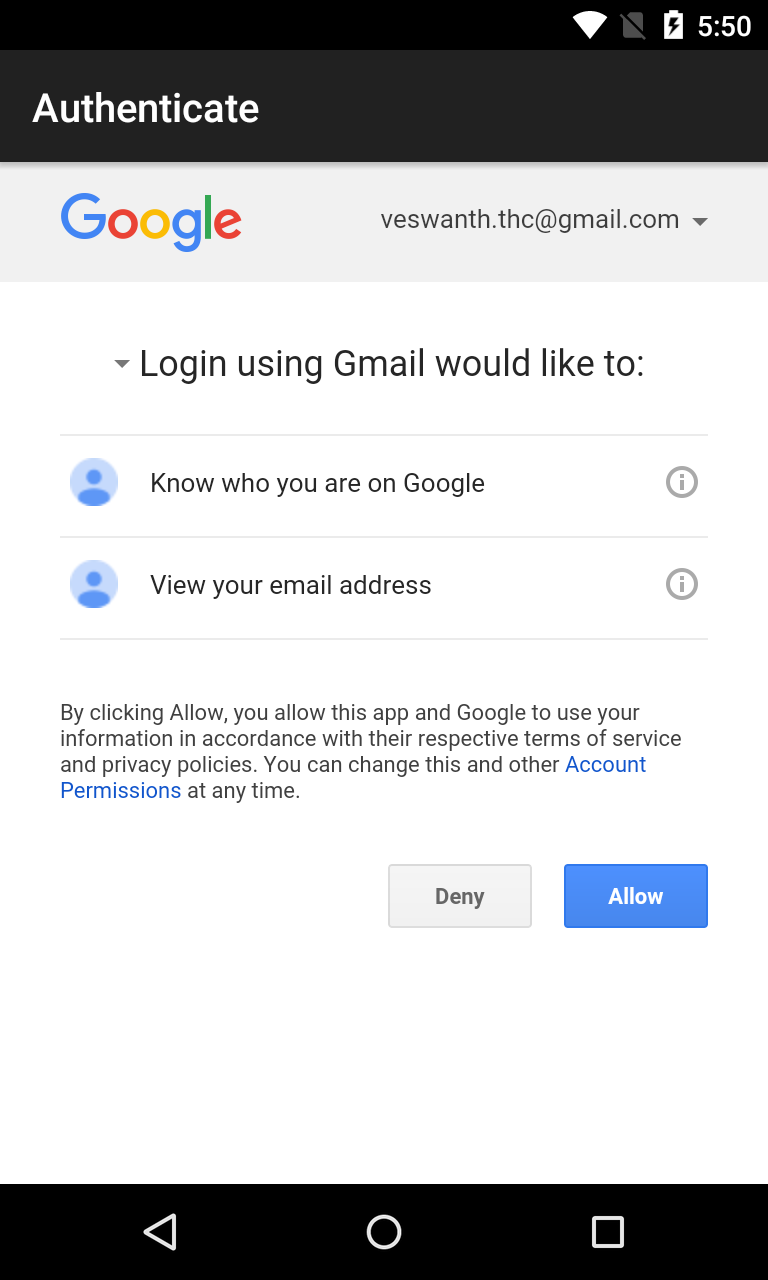
- When the user clicks on Allow the resource owner will get the Grant Access so that application can access the user data through the corresponding social account.
- So, after getting the Grant access the social account will provide the authorization token to the application.
- By using the authorization token, the application will request the required user information from the social account.
- Finally, a social account will provide the required user data. By using which the application will continue to work on.
What is Xamarin.Auth?
Xamarin.Auth is a cross-platform API that helps you to do social authentication based on oAuth. By using this we can authenticate users with social accounts such as Google, Microsoft, Facebook, and Twitter. Additionally, we can store certain details of their authorized accounts.
How to integrate Xamarin.Auth to a Mobile Application?
In order to integrate Xamarin.Auth component into our application, we need to do the following:
- App needs to be registered with social account servers (for example Gmail, Facebook servers) to get the Access token.
- Authenticating users by making use of Access Token and retrieve basic user information like email id, name, and profile pic etc.
Xamarin.Auth Component Integration with Gmail Account
In the first part of this article, we will be creating a mobile application and authenticating Google Account users using Xamarin.Auth component.
Registering on the Gmail Developer portal
Before developing an application we need to register an app in Google Developer Console in order to authenticate the user with Gmail. And, that can be achieved with the following steps:
- Sign into Google Developer Console and select Create an empty project, give your project name and click on Create.

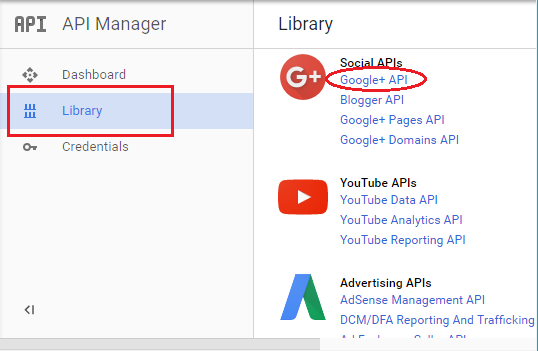
- And then click on Library on the left sidebar and select Google+ Api from Social Apis, as shown below:
- Now we can see the Google+ API window having an option ENABLE, click on it to enable the Google+ API.

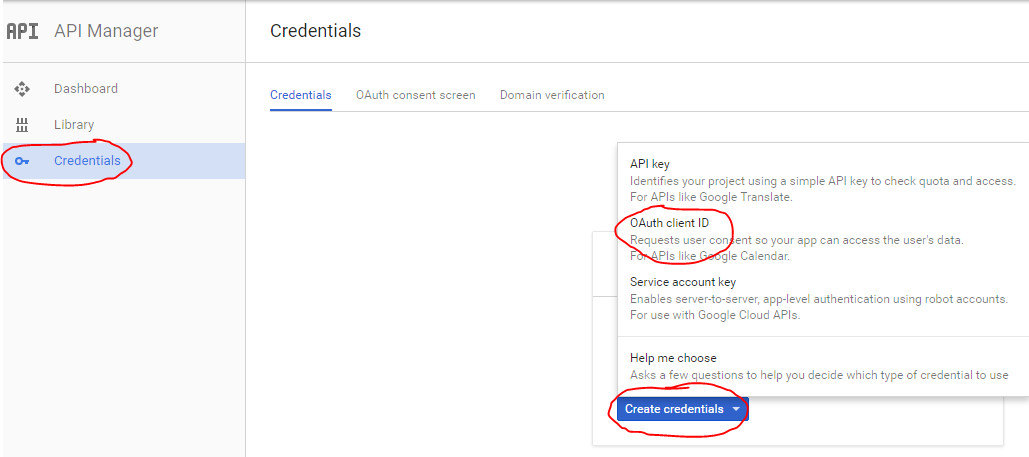
- Again from left sidebar menu, select Credential and click CREATE CREDENTIALS and select oAuthClientId, as shown below:
- Now, we can see the Configure consent screen button. Click on it.

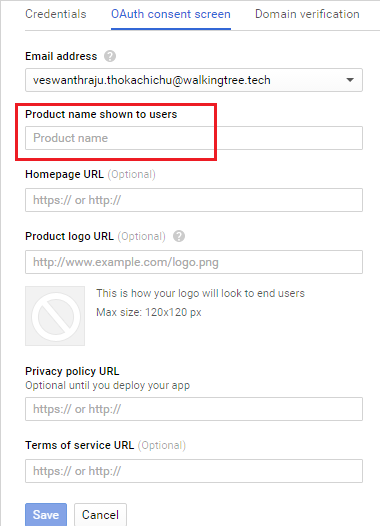
- The above step open ups the Consent screen. Enter product name (it could be any name), and click on save.
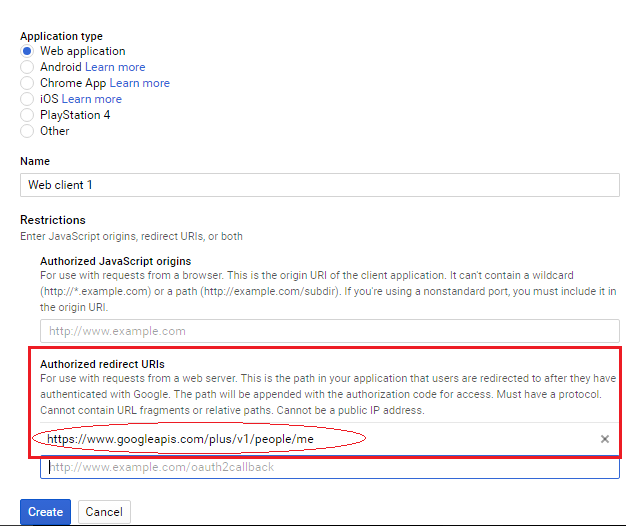
- Then it will again open the below screen where you can see the radio button asking for selecting the Application type. Select web application and mention a name in the Name field, say for example Web client 1, and give the AuthorizedRedirectURi’s as https://www.googleapis.com/plus/v1/people/me. Leave Authorized JavaScript origins field empty and click on Create button, as shown below:
- If we registered in developer console as an android application after making OAuth2Authenticator request it will show the window with message Please copy this code switch to your application and paste it there [code]. So, we manually need to close the window and proceed to authentication. To get rid of this web application type is chosen.
- The Popup appears with Client Id and Client Secret. Save them for use in your application code and click on OK button.
- Great! We have successfully integrated our app with Gmail Console Developer.
Adding Login Screen to App
For authenticating the user with different social apps we need to create buttons for each social app and link the click with the corresponding authentication process.
To do so, open the Main.axml file for editing, as shown below:.
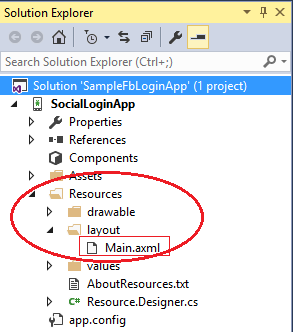
In Main.axml write the following AXML code to implement the button for Gmail.
<LinearLayout
     xmlns:android="http://schemas.android.com/apk/res/android"
     android:id="@+id/buttonPanel"
     android:layout_width="match_parent"
     android:layout_centerVertical="true"
     android:layout_height="wrap_content">
     <Button
        android:id="@+id/GmailButton"
        android:text="Login using Gmail"
        android:layout_width="wrap_content"
        android:layout_height="wrap_content" />
>
Gathering user info from Gmail
After creating an app in Developer Console we got the client ID for the application, which means we got permission to access the user info. Let us make use of the ID in our application and implement the following code in MainActivity.cs:
- Add below statement to find a view ( that was identified by the id attribute i.e. Resource.Id.Gmailbutton from the XML that was processed in Activity.OnCreate(Bundle). ) and assign it to gmailBtn inside OnCreate().
Button gmailBtn = FindViewById<Button>(Resource.Id.GmailButton);
- The application uses the OAuth2Authenticator and OAuth2Request classes, provided by Xamarin.Auth, to implement the application side of the authentication flow.
- Implement an authentication inside the click event handler for the button.
// you can find following readonly strings in Constants.cs file in the
//github project
// Pasted it here for ease of reference with the code
public static readonly string GMAIL_ID =
                          "***********.apps.googleusercontent.com";
public static readonly string GMAIL_SCOPE =
                         "https://www.googleapis.com/auth/userinfo.email";
public static readonly string GMAIL_AUTH =
                           "https://accounts.google.com/o/oauth2/auth";
public static readonly string GMAIL_REDIRECTURL =
                          "https://www.googleapis.com/plus/v1/people/me";
public static readonly string GMAIL_REQUESTURL =
                          "https://www.googleapis.com/oauth2/v2/userinfo";


gmailBtn.Click += GmailAuthentication;
private void GmailAuthentication(object sender, EventArgs e)
{
       var auth = new OAuth2Authenticator
                  (
                    GMAIL_ID,
                    GMAIL_SCOPE,
                    new Uri(GMAIL_AUTH),
                    new Uri(GMAIL_REDIRECTURL)
                   );

         //Allowing user to cancel authentication if he want to..
         auth.AllowCancel = true;

         //Used to launch the corresponding social Login page
         StartActivity(auth.GetUI(this));

         //It will fire Once we are done with authentication
         auth.Completed += async (sender, e) =>
         {
            //Fires when authentication is cancelled
             if (!e.IsAuthenticated)
             {
                 //Authentication failed Do something
                 return;
              }
             //Make request to get the parameters access
             var request = new OAuth2Request
                           (
                              "GET",
                               new Uri(GMAIL_REQUESTURL),
                               null,
                               e.Account
                           );
             //Get response here
             var response = await request.GetResponseAsync();
             if (response != null)
             {
                //Get the user data here
                var userData = response.GetResponseText();
              }
         };
}
- With the above code in place, we can authenticate the user with Gmail account and we can also get their user information.
Caching the User Data
Caching is a technique of storing frequently used data/information in memory, so that, when the same data/information is needed next time, it could be directly retrieved from the memory.
To achieve this we use accountstore in which data is stored securely by using the serviceId. The AccountStore class is responsible for storing Account information, backed by the KeyStore on Android.
Service ID
Saved Accounts are uniquely identified using a key composed of the account’s Username property and a Service ID. The “Service ID” is any string that is used when storing and fetching accounts from the store.
Here is the example code for making use of Service ID when saving, fetching and deleting the data from the store.
Save the data in a store
 Account account = new Account();
    AccountStore.Create(this).Save(account, "Gmail");
Fetch the saved data from a store
var cache = AccountStore.Create().FindAccountsForService("Gmail").FirstOrDefault();
Delete the data from the store
AccountStore.Create(this).Delete(cache, "Gmail");
Summary
This article explained how to enable a user to login to a mobile app using their own social app credentials without manually signing up for the app. We also discussed saving the user data securely inside the app store (cache), so that the user does not need to give the details every time they open the app.
In this article, we explored how to authenticate users with Gmail using Xamarin.Auth component. In the subsequent articles, we’ll be exploring Twitter and Facebook accounts.
WalkingTree is a Xamarin authorized consulting partner and we do recommend our enterprise customers to make use of Xamarin for cross-platform native application development. Do reach out to us for any professional support!
References
- For information on OAuth2Authenticator & OAuth2Request APIs refer to this link
- For information on Scope parameter of OAuth2Authenticator API.








It’s possible to use Xamarin.Auth with Identity Server 4 ?
No Xamarin.Auth doesn’t support it.
This won’t work anymore. Google has deprecated sign-ins using WebView which is what the Oauth2Authenticator fires.
Thanks for your comments.
I’ve checked with the current application source code @
( https://github.com/walkingtree/XamarinSamples/tree/master/Xamarin.Auth) , it’s still allowing gmail authentication and is working fine.
This is what google developers blog says “On April 20, 2017, we will start blocking OAuth requests using web-views for all OAuth clients on platforms where viable alternatives exist.”
We will write another article, which will show how to connect using gmail, after google blocks OAuth. Keep visiting our blog.
Wow! You dug deep on that research for this blog. Upon reading it and tried it but it was not working on me. I followed the steps correctly but I think I miss something.
Thank you very much for your comments.
Can you please let us know what exactly is not working for you , by providing screen shot or error message information, so that we can help you out with your issue?
hai Venkat,
you done a great work. It was most helped me. I want to get the gmail signed in user’s profile picture… is ti possible to get ?? Kindly tell me the way to do.. Thanks a lot.
Hello
Thanks for your comments. With the current scope declared in the program , we are already gathering profile picture information. Please refer to the screen shot at this link (https://github.com/walkingtree/XamarinSamples/blob/master/Xamarin.Auth/Gmail%20Profile%20Image%20Information.png ) for method information. All we need to do is to display the image in a separate Activity. Let me know if you still need any more information on the same.
Hi ,
I’m doing exactaly to my xamarin.ios, the login page works fire but the event auth.Completed never fire. Is there any solution for this?
Below is my Login Code
public static void LoginToFacebook(UIViewController view)
{
dialog = view;
string status=””;
var auth = new OAuth2Authenticator(
clientId: “id”,
scope: “email”,
authorizeUrl: new Uri(“https://m.facebook.com/dialog/oauth/”),
redirectUrl: new Uri(“http://www.facebook.com/connect/login_success.html”));
auth.AllowCancel = true;
auth.Completed += OnAuthenticationCompleted;}
dialog.PresentViewController((UIViewController)auth.GetUI(),true,null);
}
You can add following lines of code to know about error conditions.
auth.Error += (sender, e) =>
{
// do error handling here.
System.Diagnostics.Debug.WriteLine(“error: ” + e.Message);
};
Hope this information helps.
thanks for reply, turn out it’s a xamarin.auth bug . I’ve just found it here.
https://github.com/xamarin/Xamarin.Auth/issues/151
I would like to thank you for this amazing article, I am a .net developer who recently chooses xamarin.form to do my first application, actually, Xamarin is an extremely powerful and flexible tool.