Blogs
Consuming Microsoft Azure Cognitive Services in Xamarin.Android Application
Overview
Customer service rating plays an important role in determining user satisfaction with the company’s service. There are several techniques are already in place in the market to determine the same. In this article, we will explore how to capture customer’s emotion and which will help in calculating the service rating.
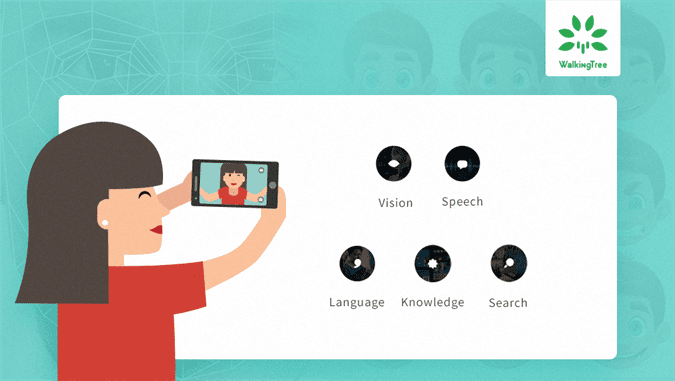
Microsoft provides many different cognitive services which we can consume in applications. In this write-up, we’ll use One such cognitive service i.e., Emotion. Using Emotion API we can analyze faces and detect a range of feelings of the user to help rate the service. The app uses the camera to get a photo of the user’s face and calculates a rating for the service based on happiness. The more you smile, the better you rate the service.
Emotions are understood to be cross-culturally and universally communicated with particular facial expressions. The emotions detected by Microsoft Azure Cognitive Service emotion API are anger, contempt, disgust, fear, happiness, neutral, sadness, and surprise.
In this article, you will develop a Xamarin.Android application and integrate it with One of the Cognitive Services API i.e., Emotion API.
Here are the steps you need to follow in order to make this happen.
Steps
This article is inspired by the mini-hacks of Microsoft cognitive services, written by Mike James. In this article, we play around with this code and see how it works in reality.
- Generating Emotion API Key
- Implementation
Generating Emotion API Key
The first step here is to subscribe to Emotion API and get an API key. The same API key will be used in Xamarin.Android application. Please follow the below steps to get the API key.
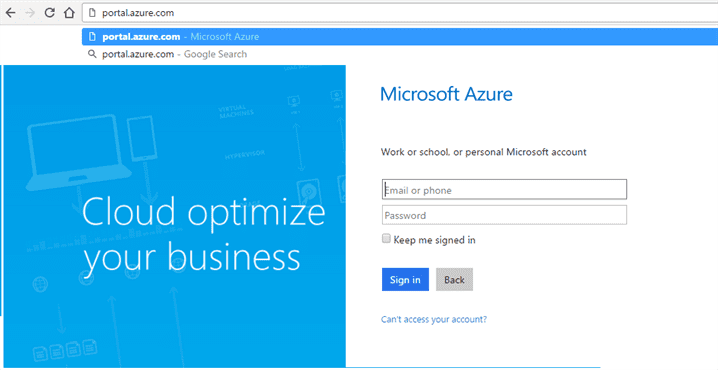
- Sign into Azure Portal ( if you don’t have an account Signup by clicking here).
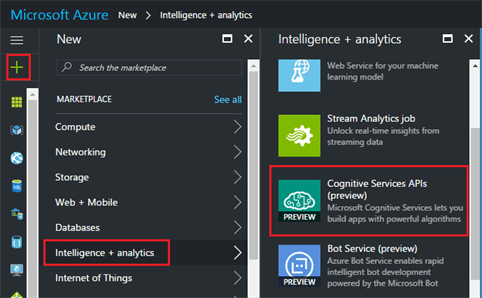
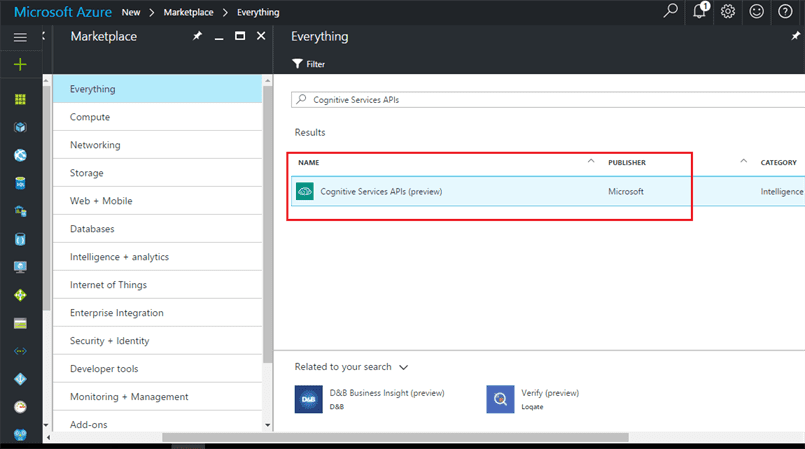
- After login, you will be redirected to the Azure portal and click on + icon on left sidebar and click on Intelligence + analytics and then on Cognitive Service APIs as shown below.
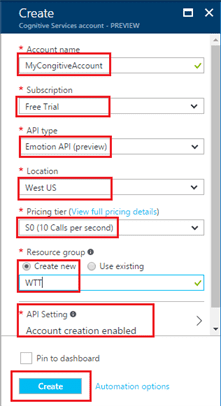
- Click on the create button as shown below.
 Fill in the required fields data as shown in below picture to create Emotion API , and click on create.
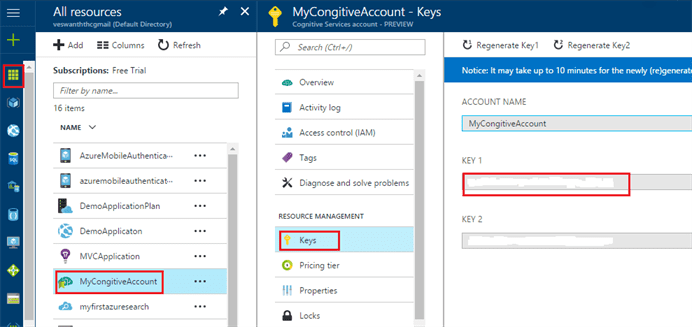
- Now you have successfully generated Emotion API keys in Azure portal and you can find those values by clicking on the All Resource icon on the left sidebar and select the API (with the name you have given) and then click on the Keys as shown below. Copy the anyone Key value, we will make use of it later.
Implementation
- Add the following Nuget packages to project in the specified order.
- Microsoft.Bcl.Build – This package provides build infrastructure components so that projects referencing specific Microsoft packages can successfully build.
- Microsoft.ProjectOxford.Emotion – This package contains Microsoft Cognitive Services Emotion Recognition Client Library.
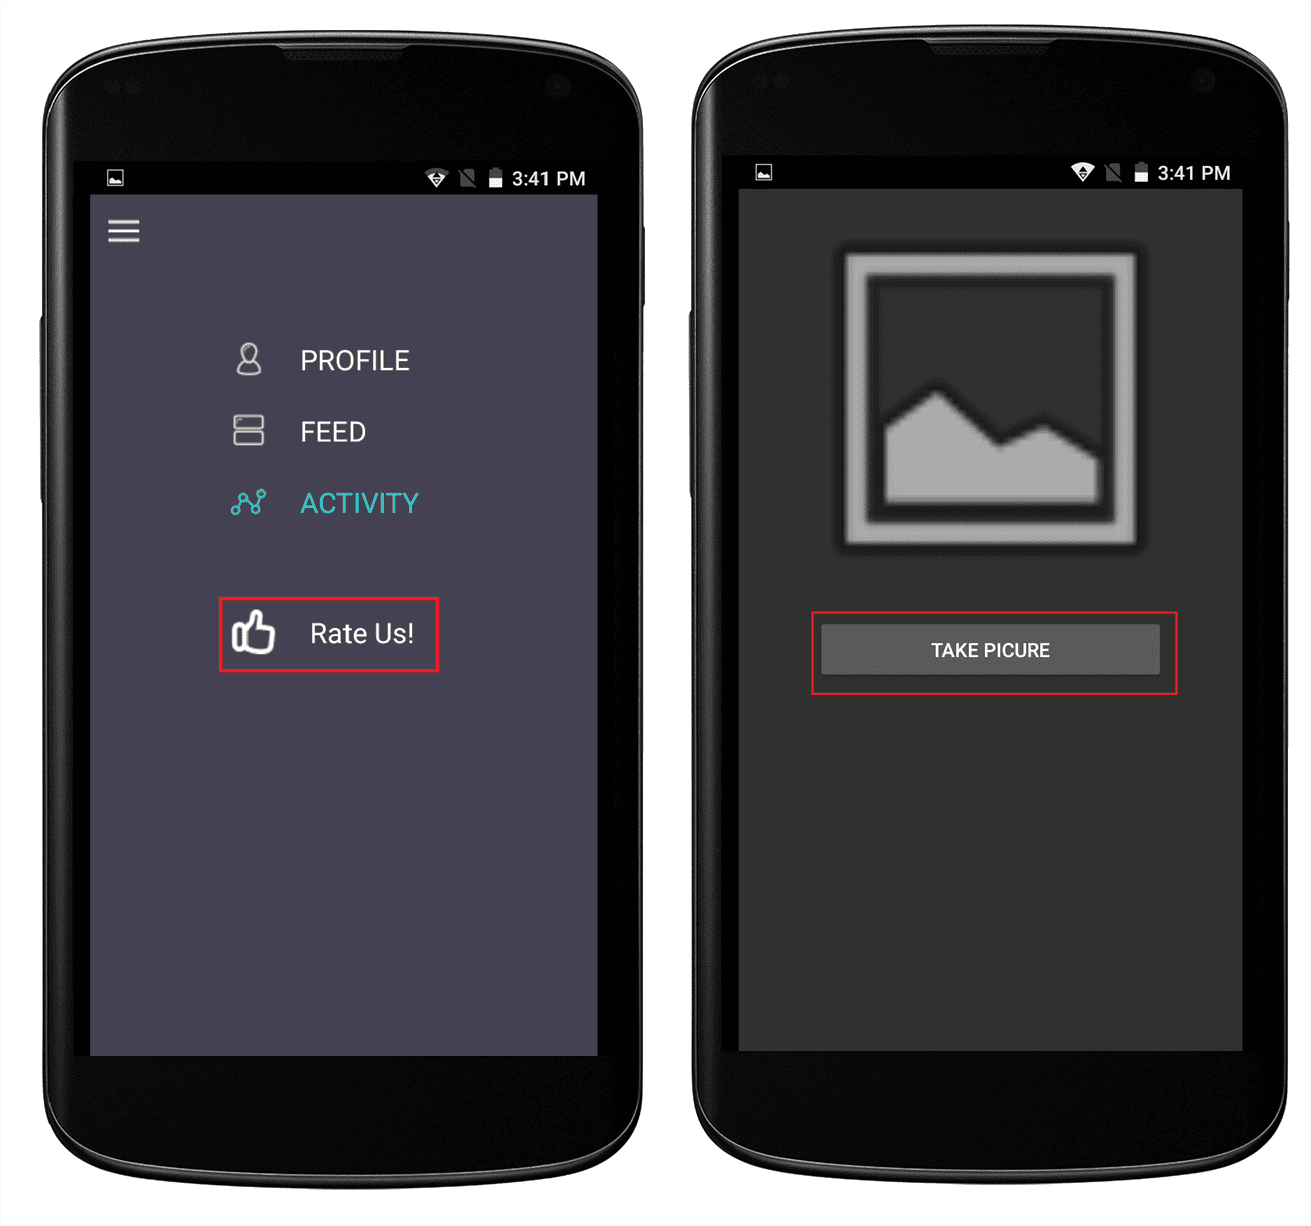
- Open MainActivity.cs you can see the click event for RateAppButton in OnCreate() replace that event with the following line of code.
RateAppButton.Click += (sender, e) => {
                   StartActivity(typeof(RatingUs_Activity));
            };
- Create a new layout file inside Resource? layout with name rateus_layout.axml and paste the below code.
<?xml version="1.0" encoding="utf-8"?>
<LinearLayout xmlns:android="http://schemas.android.com/apk/res/android"
    android:orientation="vertical"
    android:layout_width="match_parent"
    android:layout_height="match_parent">
    <ImageView
        android:src="@android:drawable/ic_menu_gallery"
        android:layout_width="match_parent"
        android:layout_height="300dp"
        android:id="@+id/imageView1"
        android:adjustViewBounds="true"/>
    <Button
       android:id="@+id/GetPictureButton"
       android:layout_width="250dp"
       android:layout_height="wrap_content"
       android:text="Take Picture"
       android:layout_gravity="center_horizontal"/>
     <TextView
       android:textAppearance="?android:attr/textAppearanceLarge"
       android:layout_width="wrap_content"
       android:layout_gravity="center_horizontal"
       android:layout_height="wrap_content"
       android:id="@+id/resultText"
       android:textAlignment="center"
       android:layout_margin="20dp"/>
    <TextView
       android:textAppearance="?android:attr/textAppearanceLarge"
       android:layout_width="wrap_content"
       android:layout_gravity="center_horizontal"
       android:layout_height="wrap_content"
       android:textSize="50dp"
       android:id="@+id/resultValue"
       android:textAlignment="center"
       android:layout_margin="2dp"/>
</LinearLayout>
- Create a class with name BitmapHelper.cs and replace its source code with the below code snippet:
using Android.Graphics;
using Android.Media;

namespace GuillotineMenuTestApp
{
    class BitmapHelpers
    {
        public static Bitmap GetAndRotateBitmap(string fileName)
        {
             Bitmap bitmap = BitmapFactory.DecodeFile(fileName);
             using (Matrix mtx = new Matrix())
              {
                if (Android.OS.Build.Product.Contains(emulator))
                 {
                     mtx.PreRotate(90);
                 }
                else
                 {
                    ExifInterface exif = new ExifInterface(fileName);
                    var orientation =  (Orientation)exif
                                             .GetAttributeInt(
                                                   ExifInterface.TagOrientation,
                                                  (int)Orientation.Normal);

                     switch (orientation)
                      {
                         case Orientation.Rotate90:
                              mtx.PreRotate(90);
                              break;
                         case Orientation.Rotate180:
                              mtx.PreRotate(180);
                              break;
                         case Orientation.Rotate270:
                              mtx.PreRotate(270);
                              break;
                         default:
                              break;
                      }
                  }

                  if (mtx != null)
                            bitmap = Bitmap.CreateBitmap(
                                              bitmap, 0, 0,
                                              bitmap.Width, bitmap.Height,
                                              mtx, false);
                   }
                   return bitmap;
          }
     }
 }
Credit: https://github.com/xamarin/mini-hacks/blob/master/microsoft-cognitive-services/Android.md
- Above class ensures that images will be sent to emotion API in portrait mode.
- Create a new activity with the name as RatingUs_Activity.cs and paste the following code to Integrating camera with your application for the button click.
using Android.App;
using Android.Widget;
using Android.OS;
using Android.Graphics;
using Android.Content;
using Android.Provider;
using Java.IO;
using System;
using Android.Support.V7.App;
using Android.Content.PM;
using System.Collections.Generic;
using Builder = Android.Support.V7.App.AlertDialog.Builder;

namespace GuillotineMenuTestApp
{
    [Activity(Label = "RatingActivity")]
    public class RatingUs_Activity : AppCompatActivity
    {
        public static File file;
        public static File dir;
        public static Bitmap bitmap;
        private ImageView imageView;
        private Button pictureButton;
        private TextView resultValue;
        private TextView resultTextView;
        private bool isCaptureMode = true;
        private Builder alert;

        protected override void OnCreate(Bundle savedInstanceState)
        {
            base.OnCreate(savedInstanceState);
            SetContentView(Resource.Layout.rateus_layout);

            resultTextView = FindViewById<TextView>(Resource.Id.resultText);
            resultValue = FindViewById<TextView>(Resource.Id.resultValue);
            imageView = FindViewById<ImageView>(Resource.Id.imageView1);
            pictureButton = FindViewById<Button>(Resource.Id.GetPictureButton);

            alert = new Builder(this);
            if (IsThereAnAppToTakePictures())
            {
               CreateDirectoryForPictures();
               pictureButton.Click += OnActionClick;
            }
        }

        private void CreateDirectoryForPictures()
        {
            dir = new File(
                   Android.OS.Environment.GetExternalStoragePublicDirectory(
                                Android.OS.Environment.DirectoryPictures),
                                "CameraAppDemo"
                           );
            if (!dir.Exists())
            {
                dir.Mkdirs();
            }
        }

        private bool IsThereAnAppToTakePictures()
        {
            Intent intent = new Intent(MediaStore.ActionImageCapture);
            IList<ResolveInfo> availableActivities =
                              PackageManager.QueryIntentActivities
                              (
                                     intent,
                                     PackageInfoFlags.MatchDefaultOnly
                              );
             return availableActivities != null &&
             availableActivities.Count > 0;
        }

      private void OnActionClick(object sender, EventArgs eventArgs)
       {
         if (!isCaptureMode)//submit new Image button clicked!
         {
             imageView.SetImageBitmap(null);
             if (bitmap != null)
              {
                 progressView.Visibility = ViewStates.Invisible;
                 bitmap.Recycle();
                 bitmap.Dispose();
                 bitmap = null;
              }
          }
           // Take Picture
           CaptureImage();
        }
        public void CaptureImage()
        {
               alert.SetTitle("Access Camera!");
               alert.SetMessage("Are you sure to access camera for this app");
               alert.SetPositiveButton("Allow", (senderAlert, args) => {
               Intent intent = new Intent(MediaStore.ActionImageCapture);
               file = new File(dir, String.Format(
                                         "myPhoto_{0}.jpg",
                                          Guid.NewGuid()
                                      )
                                 );
               intent.PutExtra(MediaStore.ExtraOutput,
               Android.Net.Uri.FromFile(file));
               StartActivityForResult(intent, 0);
            });

            alert.SetNegativeButton("Deny", (senderAlert, args) => {
               Toast.MakeText(this, "Cancelled!", ToastLength.Short).Show();
            });

            Dialog dialog = alert.Create();
            dialog.Show();
        }
     }
 }
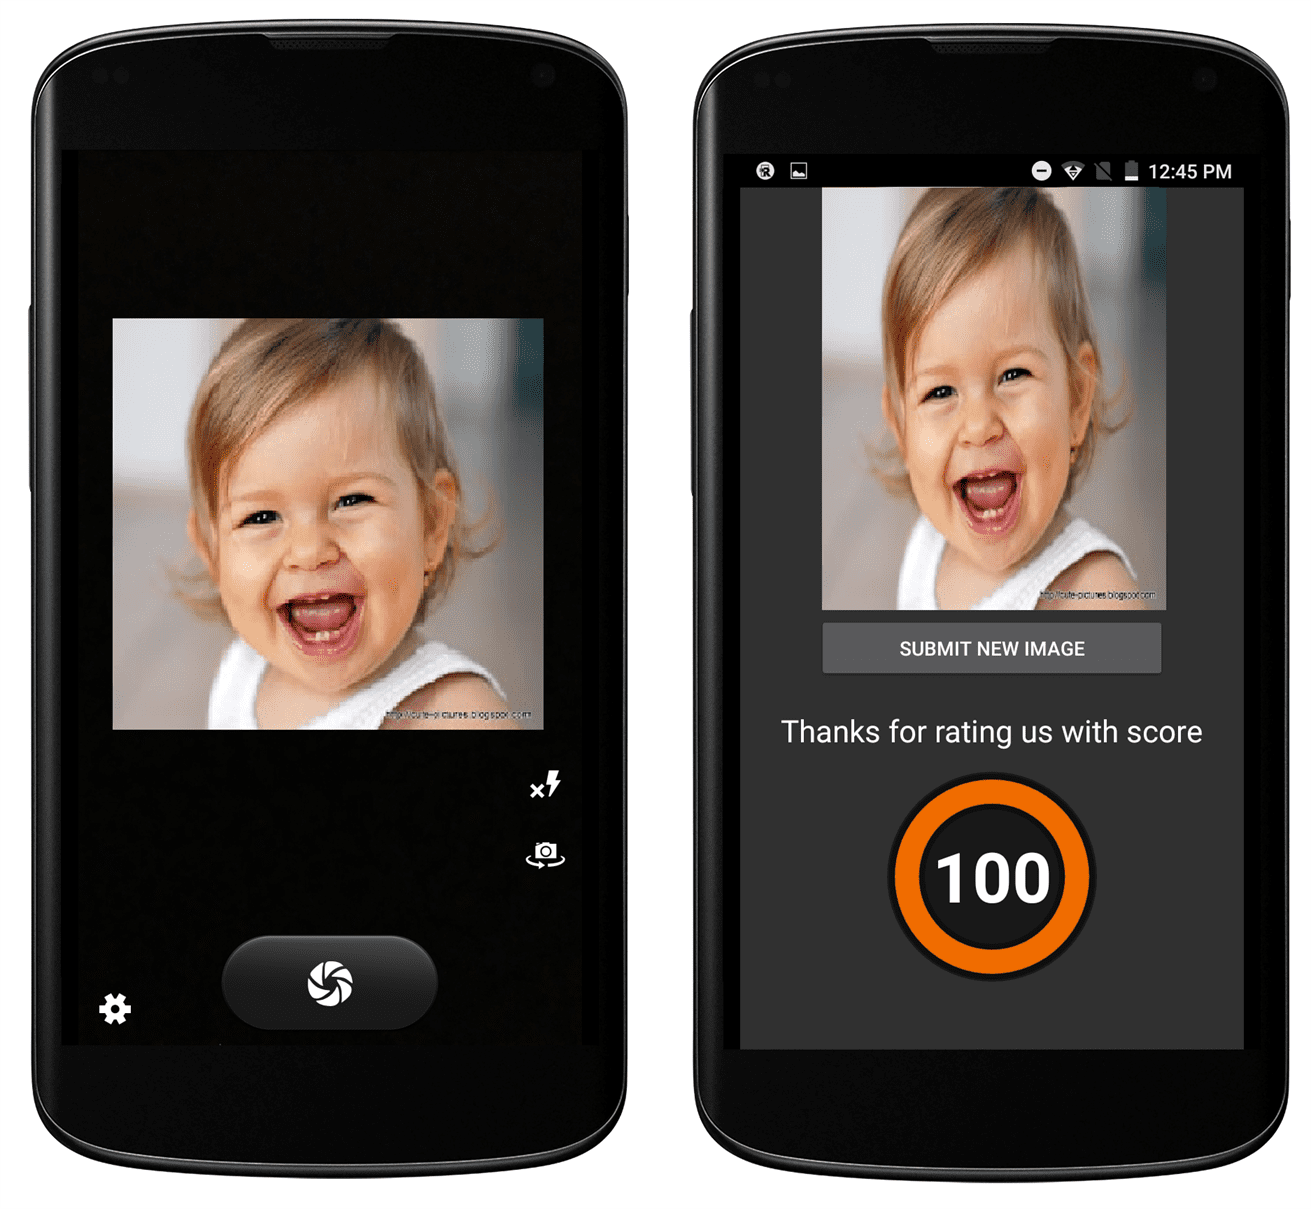
- Send the captured image as a stream to Emotion API to get the happiness result. To achieve the same implement the OnActivityResult() inside the RatingUs_Activity.cs
protected override async void OnActivityResult(int requestCode, Result resultCode, Intent data)
        {
            base.OnActivityResult(requestCode, resultCode, data);
            try
            {
                //Get the bitmap with the right rotation
                bitmap = BitmapHelpers.GetAndRotateBitmap(file.Path);

                //Resize the picture to be under 4MB
                //(Emotion API limitation and better for Android memory)
                bitmap = Bitmap.CreateScaledBitmap(
                                      bitmap, 2000,
                                      (int)(2000 * bitmap.Height / bitmap.Width),
                                      false
                                 );

                //Display the image
                imageView.SetImageBitmap(bitmap);

                //Loading message
                resultTextView.Text = "Loading";
                pictureButton.Enabled = false;

                using (System.IO.MemoryStream stream = new System.IO.MemoryStream())
                {
                    //Get a stream
                    bitmap.Compress(Bitmap.CompressFormat.Jpeg, 90, stream);
                    stream.Seek(0, System.IO.SeekOrigin.Begin);

                    //Get and display the happiness score
                    var result = await Emotion_Helper. GetAverageHappinessScore(stream);
                    resultTextView.Text = "Thanks for rating us with score";
                    resultValue.Text = Emotion_Helper.GetHappinessMessage(result).ToString();
                }
            }
            catch (Exception)
            {
                resultTextView.Text = "Please try again";
            }
            finally
            {
                pictureButton.Enabled = true;
                pictureButton.Text = "Submit New Image";
                isCaptureMode = false;
            }
        }
Credit:https://github.com/xamarin/mini-hacks/blob/master/microsoft-cognitive-services/Android.md
NOTE: We are resizing image size to below 4MB because Emotion API will not process images > 4MB and treats them as Invalid Image.
- Create a class with the name Emotion_Helper.cs and replace with the following code.
using Microsoft.ProjectOxford.Emotion;
using Microsoft.ProjectOxford.Emotion.Contract;
using System;
using System.IO;
using System.Linq;
using System.Threading.Tasks;

namespace RatingApp.Helpers
{
   static class Emotion_Helper
   {
      public const string AzureKey = "<Give your azure key here>";

      private static async Task<Emotion[]> GetHappiness(Stream stream)
      {
         var emotionClient = new EmotionServiceClient(AzureKey);
         var emotionResults = await emotionClient.RecognizeAsync(stream);

         if (emotionResults == null || emotionResults.Count() == 0)
         {
            throw new Exception("Can't detect face");
         }
         return emotionResults;
      }

      //Get the Emotion here
      public static async Task<float> GetAverageHappinessScore(Stream stream)
      {
          var emotionResults = await GetHappiness(stream);
          float happiness = 0.0f;
          foreach (var emotionResult in emotionResults)
          {
             //emotion score here
             happiness = happiness + emotionResult.Scores.Happiness;
          }
             //Average incase multiple faces
             return happiness / emotionResults.Count();
      }

      public static int GetHappinessMessage(float score)
      {
         int iHappinessScore = 1; // Bare Minimum rating is 1.
         double result = Math.Round(score * 100, 0);

         if (result <= 20)
         {
            iHappinessScore = 1;
         }
         else if (result > 20 && result <= 40)
         {
            iHappinessScore = 2;
         }
         else if (result > 40 && result <= 60)
         {
            iHappinessScore = 3;
         }
         else if (result > 60 && result <= 80)
         {
            iHappinessScore = 4;
         }
         else if (result > 80 && result <= 100)
         {
            iHappinessScore = 5;
         }
         return iHappinessScore;
      }
   }
}
Credit:https://github.com/xamarin/mini-hacks/blob/master/microsoft-cognitive-services/Android.md
- Make sure you assign the value of Emotion API Key generated in the first step to AzureKey property as highlighted in the above code.
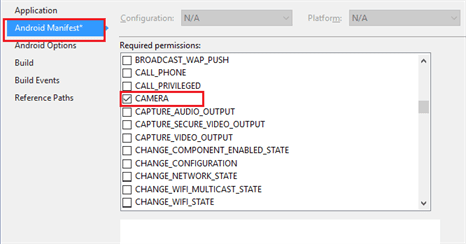
- Right click on the Android Project and select Properties to grant the following Permissions:
- CAMERA
 INTERNET
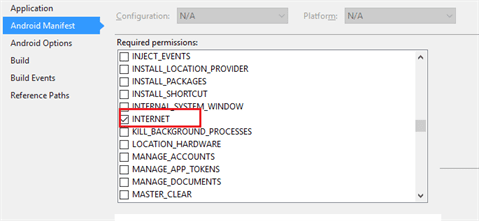
- WRITE_EXTERNAL_STORAGE
That’s it! Now build and run the application by clicking on F5.
 Summary
This article explained how to consume Microsoft Azure Cognitive Services in Xamarin.Android application. We also discussed specific cognitive service i.e., consumption emotion API and how we can use this for rating service in B2C applications.
References
- For more information on “Getting Started with Xamarin and Azure Webinar by Mike James” refer to this link and this link
- For more information on Android Mini Hacks using Azure – refer to this link
- For more information on – Integrating Camera with Xamarin.Android refer to this link
- For more information on – Microsoft Cognitive Services refer to this link.