Blogs
Setup a Private Windows Store for Business
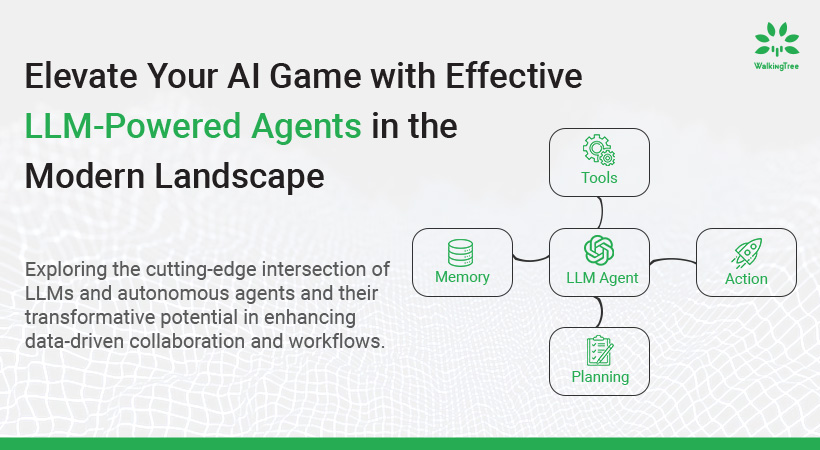
Introduction
In an organization, it is often required to distribute apps privately, accessible only to a selected audience. Microsoft offers a great way to distribute private apps across desktops or mobiles running Windows 10. This feature is called Private Store and is available in Microsoft Store for Business or Education. The private store can be accessed through the Windows Store application once we log in with Azure Active Directory credentials provided by the organization.
In this article, we will be looking at the steps to create a private store and accessing the private store on a Windows 10 machine. Creating a private store requires a working Azure account, with an Active Directory (AD) set up and a user with a Global Administrator role under the AD.
Create Azure account
Similar to the famous quote from LOTR – “One Ring to rule them all”, Microsoft provides a single account to be used to sign up to any of its services. If you do not already have a Microsoft account, go ahead and create one at https://account.microsoft.com/account.
The best place to start with Azure is by signing up for a free account at https://azure.microsoft.com/en-in/free/ using your Microsoft Account. Microsoft sets you up with a default Active Directory when you first sign up.
Before we move onto creating a Global administrator, we can add the corporate domain name(s) that the organization uses to do business with the Azure AD. This allows us to assign user names in the directory with the organization’s domain name. For this article we will use the default domain name (of the form <youraccountname>.onmicrosoft.com) that Azure creates (which can be found under Azure Active Directory > Manage > Domain Names).
For adding a custom domain you can refer this article.
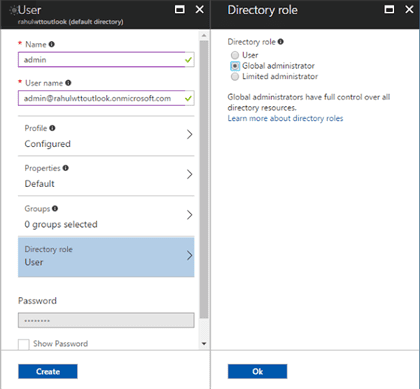
Create Global Administrator
- On the Azure portal navigate to Azure Active Directory > Users and Groups > All users
- Choose New user and fill in the form
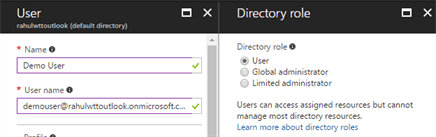
- Name: admin
- User name: admin@<youraccountname>.onmicrosoft.com
- Choose the Global Administrator as the Directory role
- Copy the password that is generated and hit Create. This creates a user under Global Administrator role.
 We will create one more user same way as mentioned above making sure Directory role selected to be User. This user will be used to access our private store later.
 Set up the Private Store
Signing up
As mentioned, only a global administrator can sign up for the store. So, we need to sign out of the current user in the Azure portal (Make sure to grab the global administrator credentials before signing out), then sign back in using the global administrator credentials. We will be prompted to update the password. A private store can be set up under Windows Store for Business or Education. In this article, we will be setting up under Windows Store for Business.
Once signed in, open a new tab in the browser and go to the Windows Store for Business website. Click on Sign In. This automatically redirects to the signup page. Review and accept the services agreement. That’s it! We are signed up for the private store.
Setup
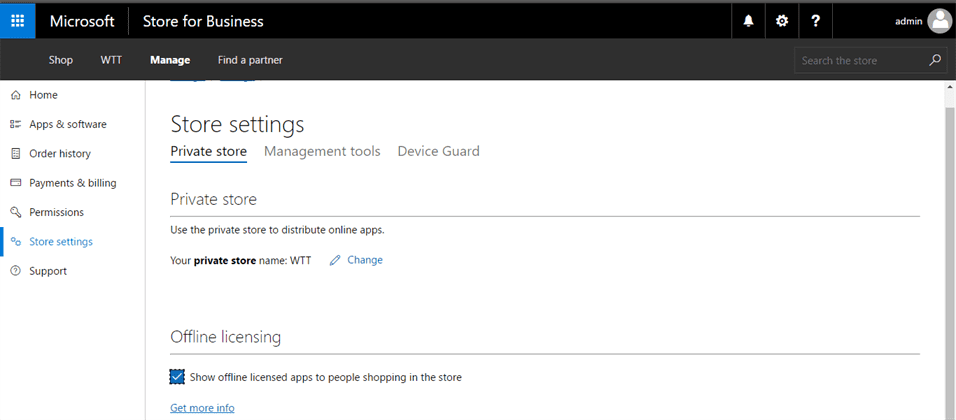
As part of the Setup, we will rename the private store to match the name of the organization and add some apps to our store.
To rename the private store navigate to Manage > Store settings > Private Store. Click on Change and type in the organization’s name or whatever name you want to give to it. You also can choose to show offline licensed apps in the store.
More on licensing model can be found in the article about Business Store.
 Add apps to the store
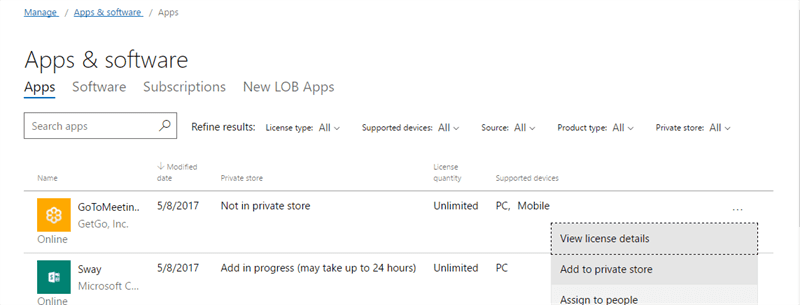
What is the use of creating a private store if we do not have any apps in it? By default, the store provides some apps that are directly added to the private store (Though adding to the private store process takes up to 24 hours to complete). We can see these apps by navigating to Manage > Apps & Software > Apps.
We can acquire more apps for our store in two ways.
- Purchasing from the shop
- Inviting line-of-business (LOB) publishers to the organization
We will see both in detail below.
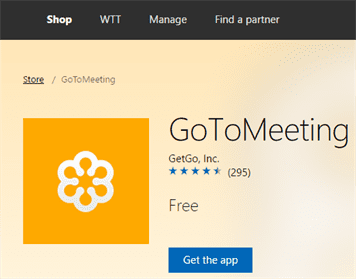
Purchasing from the Shop
This is pretty straight forward. Navigate to Shop on the Store for Business portal and choose the app that you want to purchase. For some apps, we will be given an option for the license type. Choose the appropriate license type that you want to acquire then click on “Get the app”.
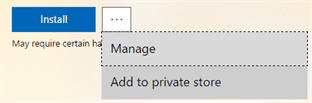
 This does not automatically add this app to the private store. We can do so directly after the purchase by clicking the “…” button beside Install and choosing “Add to private store” or at a later point go to Manage > Apps & software > Apps click on “…” button and choose “Add to private store” at the end of the row for the app you want to add to the private store. This again takes around 24 hours to process.
Inviting LOB publishers
A LOB (line-of-business) is a general term that describes the products or services offered by a business or manufacturer. The LOB publishers are the people who create and publish the apps.
To invite publishers to the store navigate to Manage > Permissions > Line-of-business publishers and click on “Invite” and enter the email address of the person who has a Microsoft developer account. This allows the developer to submit LOB apps to our store, which we can then add to our private store for everyone in the organization to download. Once the developer submits an app to our store, we can see it in our list of apps. We can choose to add it to the private store same way as mentioned above.
 Accessing the private store
We can access the private store in two ways.
- On a machine, while installing Windows 10 Enterprise edition, we can choose to “AD join” to the organization account. Or if the Windows 10 Enterprise is already installed then sign in to the Organization’s account from the settings.
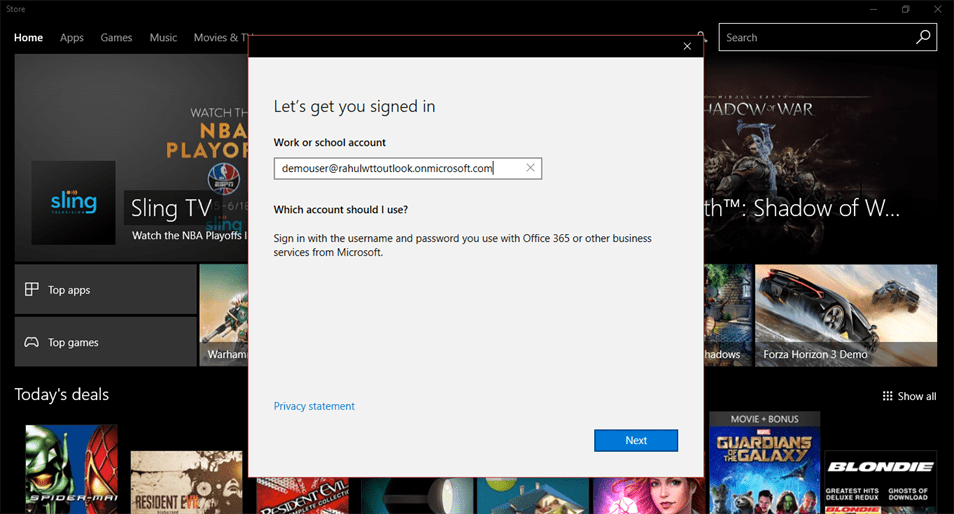
- We can also directly sign in from the Windows Store app using our organization’s account to access the store. Available on a Windows 10 Professional or higher.
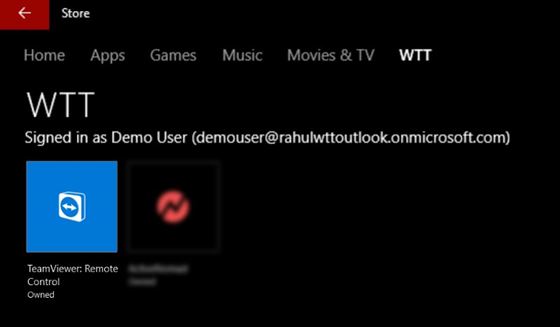
In this article, we will be doing the latter i.e., we will sign in to the Windows Store app. To do so, open the Windows Store application, click on the user icon and choose “Sign In” and choose “Add a work or school account”. Enter the credentials provided by our organization to sign into the private store. Once signed in, the private store will be visible as a tab in the Store app with the private store name that we set up in the previous step. All the apps that we pushed into the private store, once processed, will appear here under this tab.
 Conclusion
In this article, we have seen how to setup a private store for our organization and how to access the same from a Windows 10 device. This allows an organization to seamlessly distribute the required apps and software to its employees and to push the updates to them via the store.
![]()