Blogs
Setup Private Ethereum Node On macOS
Ethereum is popular platform for the cryptocurrency. In order to ensure that your contract will run perfectly on the main network, it is important to test them on ethereum node by setting up an appropriate private node.
As part of my previous article, you learned how to setup ethereum development environment on macOS. Continuation to that, in this article you will learn how to setup private ethereum node on macOS.
Prerequisites
Details
To setup private ethereum node following are the steps:
- Creating genesis block
- Initialization of private node
- Creating accounts
- Starting private node
- Initializing console for private node
- Commonly used command for geth console
- Making transactions between two accounts and checking their balances
- Stop private node
You will see the details about each step below:
To store accounts and database for private node we need to create a directory as below,
mkdir <directory name>
As part of this article I will create directory name as ‘private’
mkdir private
Change directory to blockchain,
cd private
1. Creating the genesis block
- Genesis block is the first block of Blockchain
- It defines initial behaviour for your private node
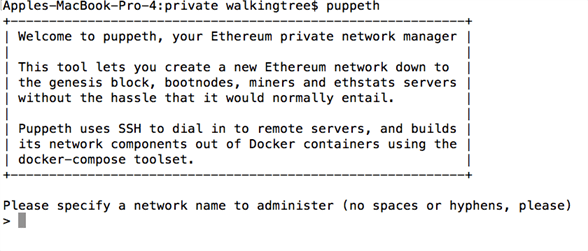
- In order to compliant genesis block with geth, we will use Puppeth tool
- Puppeth – Command line tool, comes by default with geth
- Run following command in the terminal from private directory created above:
puppeth
This will show below output in the terminal:
- Below images will show you different options and their correct values, follow these images for more details:

- Now type control + c to exit from the tool.
- With this, your genesis block is created successfully
- To see the content of private directory type below command:
ls
- This will show you your genesis block with name walkingtree.json:
2. Initialization of private node
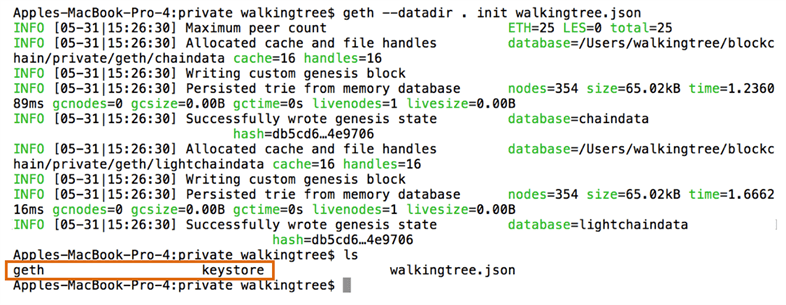
- To initialize private ethereum node you need genesis file, let’s use walkingtree.json created in the earlier step
- Use below command to create a private node:
geth –datadir . init walkingtree.json
- Following are the explanation for each parameter options
- –datadir parameter represent data directory, used to store private node data will be saved
- . (dot) represents the current directory
- Init parameter to specify genesis block to initialize a private node
- Note – Make sure you run above command from the private directory
- After executing above command, below two new directories will be created
- geth – Stores blockchain instance data
- keystore – Stores your accounts on node
- Type below command to see content of private directory:
ls
3. Creating accounts
- Use below command to create a new account:
geth –datadir . account new
- After executing above command, it will ask you for password, provide it, see below image for reference:
-
- Above step will create a new account, you can run above command as many times as many numbers of accounts you need.
- As part of this article, I will create another account so that we can transfer some ether to another account.
- See below image for another account created:
- Your newly created accounts are stored in keystore directory, run below command to see the content of keystore directory:
ls keystore/
See below image for output:

4. Starting private node
- To start our private ethereum node, create a file with name startmynode.sh in private directory.
- Copy below command into the file and save
geth –networkid 4224 –mine –minerthreads 1 –datadir “~/blockchain/private” –nodiscover –rpc –rpcport “8545” –port “30303” –rpccorsdomain “*” –nat “any” –rpcapi eth,web3,personal,net –unlock 0 –password ~/blockchain/private/password.sec –ipcpath “~/Library/Ethereum/geth.ipc”
- Make startmynode.sh executable using below command:
sudo chmod +x startmynode.sh
- To understand geth command line options refer to the below URL:
https://github.com/ethereum/go-ethereum/wiki/Command-Line-Options - Have an eye on following things when starting the network:
- Starting peer-to-peer node
- Initialised chain configuration (config=”{ChainID: 4224 Homestead: 1 DAO: <nil> DAOSupport: false EIP150: 2 EIP155: 3 EIP158: 3 Byzantium: 4 Constantinople: <nil> Engine: ethash}”)
- Initialising Ethereum protocol (versions=”[63 62]” network=4224)
- IPC endpoint opened (url=/Users/walkingtree/Library/Ethereum/geth.ipc)
- HTTP endpoint opened (url=http://127.0.0.1:8545)
- Unlocked account (address=0x1FDaD4949E4409c19ed9E2683F305a5fc0000226)
- Transaction pool price threshold updated (price=18000000000)
- Starting mining operation
- Commit new mining work (number=1 txs=0 uncles=0 elapsed=361.017µs)
- Generating DAG in progress (epoch=0 percentage=99 elapsed=2m36.072s)
- Generated ethash verification cache (epoch=0 elapsed=2m36.075s)
- Successfully sealed new block (number=1 hash=314549…6cd344)
- [wp-svg-icons icon=”hammer” wrap=”i”] mined potential block (number=1 hash=314549…6cd344)
- [wp-svg-icons icon=”link” wrap=”i”] block reached canonical chain (number=2 hash=d1cb43…2c886f)
If you observe all above items while starting network then, Great…! Your ethereum private node is successfully setup
5. Initializing console for private node
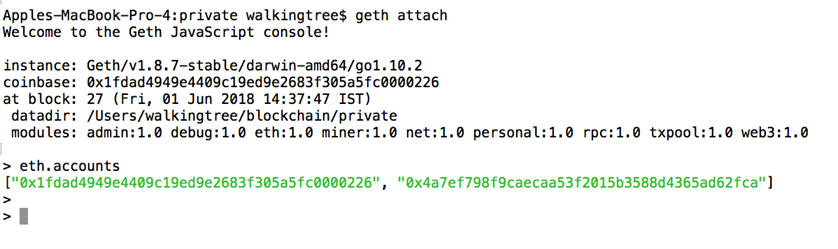
- To open geth console open new tab/window of the terminal (keep your private node running)
- Use below command to attach geth console:
geth attach
- This will open console for running geth instance, its JavaScript console:

- You can execute various geth commands from the console for more details on commands refer to the next section.
6. Commonly used commands for geth console
- Below are the list of commands which are most commonly used:
- eth.accounts – Shows list of accounts which are registered on ethereum node
- eth.coinbase – Shows address of the main account which is used for mining
- eth.getBalance(eth.accounts[1]) – Shows the balance of account at 1st index in accounts array on node
- miner.start() – To start mining process on node
- miner.stop() – To stop mining process on node
- For more commands please refer to the below link:
https://github.com/ethereum/wiki/wiki/JavaScript-API
7. Making transactions between two accounts and checking their balances
- Now let’s use this console to do some transactions between two accounts
- Get list of accounts on node:
eth.accounts
See below image for output:
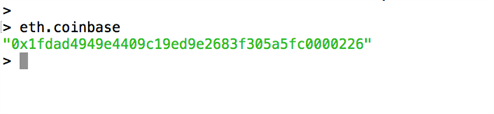
- To get the coinbase account address:
eth.coinbase
See below image for output:
- Check balance of the coinbase account:
web3.fromWei(eth.getBalance(eth.coinbase),”ether”)
Here is the output for above command:

- Now get balance of another account:
web3.fromWei(eth.getBalance(eth.accounts[1]),”ether”)
Here is the output after running above command:

- In order to exchange cryptocurrency i.e. to send ether among accounts use below command:
web3.sendTransaction( {from:eth.accounts[0], to:eth.accounts[1], value:web3.toWei(10,”ether”) })
Below image shows the output of above command:
![]()
- You can observe transaction on the terminal where geth node is running with hash same as shown in the above image.
![]()
- Now check balances for both accounts as shown in below image:
![]()
If you are able to do transaction then your setup is working fine.
8. Stop private node
- To stop your private node you can press Ctrl + C
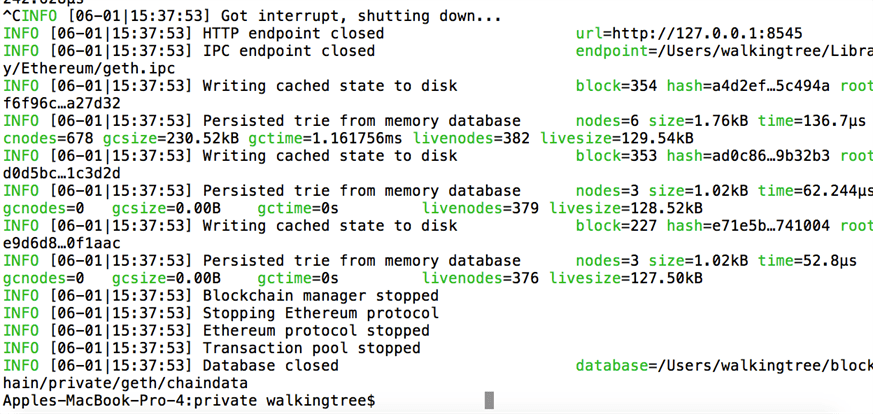
- Above command will interrupt and start shutting down private node.
- It also closes HTTP and IPC endpoint and rest of items like ethereum protocol, transaction pool and database closed.
Summary
As part of this article we have learned how to setup a private ethereum node using geth and perform transactions and mine on macOS. It’s important that before going to the main network you would like to test all your contracts works well on the test node.