


Blogs
Flutter Plugins : Implementing Camera for Pictures and Video
Flutter is great with device-related functionalities and, in most cases, there are plugins available to handle different native device capabilities.
You will sometimes see different options for plugins and it becomes tricky to know which plugin is the most suitable for, and works most perfectly for your requirements.
We had a requirement for camera functionality in one of our apps and of the plugins available, we used image_picker as it was easy to implement and seemed to work as per our requirements. It did work perfectly and we didn’t have any doubts about that before we had to go for a flutter upgrade.
For one of the other plugins(local_auth), we had to upgrade to the latest version(1.17), after which we started facing issues with image_picker and the application crashed every time we launched the camera.
We realised that it was using some deprecated methods and causing the app to crash. Flutter does provide you warnings, so make sure to check them instead of ignoring them as mere warnings.
This is when we picked up the camera plugin, which is the recommended plugin for using device cameras in the Flutter cookbook.
In this blog series, we will be sharing our project experiences with Flutter and how we implemented its plugins.
In the first blog of this series, we will explain how we can implement the camera plugin step-by-step to incorporate Picture and video capture capabilities of the device camera in a demo application.
Getting Started
Create a new Flutter app using the following-
flutter create flutter_native_demo
Dependencies
Add the prerequisites in the pubspec.yaml which includes the camera plugin for the camera, path and path_provider to handle the file path to save the image/video files generated by the camera.
camera: ^0.5.8+2
path_provider: ^1.6.11
path: ^1.6.4
Change the minimum Android SDK version to 21 (or higher) in your android/app/build.gradle file.
minSdkVersion 21
If also handling iOS, include the below lines to the ios/Runner/Info.plist,
<key>NSCameraUsageDescription</key>
<string>Can I use the camera please?</string>
<key>NSMicrophoneUsageDescription</key>
<string>Can I use the mic please?</string>
Building the Screens
Modify the main.dart to only launch our landing page of the application named LaunchScreen.
class MyApp extends StatelessWidget {
  // This widget is the root of your application.
  @override
  Widget build(BuildContext context) {
    return MaterialApp(
      title: 'Flutter Demo',
      theme: ThemeData(
        primarySwatch: Colors.blue,
        visualDensity: VisualDensity.adaptivePlatformDensity,
      ),
      home: LaunchScreen(),
    );
  }
}
The launch screen will be a stateful widget for the intermediate screen to launch the camera and also show the pictures and videos taken by the camera in the form of a list of files.
import 'dart:io';
import 'package:flutter/material.dart';
import 'package:camera/camera.dart';
import 'package:flutter_native_demo/widgets/take_picture_page.dart';
import 'package:flutter_native_demo/widgets/file_list_preview.dart';

class LaunchScreen extends StatefulWidget {
  @override
  _LaunchScreenState createState() => _LaunchScreenState();
}

class _LaunchScreenState extends State<LaunchScreen> {
  List<File> attachmentList = [];
  _launchCamera() {
    _showCamera();
  }

  _showCamera() async {
    final cameras = await availableCameras();
    final camera = cameras.first;

    final pickedImage = await Navigator.push(
        context,
        MaterialPageRoute(
            builder: (context) => TakePicturePage(camera: camera)));
    setState(() {
      attachmentList.add(pickedImage);
    });
  }

  void _removeImage(File pickedFile) {
    setState(() {
      attachmentList.remove(pickedFile);
    });
  }

  @override
  Widget build(BuildContext context) {
    return Scaffold(
      body: Column(
        children: [
          Container(
            child: GestureDetector(
              onTap: _launchCamera(),
              child: Card(
                elevation: 10,
                color: Colors.white,
                shape: RoundedRectangleBorder(),
                child: Icon(
                  Icons.camera_front,
                  size: 10,
                ),
              ),
            ),
          ),
          attachmentList.length >= 1
              ? Padding(
                  padding: const EdgeInsets.all(10),
                  child: FileListPreview(attachmentList, _removeImage),
                )
              : SizedBox(),
        ],
      ),
    );
  }
}
Let’s create a widget with the name take_picture_page which will have the logic of the camera to capture pictures as well as video.
The camera controller will be initialised as follows.
CameraController _cameraController;
  Future<void> _initializeCameraControllerFuture;

@override
  void initState() {
    super.initState();

    _cameraController =
        CameraController(widget.camera, ResolutionPreset.medium);

    _initializeCameraControllerFuture = _cameraController.initialize();
    _fileInit();
  }
The fileInit method is used for initialization of the file path for the video file as the same should be used to start and stop recording.
For image capture, the temporary file will be initialized before the image capture only.
void _fileInit() async {
    vidPath = join((await getTemporaryDirectory()).path, '${fileName}.mp4');
  }

The _takePicture method includes the logic to handle the image capture and video recording actions of the camera, by using the camera controller functions.

void _takePicture(BuildContext context) async {
    try {
      await _initializeCameraControllerFuture;

      if (_selectedIndex == 0) {
	// capture picture
        final imgPath =
            join((await getTemporaryDirectory()).path, '${fileName}.png');
        await _cameraController.takePicture(imgPath);
        Navigator.pop(context, imgPath);
      } else {
	//video recording
        if (_start) {
//start recording
          await _cameraController.startVideoRecording(vidPath);
          setState(() {
            _start = !_start;
            _isRec = !_isRec;
          });
        } else {
	// stop recording
          _cameraController.stopVideoRecording();
          setState(() {
            _isRec = !_isRec;
          });
          Navigator.pop(context, vidPath);
        }
      }
    } catch (e) {
      print(e);
    }
  }
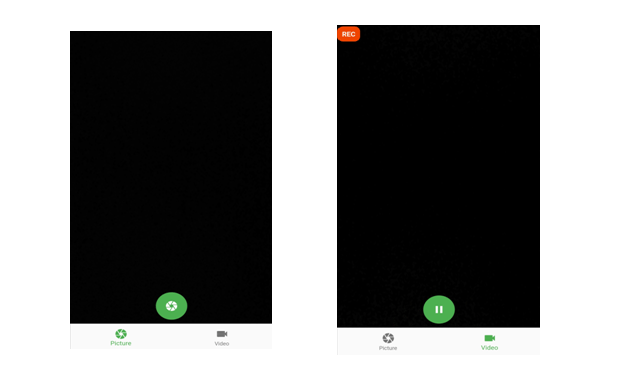
For the view section, the entire body is within a Scaffold, with a Stack in order to get the other elements stacked over the camera view given by the CameraPreview(_cameraController). It is also complemented by a FloatingActionButton, on click of which the camera action is handled and invoked implemented by the _takePicture method.
A bottom navigation bar is added to handle the picture and video in the same screen.
The state property _selectedIndex handles the bottom navigation bar selection between picture and video and accordingly is handled in the _takePicture method.
The state property _isRec is set to indicate if a recording is already in progress so that the same button can be used to start and stop recording.
The below code shows the complete stack returned within the Scaffold widget for the camera view. This can be designed and customized as per your requirement of the view.
@override
  Widget build(BuildContext context) {
    return Scaffold(
      body: Stack(
        children: <Widget>[
          FutureBuilder(
            future: _initializeCameraControllerFuture,
            builder: (context, snapshot) {
              if (snapshot.connectionState == ConnectionState.done) {
                return CameraPreview(_cameraController);
              } else {
                return Center(child: CircularProgressIndicator());
              }
            },
          ),
          SafeArea(
            child: Align(
              alignment: Alignment.bottomCenter,
              child: Padding(
                padding: const EdgeInsets.all(8.0),
                child: FloatingActionButton(
                  backgroundColor: Colors.orange,
                  // child: Icon(Icons.camera_alt, color: Colors.white),
                  onPressed: () {
                    _takePicture(context);
                  },
                ),
              ),
            ),
          ),
          _isRec == true
              ? SafeArea(
                  child: Container(
                    height: 40,
                    // alignment: Alignment.topLeft,
                    decoration: BoxDecoration(
                      color: Color(0xFFEE4400),
                      borderRadius: BorderRadius.circular(10),
                    ),
                    child: Padding(
                      padding: const EdgeInsets.all(8.0),
                      child: Text(
                        "REC",
                        style: TextStyle(
                            fontWeight: FontWeight.bold,
                            fontSize: 15,
                            color: Color(0xFFFAFAFA)),
                      ),
                    ),
                  ),
                )
              : SizedBox(
                  height: 0,
                )
        ],
      ),
      bottomNavigationBar: BottomNavigationBar(
        items: const <BottomNavigationBarItem>[
          BottomNavigationBarItem(
            icon: Icon(Icons.camera),
            title: Text('Picture'),
          ),
          BottomNavigationBarItem(
            icon: Icon(Icons.videocam),
            title: Text('Video'),
          ),
        ],
        currentIndex: _selectedIndex,
        selectedItemColor: Colors.amber[800],
        onTap: _onItemTapped,
      ),
    );
  }
Do not forget to dispose the camera controller, when you are done using it, as shown.
@override
  void dispose() {
    _cameraController.dispose();
    super.dispose();
  }
Using this plugin gives you the flexibility to further customize the camera view as per your requirement.
The below screenshots shows the current camera view for pictures and video:
You can find the complete git repository for the basic implementation here.
Conclusion
In this blog, we saw the steps to implement the camera plugin to implement the device camera functionality in your application and customize the picture and video capturing view as required.
In the next blog of this series, we will explore some other Flutter plugin, share any challenges we faced while implementing it, and see how we finally implemented it.


Really want´s to thank you.
Your work was great and really helped me. Specially the git repository.
Amazing work.
Congratulations from Brazil.