


Blogs
Micronaut setup and getting started with Sample CRUD application

In my previous blog, we have discussed the new Microservices framework i.e Micronaut.
Do check that blog for the introduction and to know the advantages of the Micronaut.
As part of this blog, I would like to take you through the installation and implementation of a simple business use case with Micronaut framework, so you can immediately get started with the build, deploy and run the simple application.
Prerequisites
- Java 8 or above SDK
- Suitable IDE i.e Eclipse or IntelliJ IDEA
- M2Eclipse for Maven
- Maven integration with Eclipse JDT Annotation Processor Toolkit
Install Micronaut on windows
As part of this article, I will take you through the Micronaut installation on Windows 10.
First, we need to install the Micronaut CLI on windows
- Download the latest Micronaut CLI binary from the Micronaut download page
- Unzip the downloaded binary file into your system
- Create the MICRONAUT_HOME environment variable with the installation directory path.
- Update your windows PATH environment variable, by appending MICRONAUT_HOME variable as well: %MICRONAUT_HOME%\bin
After the environment variable setup, we should be able to run the Micronaut CLI from the command prompt:

Now we are all set for the server application creation in the Micronaut.
Use case
I took a simple use case from HR Management domain i.e. Creation of an employee, Read employee details, Updating salary and Deleting user to create a sample application, using the Micronaut framework.
Creating a Server Application
By using the Micronaut CLI, we can easily create a new server application. As part of the demonstration of The Micronaut server application, I will be creating a simple CRUD application. We can create a new Micronaut application using the CLI in Java, Groovy or Kotlin, if we don’t specify any language while creating the application then it considers the “Java” by default. We can also specify the build option i.e Maven or Gradle while creation of the application if we don’t specify any build option then “Gradle” will be taken by default.
The following command will be used to create the Micronaut application in Java with Maven build:
mn create-app HRManagement –build maven

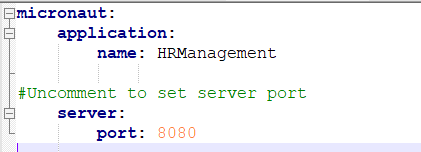
The Micronaut HTTP server will run on a random port by default but we can update the default configurations to run on the standard port in the following file: src/main/resources/application.yml
Just uncomment the server and port in application.yml file
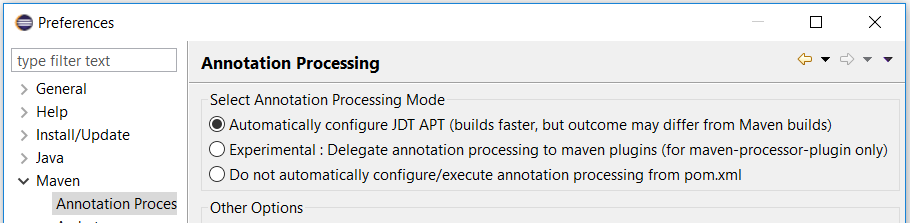
Import above Application in Eclipse and select the Automatically configure JDT APT in to support annotations:
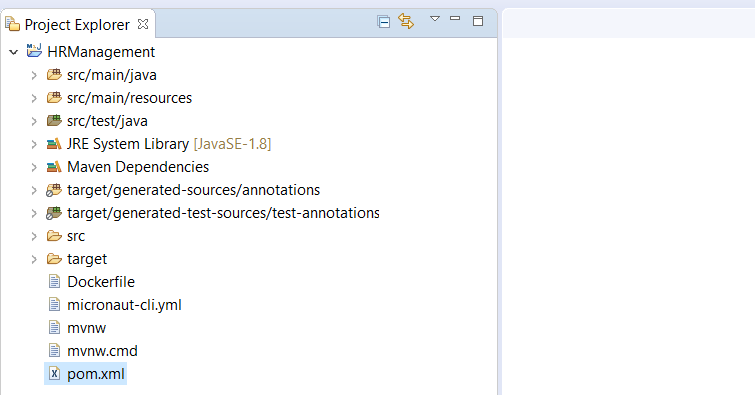
Following is the Micronaut project structure after importing into Eclipse:
Now create a controller to define the endpoints for CRUD operations. I have created the EmployeeController to perform the CRUD operations on the Employee object.
Following is the Employee Controller java file:
Employee Controller.java

package com.walkingtree.controller;
import io.micronaut.http.MediaType;
import io.micronaut.http.annotation.Body;
import io.micronaut.http.annotation.Controller;
import io.micronaut.http.annotation.Get;
import io.micronaut.http.annotation.Post;
import io.micronaut.http.annotation.Produces;
import io.micronaut.http.annotation.QueryValue;
import javax.inject.Inject;
import javax.validation.constraints.Size;
import org.json.simple.JSONObject;
import com.walkingtree.model.Employee;
import com.walkingtree.service.EmployeeService;

@Controller("/employee")
public class EmployeeController {

	@Inject
	EmployeeService employeeService;

	@Get("/")
	public String index() {
		return "Hello world";
	}

	/**
	 * Add Employee service endpoint
	 *
	 * @param employee
	 *
	 * @return
	 */
	@Produces(MediaType.APPLICATION_JSON)
	@Post("/addEmployee")
	public JSONObject addEmployee(@Size(max = 1024) @Body Employee employee) {
		return 	employeeService.saveOrUpdateEmployee(employee);

	}


                /**
	 * Get All Employees Service Endpoint
	 *
	 * @return
	 */
	@Produces(MediaType.APPLICATION_JSON)
	@Get("/getEmployees")
	public JSONObject getEmployees() {
		JSONObject jsonObject = employeeService.getEmployees();
		return jsonObject;

	}

	/**
	 * Update Employee details service Endpoint
	 *
	 * @param text
	 *
	 * @return
	 */
	@Produces(MediaType.APPLICATION_JSON)
	@Post("/updateEmployee")
	public JSONObject saveOrUpdateEmployee( @Size(max = 1024) @Body Employee text ) {
		return employeeService.saveOrUpdateEmployee(text);

	}

	/**
	 * Get Single Employee service Endpoint
	 *
	 * @param id
	 *
	 * @return
	 */
	@Produces(MediaType.APPLICATION_JSON)
	@Get("/getEmployee")
	JSONObject getEmployee(@QueryValue("id") Integer id) {
		return employeeService.getEmployeeId(id);

	}

	/**
	 * Delete specific Employee service Endpoint
	 *
	 * @param id
	 *
	 * @return
	 */
	@Produces(MediaType.APPLICATION_JSON)
	@Get("/deleteEmployee")
	JSONObject deleteEmployee(@QueryValue("id") Integer id) {
		return employeeService.deleteEmployee(id);

	}


}
Following is the Service implementation file which has the actual implementation of Employee CRUD operations:
EmployeeServiceImpl.java

package com.walkingtree.serviceimpl;

import java.util.List;
import javax.inject.Singleton;
import org.jboss.logging.Logger;
import org.json.simple.JSONObject;
import org.springframework.context.ApplicationContext;
import com.fasterxml.jackson.databind.ObjectMapper;
import com.walkingtree.dao.EmployeeDao;
import com.walkingtree.dao.ImplementationClass;
import com.walkingtree.model.Employee;
import com.walkingtree.service.EmployeeService;

@Singleton
public class EmployeeServiceImpl implements EmployeeService {

	static ObjectMapper mapper = new ObjectMapper();
	EmployeeDao employeeDao    = new ImplementationClass().getEmployeeDao();
	private static final Logger LOGGER = Logger.getLogger(EmployeeServiceImpl.class);
	public static final java.lang.String MESSAGE = "message";
	public static final java.lang.String STATUS  = "status";
	public static final java.lang.String ERROR   = "error";
	public static final java.lang.String SUCCESS = "success";

	@SuppressWarnings("unchecked")
	public JSONObject getEmployeeId(int empId) {

		JSONObject responseObj = new JSONObject();

		try {

			Employee employee = employeeDao.getEmployee(empId);

			if ( employee != null) {
				responseObj.put("Data", employee);

			} else {
				responseObj.put(EmployeeServiceImpl.MESSAGE,
"Requested Employee doesn't exist in System.");

			}

			responseObj.put(EmployeeServiceImpl.STATUS, EmployeeServiceImpl.SUCCESS);

		} catch (Exception e) {
			responseObj.put(EmployeeServiceImpl.STATUS, EmployeeServiceImpl.ERROR);
			responseObj.put(EmployeeServiceImpl.MESSAGE,
"Exception occurred while getting the Employee : "+e.getMessage());
			LOGGER.error("Exception occurred while getting the Employee : "+e.getMessage());

		}

		return responseObj;

	} //getEmployeeId

	@SuppressWarnings("unchecked")
	public JSONObject getEmployees() {
		JSONObject responseObj = new JSONObject();

		try {

			List<Employee> employees = employeeDao.getAllEmployees();

			if ( employees != null) {
				responseObj.put("Data", employees);

			} else {
				responseObj.put(EmployeeServiceImpl.MESSAGE,
"There are no employees exist in System.");

			}

			responseObj.put(EmployeeServiceImpl.STATUS, EmployeeServiceImpl.SUCCESS);

		} catch (Exception e) {
			responseObj.put(EmployeeServiceImpl.STATUS, EmployeeServiceImpl.ERROR);
			responseObj.put(EmployeeServiceImpl.MESSAGE,
"Exception occurred while getting the Employees : "+e.getMessage());
			LOGGER.error("Exception occurred while getting the Employees : "+e.getMessage());
		}

		return responseObj;

	} //getEmployees


	@SuppressWarnings("unchecked")
	public JSONObject deleteEmployee(int empId) {

		JSONObject responseObj = new JSONObject();
		Boolean isEmpDeleted   = Boolean.FALSE ;

		try {

			Employee employee = employeeDao.getEmployee(empId);
			responseObj.put(EmployeeServiceImpl.STATUS, EmployeeServiceImpl.SUCCESS);

			if ( employee != null ) {

				isEmpDeleted = employeeDao.deleteEmployee(employee);

				if ( isEmpDeleted ) {
					responseObj.put(EmployeeServiceImpl.MESSAGE,
"Employee has been deleted successfully");
					responseObj.put("empId", empId);

				} else {
					responseObj.put(EmployeeServiceImpl.MESSAGE,
"Failed to delete the Employee ");
					return responseObj;

				}

			} else {
				responseObj.put(EmployeeServiceImpl.MESSAGE,
"Requested Employee doesn't exist in the System. Employee ID : "+empId);

			}

		} catch (Exception e) {
			responseObj.put(EmployeeServiceImpl.STATUS, EmployeeServiceImpl.ERROR);
			responseObj.put(EmployeeServiceImpl.MESSAGE,
"Exception occurred while deleting the Employee : "+e.getMessage());
			LOGGER.error("Exception occurred while deleting the Employee : "+e.getMessage());

		}

		return responseObj;

	} // deleteEmployee

	@SuppressWarnings("unchecked")
	public JSONObject saveOrUpdateEmployee(Employee employee) {

		JSONObject responseObj = new JSONObject();
		int beforeSaveEmpId    = employee.getId();

		try {

			int afterSaveEmpId = employeeDao.addEmployee(employee);

			if ( beforeSaveEmpId == 0) {
				responseObj.put("EmpId", afterSaveEmpId);
				responseObj.put(EmployeeServiceImpl.MESSAGE,
"Employee created successfully");

			} else if (afterSaveEmpId > 0) {
				responseObj.put("EmpId", afterSaveEmpId);
				responseObj.put(EmployeeServiceImpl.MESSAGE,
"Employee updated successfully");

			} else {
				responseObj.put(EmployeeServiceImpl.MESSAGE,
"Requested employee doesn't exist in the System.");

			}

		} catch (Exception e) {
			responseObj.put(EmployeeServiceImpl.STATUS, EmployeeServiceImpl.ERROR);
			responseObj.put(EmployeeServiceImpl.MESSAGE,
"Exception occurred while adding/updating the Employee : "+e.getMessage());
			LOGGER.error("Exception occurred while adding/updating the Employee :
"+e.getMessage());

		}

		return responseObj;

	} //saveOrUpdateEmployee

	public static EmployeeDao getFromApplicationContext(ApplicationContext ctx) {
		return (EmployeeDao) ctx.getBean("employeeDao");

	}
}
Test the server application from Postman
Run the above Micronaut application and send the requests to each endpoint sequentially.
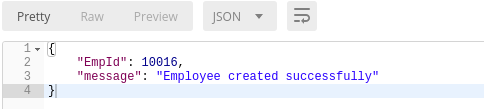
Add a new Employee:

The employee created successfully:
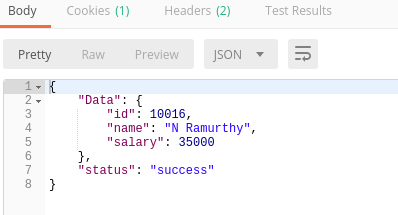
Get Employee details:

Get Employee service returned with complete details of Employee, we could define more fields in Employee table to store but in this example, I just added Salary along with Employee Id and Name.
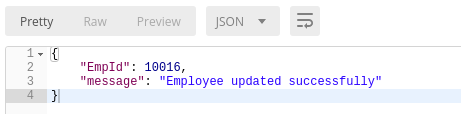
Update Employee Salary through updateEmployee service:
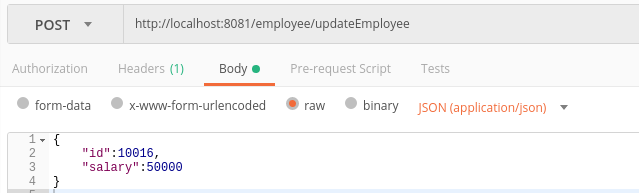
Employee salary has been updated successfully:
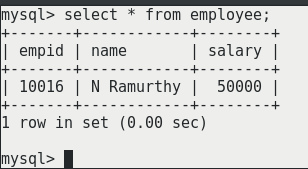
Verify the above Employee details in the table to make sure that we have proper data before deletion of the above Employee:
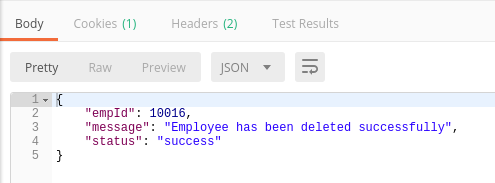
Delete the Employee by using the deleteEmployee Service:

The employee has been deleted successfully:
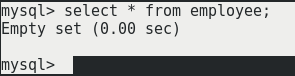
Verify the data in the table as well, if no data is available in table, services are working fine:
Summary :
As a part of this article, we have covered Micronaut CLI installation on windows, learned and prepared a sample Micronaut application with CRUD operations and demonstrated the services.
I hope this article was informative and leaves you with a better understanding of The Micronaut framework. At Walking Tree, we are excited about the possibilities that Microservices ecosystem brings in. Stay tuned for more articles on this topic.


Things are not clear, where is employee dao class. i dont understand how object is going in EmployeeDao and saving there. code gives idea about implementation logic but not real implementation of saving or updating in database. if there is git repository of this project then please share it
Yes, a git repo will be useful!
1. Think you are missing so much from this document, what version of eclipse ?
Current version downloaded appeared to have all those things as part of it
2. How did you import it ?
> Following is the Micronaut project structure after importing into Eclipse:
– This doesn’t really delve into how you went about getting the thing to work under windows
I get that the DAO, model, and service is up for interpretation depending upon how one would like to execute upon it, but do at least provide a warning next time for those that are very new to the concept of CRUD, dependency injection, etc.
Things are missing and not clear at some point. As a new bei to the micronaut, I want be able to understand where actually the MySQL database connectivity has been done. and what actually DAO. So proper explanation need to know more about this.