Blogs
Apache Kafka integration with Spring Boot
In my previous blog, we discussed the importance of inter-service communication and especially asynchronous communication in Microservices. In this blog, I will be covering the steps to integrate Apache Kafka with spring boot application.
What is Apache Kafka?
Apache Kafka is the widely used tool to implement asynchronous communication in Microservices based architecture. Apache Kafka is a simple messaging system which works on a producer and consumer model. In this model, the producer will send data to one or more topics. All consumers who are subscribed to that particular topics will receive data. Apache Kafka can be run as a cluster on one or more servers. Apache Kafka cluster stores multiple records in categories called topics. Each record consists of a key, a value, and a timestamp.
How Apache Kafka Works?
Apache Kafka has four core API’s as mentioned in the below diagram:
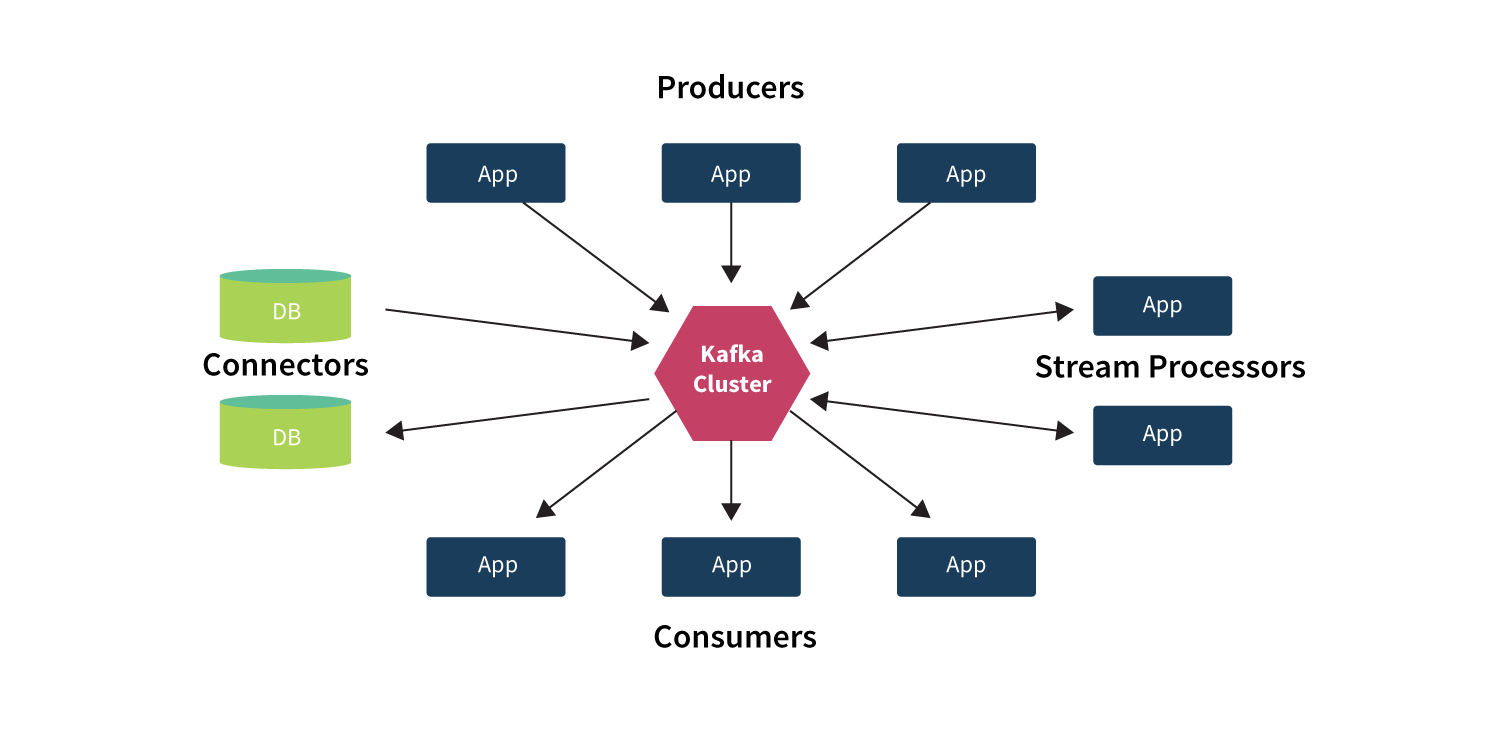 Credit: https://kafka.apache.org
- Producer API is responsible for sending the stream of data to one or more topics
- Consumer API is responsible for receiving data from one or more topics.
- Stream API is responsible for consuming input data from one or more topics and producing as an output stream for one or more topics.
- Connector API is responsible for building and running as reusable producers or consumers that connect Kafka topics to existing applications or data sources.
Apache Kafka will internally use ZOOKEEPER for managing different Kafka instances as a cluster, maintaining leader for each partition to avoid a crash of data and it will track the messages and topics of each Kafka instance.
Basic building blocks in Apache Kafka
Topic: Topic is a unique representation or category to which producer publishes a stream of data. A topic will be subscribed by zero or multiple consumers for receiving data.
Producer: Producer is responsible for sending data to one or more topics and assigning data to partitions within the topic.
Consumer: Consumer is responsible for consuming data from one or more topics when the producer sends the data to topics.
Apache Kafka has a built-in system to resend the data if there is any failure while processing the data, with this inbuilt mechanism it is highly fault-tolerant.
Integration of Apache Kafka with Spring Boot Application
Apache Kafka Setup
- Download the Apache Kafka software from the following link and extract the folder from zip: https://kafka.apache.org/downloads
- If you want to change the port number of a zookeeper, open zookeeper properties file inside config folder and modify the client port property.
- Configure the zookeeper running URL in the server.properties file inside the config folder.
- Now start the zookeeper server by using the following command:
.\bin\windows\zookeeper-server-start.bat .\config\zookeeper.properties (windows)
.\bin\zookeeper-server-start.sh .\config\zookeeper.properties(linux)

5. Open new terminal and now start the kafka server using the following command:
.\bin\windows\kafka-server-start.bat ./config/server.properties(windows)
.\bin\\kafka-server-start.sh ./config/server.properties(linux)

Now Kafka server is running on port number 9092(default).
Setup in spring boot project
6. Add the following dependency in your pom.xml:
<dependency>

 <groupId>org.springframework.kafka</groupId>

<artifactId>spring-kafka</artifactId> </dependency>
7. Create sender configuration class and add the properties of serialization and deserialization classes, kafka server URL.
Create Kafka template bean with these properties:
@Configuration

public class SenderConfig {

@Value("${kafka.bootstrap-servers}")
private String bootStrapServers;

@Bean
public Map<String,Object> producerConfig(){

Map<String,Object> producerProperties=new HashMap<String,Object>();
producerProperties.put(ProducerConfig.BOOTSTRAP_SERVERS_CONFIG, bootStrapServers);
producerProperties.put(ProducerConfig.KEY_SERIALIZER_CLASS_CONFIG, StringSerializer.class);
producerProperties.put(ProducerConfig.VALUE_SERIALIZER_CLASS_CONFIG, JsonSerializer.class);
return producerProperties;
}


@Bean
public ProducerFactory<String, Object> producerFactory(){
return new DefaultKafkaProducerFactory<>(producerConfig());
}

@Bean
public KafkaTemplate<String, Object> kafkaTemplate(){
return new KafkaTemplate<>(producerFactory());
}

}
8. Now add the class for receiver configuration with the deserializer class, consumer group, and Kafka server URL.
@Configuration
@EnableKafka
public class ReceiverConfig {
@Value("${kafka.bootstrap-servers}")
private String bootStrapServers;

@Value("${consumer.group}")

private String consumerGroup;


@Bean
public Map<String,Object> consumerConfig(){
Map<String,Object> consumerProperties=new HashMap<String,Object>();
consumerProperties.put(ConsumerConfig.AUTO_OFFSET_RESET_CONFIG, "earliest");
consumerProperties.put(ConsumerConfig.BOOTSTRAP_SERVERS_CONFIG, bootStrapServers);
consumerProperties.put(ConsumerConfig.KEY_DESERIALIZER_CLASS_CONFIG, StringDeserializer.class);
consumerProperties.put(ConsumerConfig.VALUE_DESERIALIZER_CLASS_CONFIG, JsonDeserializer.class);


consumerProperties.put(ConsumerConfig.GROUP_ID_CONFIG,consumerGroup);
return consumerProperties;
}

@Bean
public ConsumerFactory<String, Object> consumerFactory(){
return new DefaultKafkaConsumerFactory<>(consumerConfig(),new
StringDeserializer(),new JsonDeserializer<>(Object.class));

}

@Bean
public ConcurrentKafkaListenerContainerFactory<String, Object> kafkaListenerContainerFactory(){
ConcurrentKafkaListenerContainerFactory<String, Object> factory=new
ConcurrentKafkaListenerContainerFactory<String,Object>();
factory.setConsumerFactory(consumerFactory());
return factory;
}
@Bean
public Receiver receiver(){
return new Receiver();
}
}
9. Now add the listener for receiving data from the sender. In this example when a user sends a request for creating a new user, it will return a response immediately and the producer will send data to the consumer. Once the consumer receives the data it will save in the MySQL database.
@KafkaListener(topics = "${user.create}")

public void receive(ConsumerRecord<String, LinkedHashMap<String,Object>>obj) {
  logger.info("received object is"+obj.toString());
  UserModel userModel=new UserModel();
  userModel.setUserName(obj.value().get("userName").toString());
  userModel.setPassword(obj.value().get("password").toString());
  userModel.setfirstName(obj.value().get("firstName").toString());
  userModel.setLastName(obj.value().get("lastName").toString());
  userModel.setEmail(obj.value().get("email").toString());
  userModel.setPhoneNumber((int)obj.value().get("phoneNumber"));
  userService.saveUserInMysql(userModel);
    }
10. Now add the topic name and Kafka server URL in your application.properties
user.create=user-create
kafka.bootstrap-servers=localhost:9092
consumer.group=user
11. Now run the application and send the user object to the user creation endpoint.
Summary:
In this article, we have covered detailed steps of installing apache Kafka and steps we need to follow to integrate Apache Kafka with spring boot application.
I hope this article was informative and leaves you with a better understanding of Apache Kafka integration with Spring Boot. At Walking Tree, we are excited about the possibilities that Microservices ecosystems bring in. Stay tuned for more articles on this topic


