Blogs
Real-time Monitoring with Arbela and PubNub

Overview
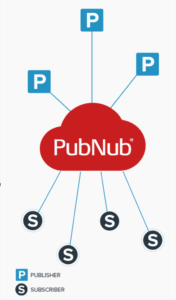
PubNub is a global data stream network for IoT, Mobile, and Web applications. Its Publish-Subscribe messaging streams data and signals device in real-time. Publishers are the ones who send messages and Subscribers are the ones who read messages. The messages travel through a Channel that PubNub network maintains. The following diagram depicts a typical PubNub topology:
Target Topology
In this article, we will connect PubNub endpoints (devices) to Arbela via PubNub data stream network, as shown below:
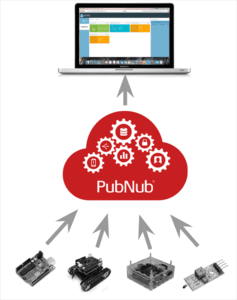
In this topology, the endpoints are acting as publishers where they would publish their device data and Arbela will act as a subscriber listening for the data to arrive from the endpoints on different/same channel(s). You may chose to use a single channel to report data from multiple endpoints or dedicated channel per device. You may want to read the guidelines around channels that PubNub team has provided.
Whether you chose a single channel or a dedicated one, Arbela is ready for it.
Getting data to PubNub network
With the topology set, let us first look at what does it take to get the data to the PubNub stream data network.
Debug Console – Your Subscriber!
There is a Debug Tool offered by PubNub to test drive Publish-Subscribe messaging.
Open the tool in a browser and enter the following:
Channel: TEMP
Publish Key: <your publish key>
Subscribe Key: <your subscribe key>
Click on SUBSCRIBE button. This will initialize the PubNub channel and start listening for data to arrive. You shall see the following message, in the messages area, as shown below:
Mon Jun 27 2016 15:28:47:625: [“CONNECTED TO”, “TEMP”]
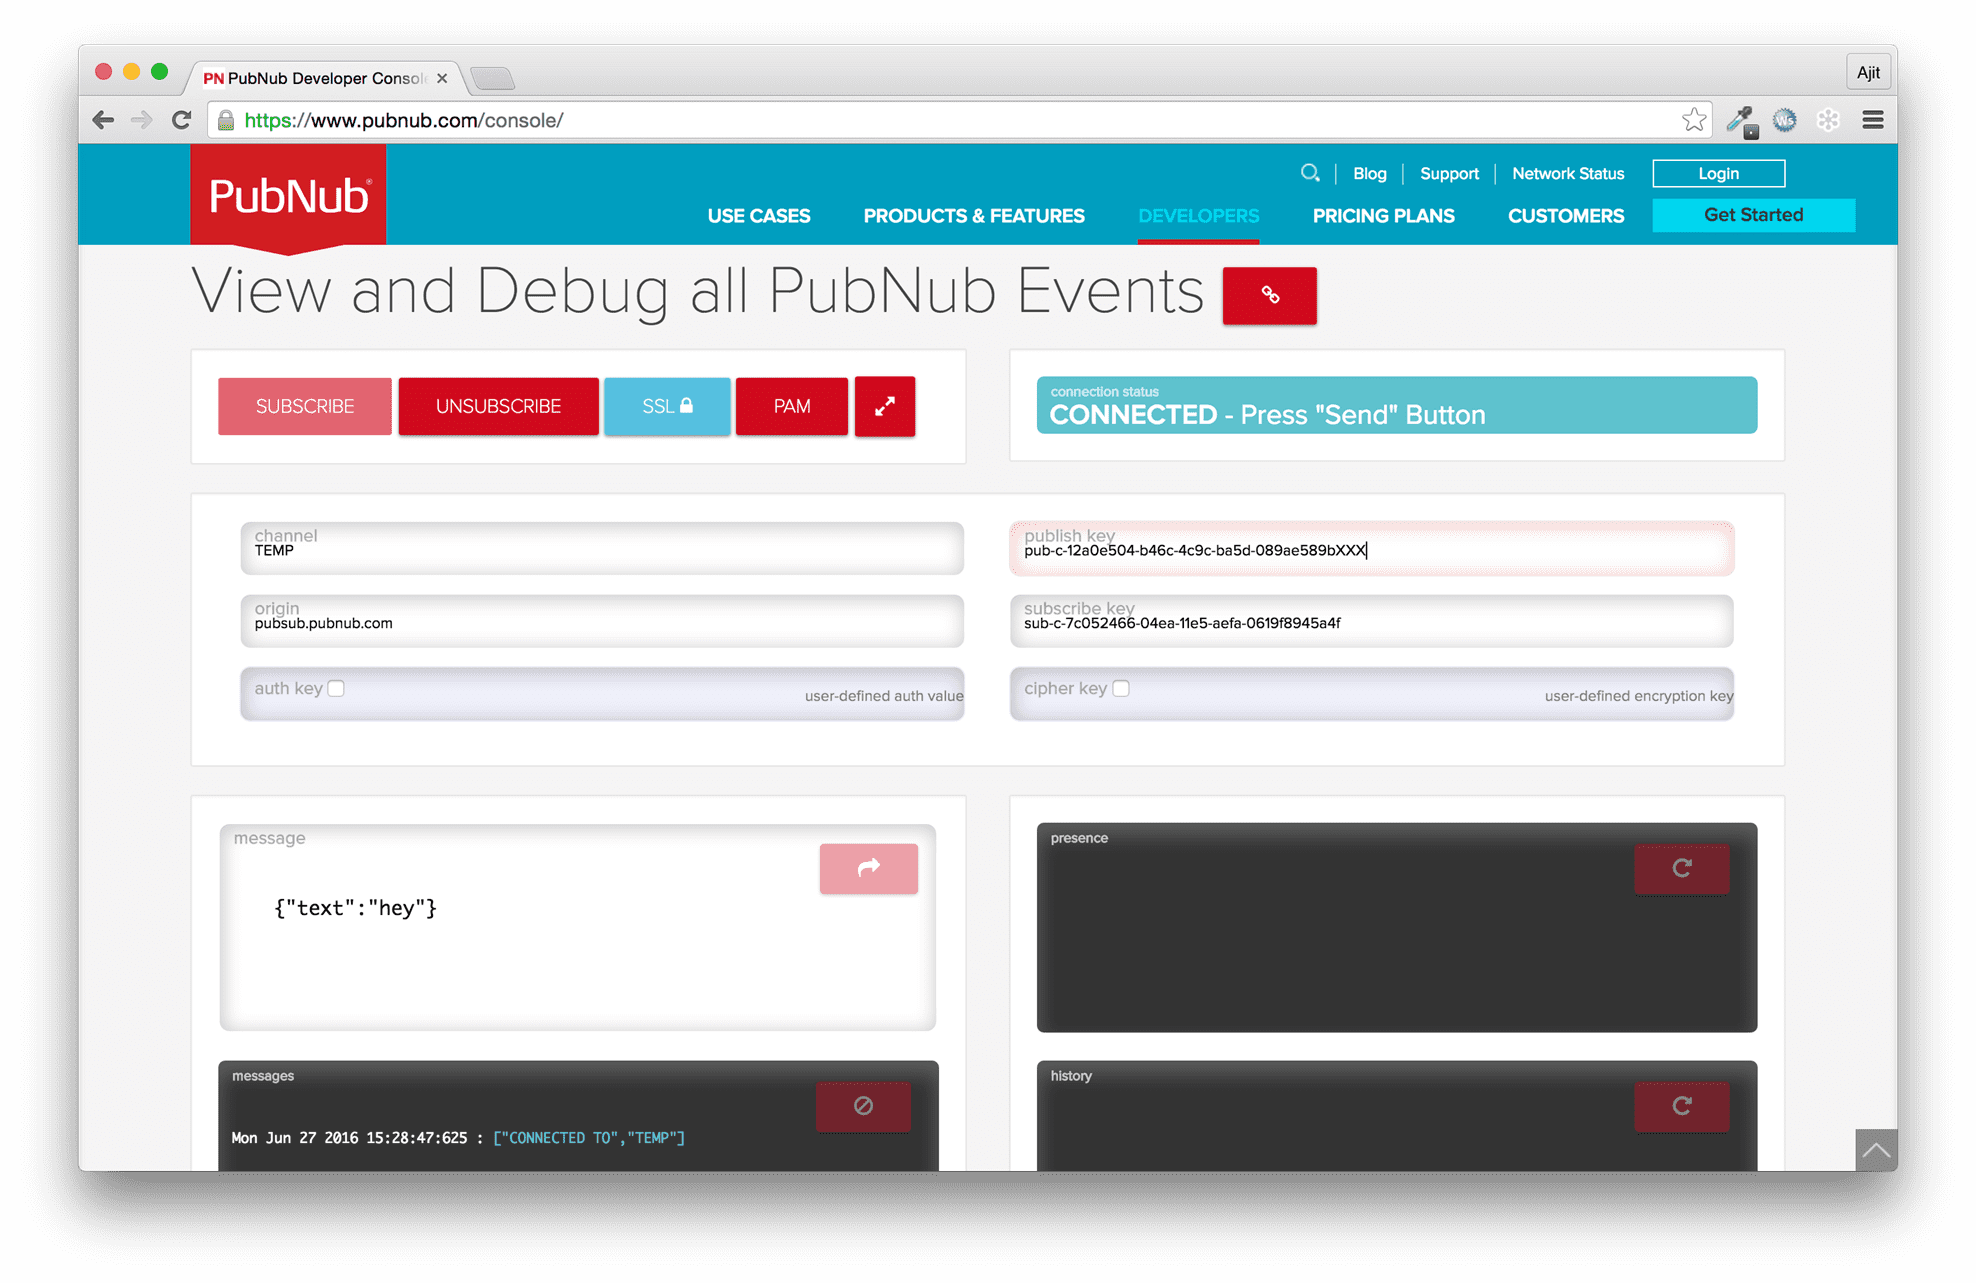
The Debug Console is acting as a subscriber.
Endpoint Client
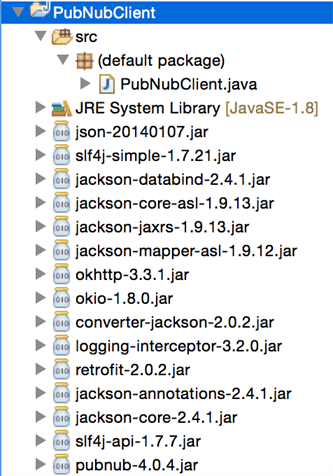
Now, we need to build the endpoint client, which can start publishing messages to the TEMP channel. In this article, I have chosen PubNub’s Java API/SDK for demonstration. You may select other SDK from their list of 70+ SDKs.
I am not going to get into the hardware specific steps to build and run PubNub client code. Let us build a simple Java client that will simulate an endpoint. The following client code publishes messages to the PubNub network:
import com.pubnub.api.PNConfiguration;
import com.pubnub.api.PubNub;

import java.util.HashMap;

public class PubNubClient {

public static void main(String[] args) throws Exception {
PNConfiguration pnConfiguration = new PNConfiguration();
     pnConfiguration.setSubscribeKey("sub-c-7c052466-04ea-11e5-aefa-0619f8945XXX");
     pnConfiguration.setPublishKey("pub-c-12a0e504-b46c-4c9c-ba5d-089ae589b37e");

     PubNub pubNub = new PubNub(pnConfiguration);

     try {
     System.out.println("Publishing message....");
     HashMap<String, String> data = new HashMap<String, String>();
     data.put("value", "39");
     data.put("since", "07:00 AM");

     pubNub.publish()
           .message(data)
           .channel("TEMP")
           .sync();

     System.out.println("Message published!!");

     System.exit(0);
     } catch(Exception ex) {
     System.out.println("Got exception while publishing" + ex.toString());
     throw ex;
     }
}
}
The above code initializes PubNub API with the publish and subscribe keys and publishes a message to the TEMP channel, synchronously. In order to build and run the code, you shall have the following libraries/JARs:
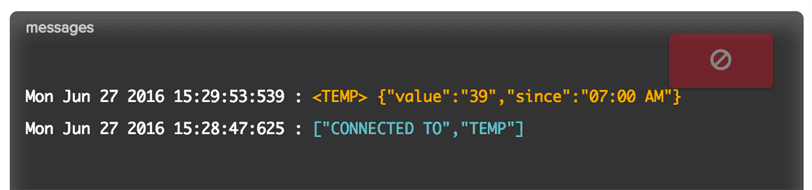
Build and run the client code. It will publish a message on TEMP channel, which will appear on the PubNub console, as shown below:
Now that our endpoint is ready and it is successfully publishing messages to the PubNub network, let us go back to Arbela and see how we can start consuming these messages to provide real-time monitoring to the user.
Step 1: Running Arbela
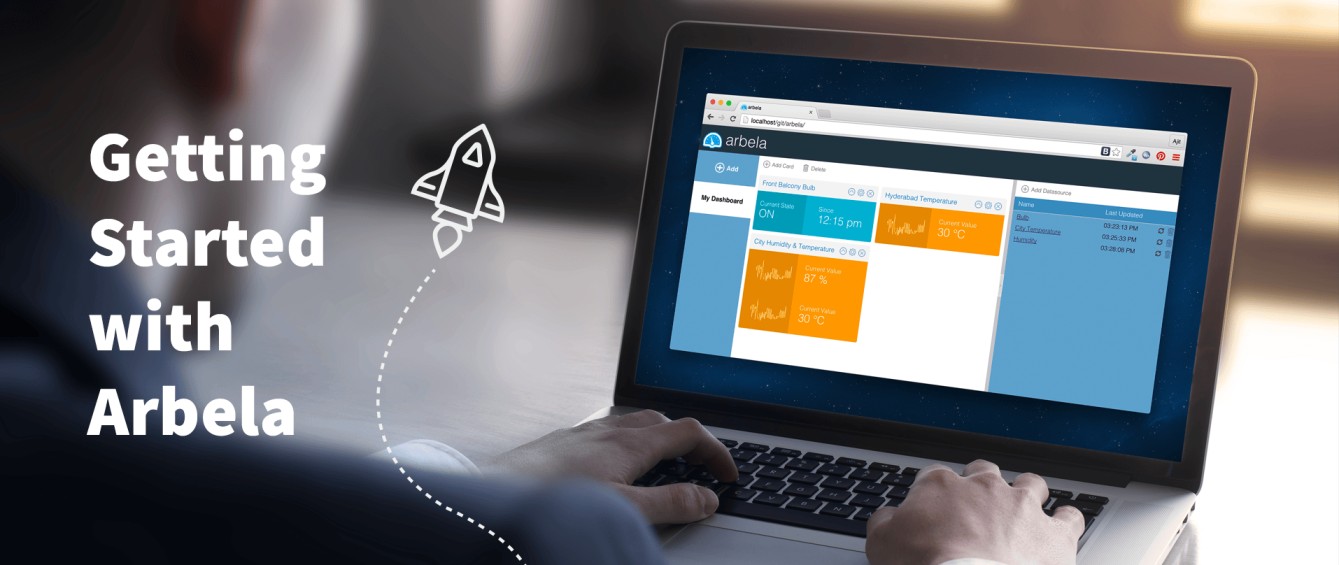
Open Arbela in a browser. You may open the demo version or run it from your own Web/App Server. In case you choose to use the demo version, I suggest that you go through Getting Started with Arbela.
Step 2: Adding PubNub Datasource
With Arbela running, click on Add Datasource button in the Data Sources area on the right-hand side. This will prompt you to enter the new datasource detail. Fill the detail as mentioned below:
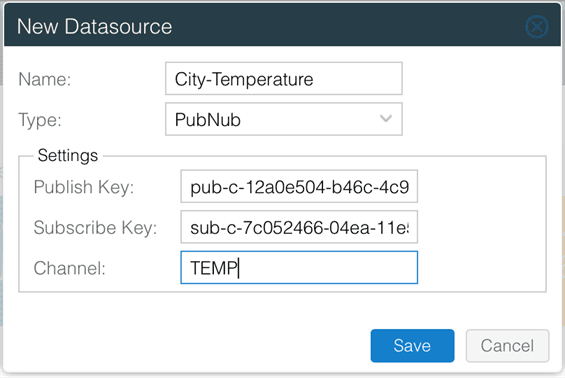
Name: You may give any name to uniquely identify your datasource.
Type: Select PubNub as the type to connect to the PubNub network. Upon selection, the corresponding Settings area will appear.
Publish Key: PubNub publish key that you must have received after Sign Up
Subscribe Key: PubNub subscribe key that you must have received after Sign Up
Channel: Name of the channel where data is being streamed. Set it to TEMP as our endpoint is publishing the data stream to it.
Click on Save button to add the new PubNub data source to Arbela.
Step 3: Adding Card
Next step is to setup the Card so that we can start visualizing the data that is arriving on the TEMP channel. To do that, click on Add Card button on the toolbar. This will prompt you to setup the card detail. Enter the values as mentioned below:
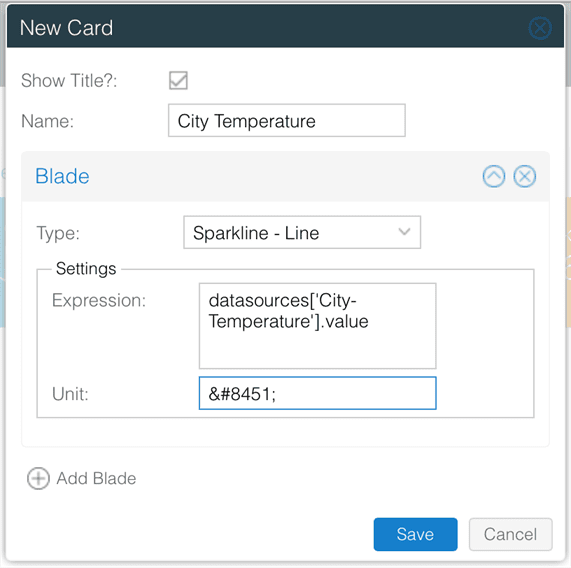
Name: This can be any name given to your card. It will appear as the card title.
Type: Select Sparkline-Line as the Blade Type as we want to show the current temperature as well as how the temperature is changing over a period. Upon selection, blade specific Settings area will appear.
Expression: This is the expression using which Arbela would retrieve the data coming from the PubNub data source. Our endpoint is sending data/message in the following format:
{
“value”: “39”,
“since”: “07:00 AM”
}
So, the expression would be datasources[‘City-Temperature’].value to read the current temperature.
Unit: HTML code for degree celsius, which will appear next to the value.
Click on Save button to add the new card to Arbela, which will start showing the data arriving on the TEMP channel, as shown below:
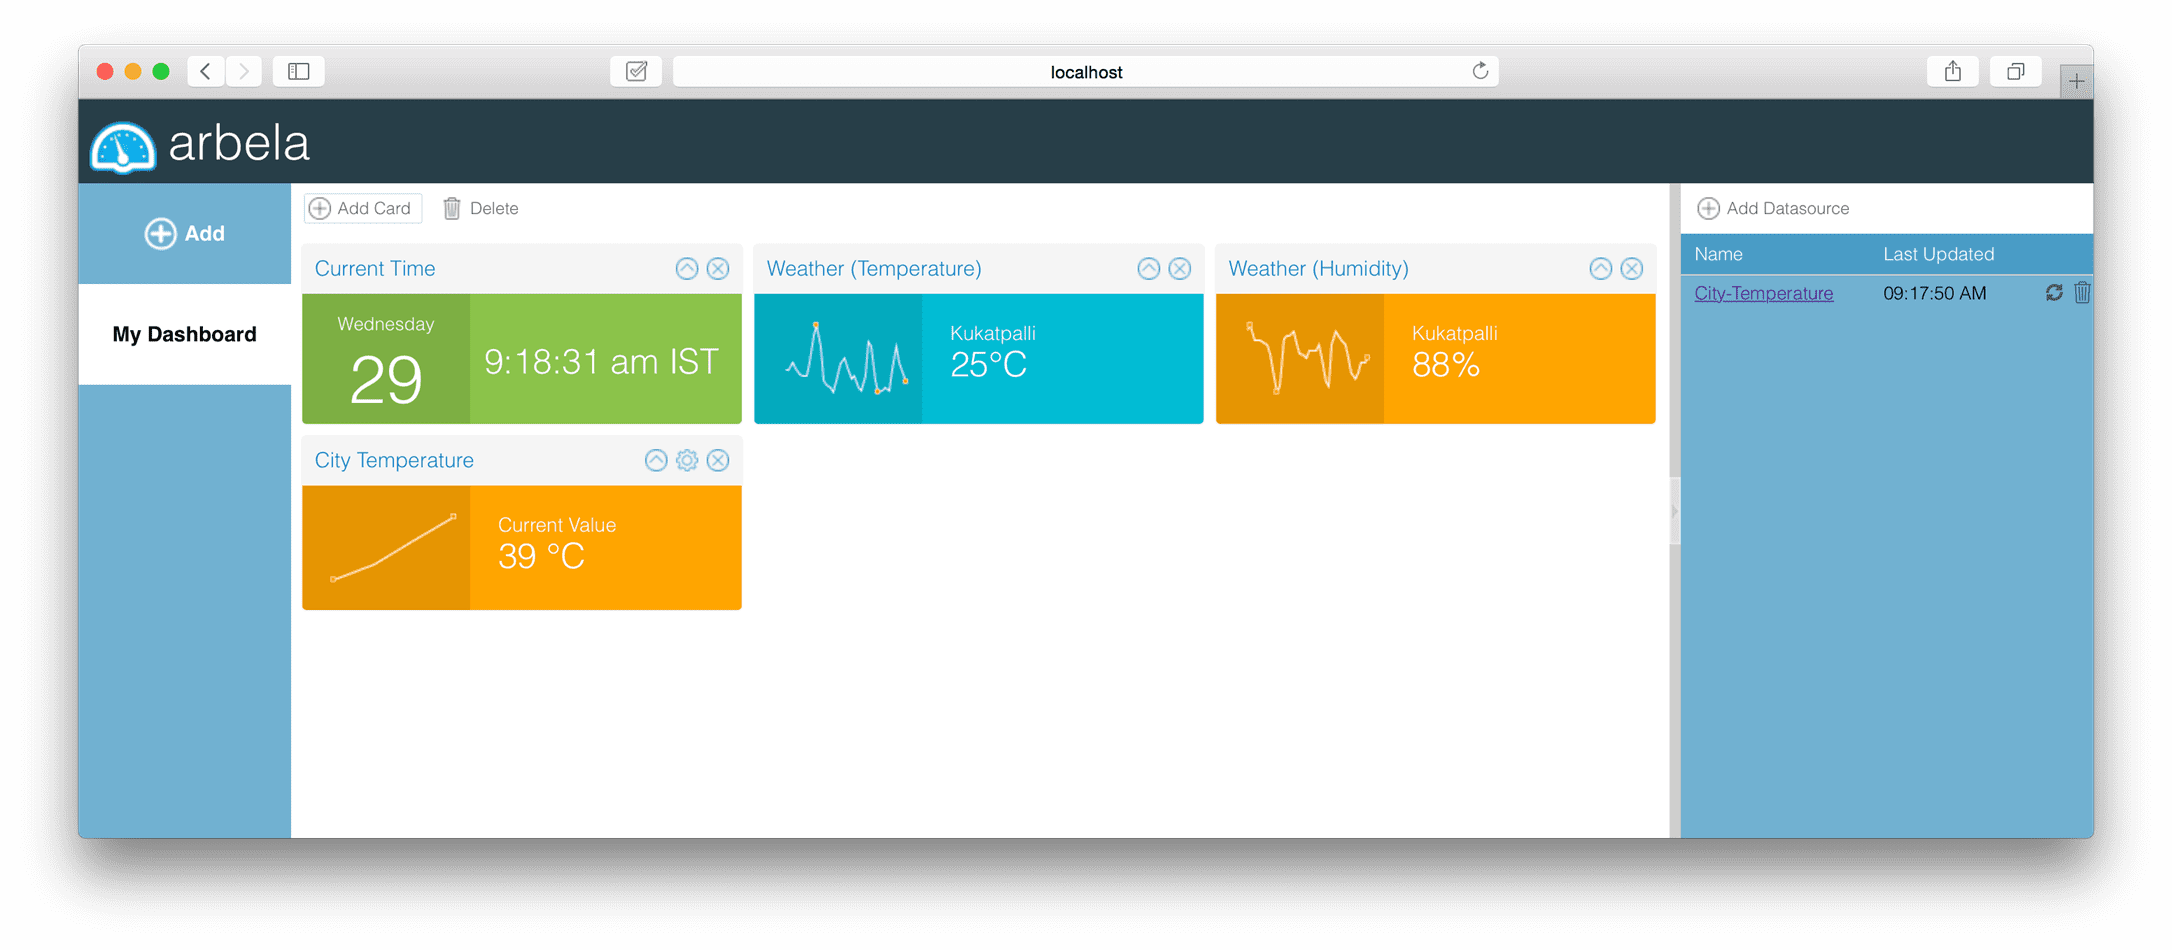
You may run the PubNub endpoint client with different temperature values to see how the data is arriving, in real-time, on the Arbela dashboard.
That’s it! You are ready to connect any PubNub device to Arbela and start monitoring!
Summary
In this article we saw how you can connect PubNub devices to Arbela and monitor them in real-time.
To learn more about Walking Tree’s offerings in the area of IoT and PubNub, please submit your inquiry on Contact Us.