
Deploying a Smart Contract in Rinkeby using Infura
Rinkeby is a “Proof-of-Authority” network, which means that blocks are signed by well-known trusted community members. This prevents attackers from taking over the mining power on the network.
Infura offers Infrastructure-as-a-service for Ethereum, which offers developers a suite of tools to connect their apps to the Ethereum network and other decentralized platforms. It is a hosted Ethereum node cluster that let your users run your application without requiring them to set up their own Ethereum node or wallet.
This article will talk about steps and considerations for deploying an Ethereum smart contract in Rinkeby Testnet using Infura.
Sign-up with Infura
Infura requires a quick signup, which you can do by following the below steps:
- Visit the following URL: https://infura.io/register
- Submit registration form by filling in the relevant details
- Confirm the email receipt
Creating a new project
When you login into Infura, you can see that you don’t have any project. Create your project by providing the project name and you shall be all set with the required details like API Key & Secret and the End Point, as shown below:
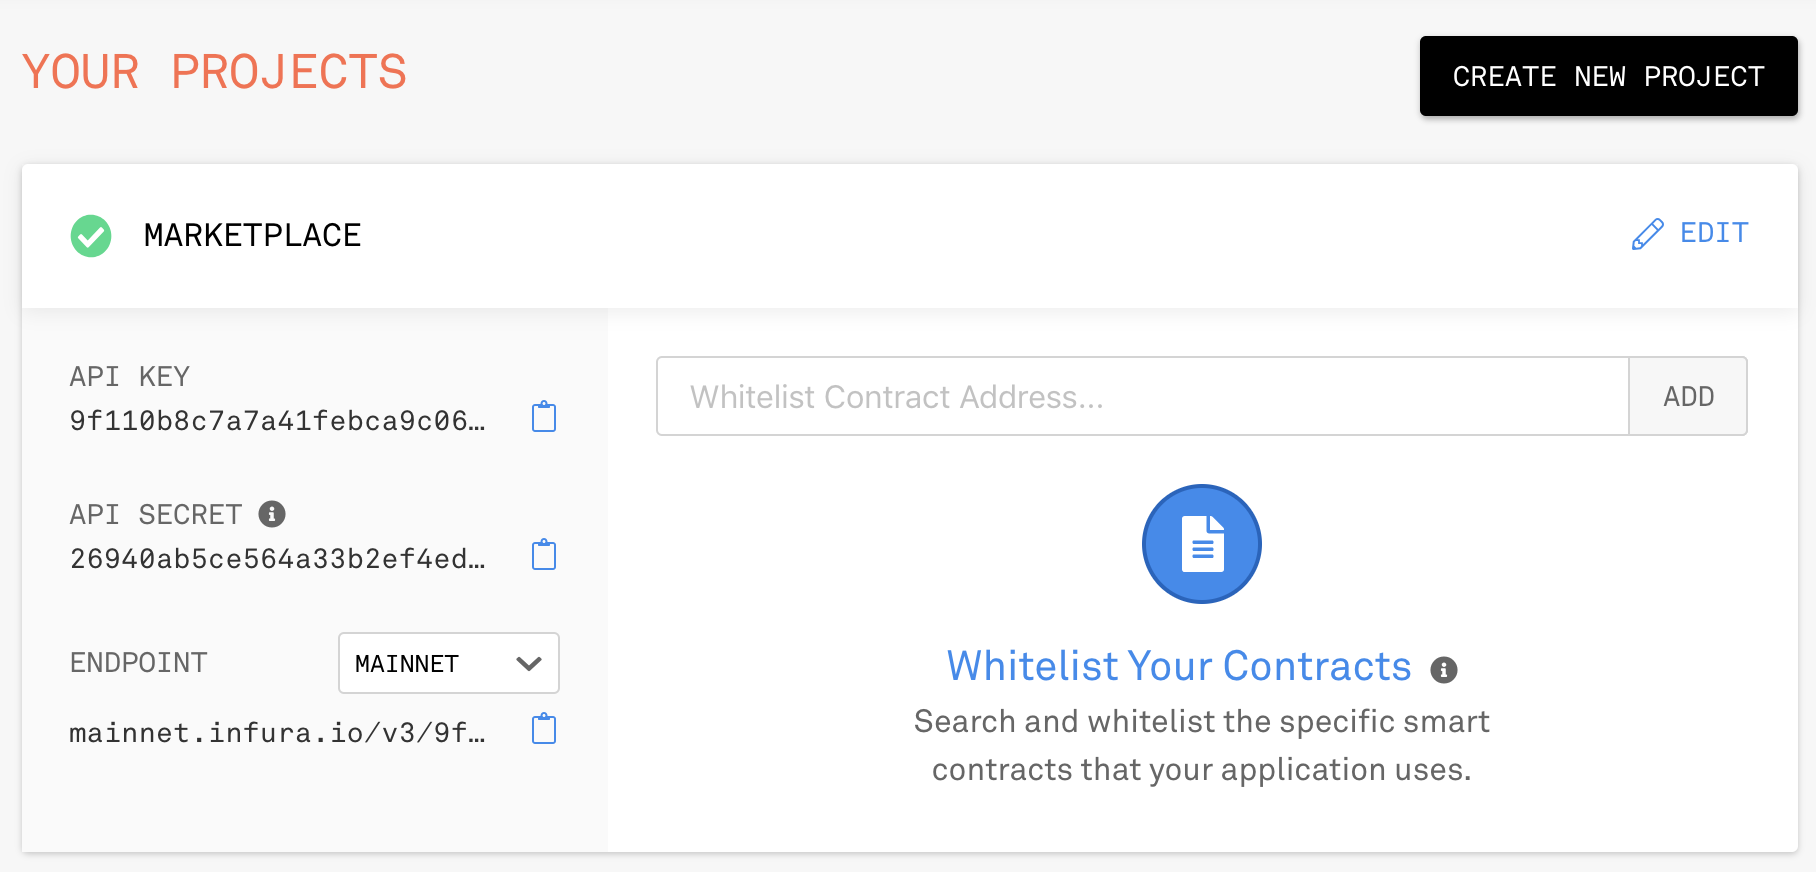
In the above screenshot, Infura provides you the following options for the endpoint:
- Mainnet
- Ropsten
- Kovan
- Rinkeby
Select Rinkeby from the options list. However, the steps discussed in this article will be applicable to other networks as well.
Add Rinkeby Network Options
Depending on your Operating System, edit truffle.js or truffle-config.js and make the changes explained in this section.
Step 1: Add Rinkeby network options
In the network options of module.exports object, add rinkeby option by adding the following configuration:
rinkeby:{
      host: "localhost",
      provider: function() {
        return new HDWalletProvider( mnemonic, "https://rinkeby.infura.io/v3/" + tokenKey);
      },
      network_id:4
      , gas : 6700000
      , gasPrice : 10000000000
    }
Essentially Infura doesn’t manage your private keys (i.e. it is not your wallet), hence it cannot sign your transaction. That is why you use HDWalletProvider object so that that truffle can sign transactions using this.
Step 2: Create a separate .env file for tokenKey and mnemonic
Since Rinkeby is a testnet, many people may take an easy approach and directly include the mnemonic and token key inside the truffle.js file. However, I strongly recommend separating the environment specific variables from the code.
Follow below sub-steps:
- Create a “.env” file in the project root folder
- Add NEMONIC and ENDPOINT_KEY as environment variables
Here are a sample .env file details for you (you must use your own details here):
NEMONIC="orphan blur library music create dump destroy shallow kind float warrior badge"
ENDPOINT_KEY="9f110b8c7a7a41febca9c060f2d1d3e4"
Step 3: Import truffle-hdwallet-provider and dotenv
Inside truffle.js, add the following code at the top:
require('dotenv').config();
var HDWalletProvider = require("truffle-hdwallet-provider");
var mnemonic = process.env["NEMONIC"];
var tokenKey = process.env["ENDPOINT_KEY"];
The inclusion of dotenv puts all the environment variables in the process.env array, which you can use to set your respective variables.
Step 4: Install dotenv and hdwallet
Inside your project root folder, run the following npm commands:
$npm install truffle-hdwallet-provider
$npm install dotenv
Acquiring Rinkeby Ether
Visit below URL and follow the instruction about sharing your account details on the social channel (currently it supports G+, Facebook, and Twitter) and using the post details to seek Rinkeby ether:
https://www.rinkeby.io/#faucet
The following screen shows sample options for seeking ether:
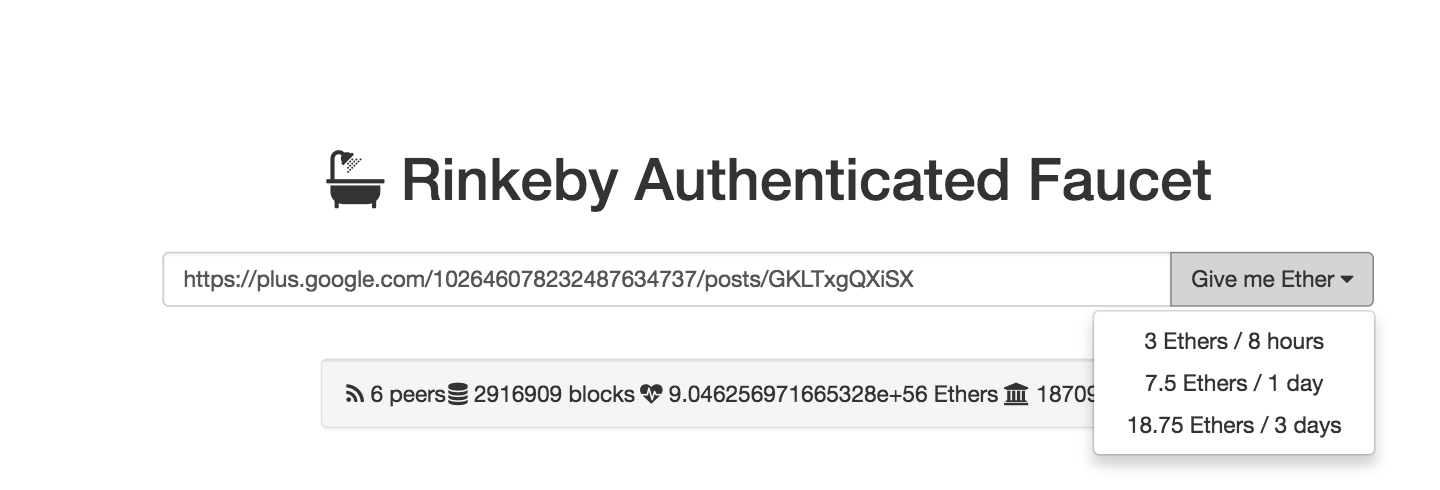 I generally select 18.75 Ethers option. However, you can choose whatever option works best for you.
Run migration/deployment script
By now you should be all set to run your migration script. Run the following command:
$ truffle migrate --network rinkeby --reset --compile-all
Ideally, this should deploy your contract in the Rinkeby Testnet. However, sometimes it does give errors. For example, for me, it was giving below error, which indicated that my contract deployment needs more gas than the block gas limit configured in the network:
Running migration: 5_marketplace.js
  Linking Utils to MarketPlace
  Deploying MarketPlace...
  ... 0x57d5e0c632b465ad23d5e2b671cf8612a15013627550ac0f24f9c805fbb93141
Error encountered, bailing. Network state unknown. Review successful transactions manually.
Error: The contract code couldn't be stored, please check your gas amount.
    at Object.callback (/usr/local/lib/node_modules/truffle/build/webpack:/~/web3/lib/web3/contract.js:147:1)
Setting up the gas limit in Rinkeby network option
The Rinkeby network has a block gas limit of around 7 million. Refer to below URL to know the gas stats: https://www.rinkeby.io/#stats
Of course, setting a gas limit above the block gas limit will not work. However, you can definitely push the boundary. For example, I have kept around 6.7M.
Optimizing your solidity compiler configuration
The following configuration in the truffle.js helped me to reduce the overall gas need significantly:
solc: {
    optimizer: {
      enabled: true,
      runs: 200
    }
  }
However, it is still important to understand the gas usage closely and handle it well through design and programming.
A successful deployment
A successful deployment shall give you a detail similar to as shown below:
$ truffle migrate --network rinkeby --reset --compile-all
Compiling ./contracts/EIP20.sol...
Compiling ./contracts/EIP20DetailedInterface.sol...
Compiling ./contracts/EIP20Interface.sol...
Compiling ./contracts/MarketPlace.sol...
Compiling ./contracts/Migrations.sol...
Compiling ./contracts/Store.sol...
Compiling ./contracts/library/SafeMath.sol...
Compiling ./contracts/library/Utils.sol...
Writing artifacts to ./build/contracts

Using network 'rinkeby'.

Running migration: 1_initial_migration.js
  Replacing Migrations...
  ... 0x861beecf361485aa078cf1111ab7775fa7d5497b3649530fb671e15dd636f159
  Migrations: 0x70f564f896f6332ec40281243198299239455d42
Saving successful migration to network...
  ... 0x73e34224bf325052789ee922de0c48baf06987de283e75335b78fbd8f852d7b1
Saving artifacts...
Running migration: 2_utils.js
  Replacing Utils...
  ... 0x77d22538166a7abbc5cc92c0e7aaf6ec4ee9c3861ebf0fa324c6d07ab8241cd3
  Utils: 0x8aba48505fb02b8617a15e09bab1a14d2528781f
Saving successful migration to network...
  ... 0x46426101892a2aca2a4984a6e39ce4d0ee5e5ece2441e38ce8062f4280a8c39d
Saving artifacts...
Running migration: 3_store.js
  Replacing Store...
  ... 0xf6b2941af133d68cc226547f4dd927cb257a5afa2eb9160e95dc5aa32c426f3f
  Store: 0x38767ddd3e99cf4e3e742c9c661899a116dd4e61
Saving successful migration to network...
  ... 0xce21ac96acd98a043e6b5164fec46fee3de3844b2100658a5c771cc4ddc9b97e
Saving artifacts...
Running migration: 4_EIP20Token.js
  Replacing SafeMath...
  ... 0x868fabc87078ad6ba172f8ca45f5f7c3824d542c98370ab55c744fd14072c566
  SafeMath: 0x0ee0de3b98c7828cfde2e5101962836f1dd56a5e
  Replacing EIP20...
  ... 0x46b52bb523f78255e2b8e40617e14c4558c807e7d94b68436bbcb86d53c31c14
  EIP20: 0xef0deb8963b2039a58e3cda6cd26c3226db37c6a
Saving successful migration to network...
  ... 0x81430b2a51c2a3984b446a295c549311fe16e8c47c5675df4b028ca8187539f2
Saving artifacts...
Running migration: 5_marketplace.js
  Linking Utils to MarketPlace
  Replacing MarketPlace...
  ... 0x4d885b06e6d95d1d9997589b9b2f1f4ffa6ceda0ef93d5ab05bd69565009f69b
  MarketPlace: 0x9c6ef65f82f569cd27b599a0bb79f604bf931be2
Saving successful migration to network...
  ... 0xde89270b5fc1083782053e23ab7a640ec241aa7b0dee1a5bc499f8747954afb1
Saving artifacts...
Verifying the deployed contracts
You can verify your deployed contracts on Rinkeby by visiting the following URL and looking for your contract address: https://www.rinkeby.io/#explorer
For example, in previous section the contract address for MarketPlace contract is 0x9c6ef65f82f569cd27b599a0bb79f604bf931be2.
If you look for this address in Rinkeby then you shall see the following details:
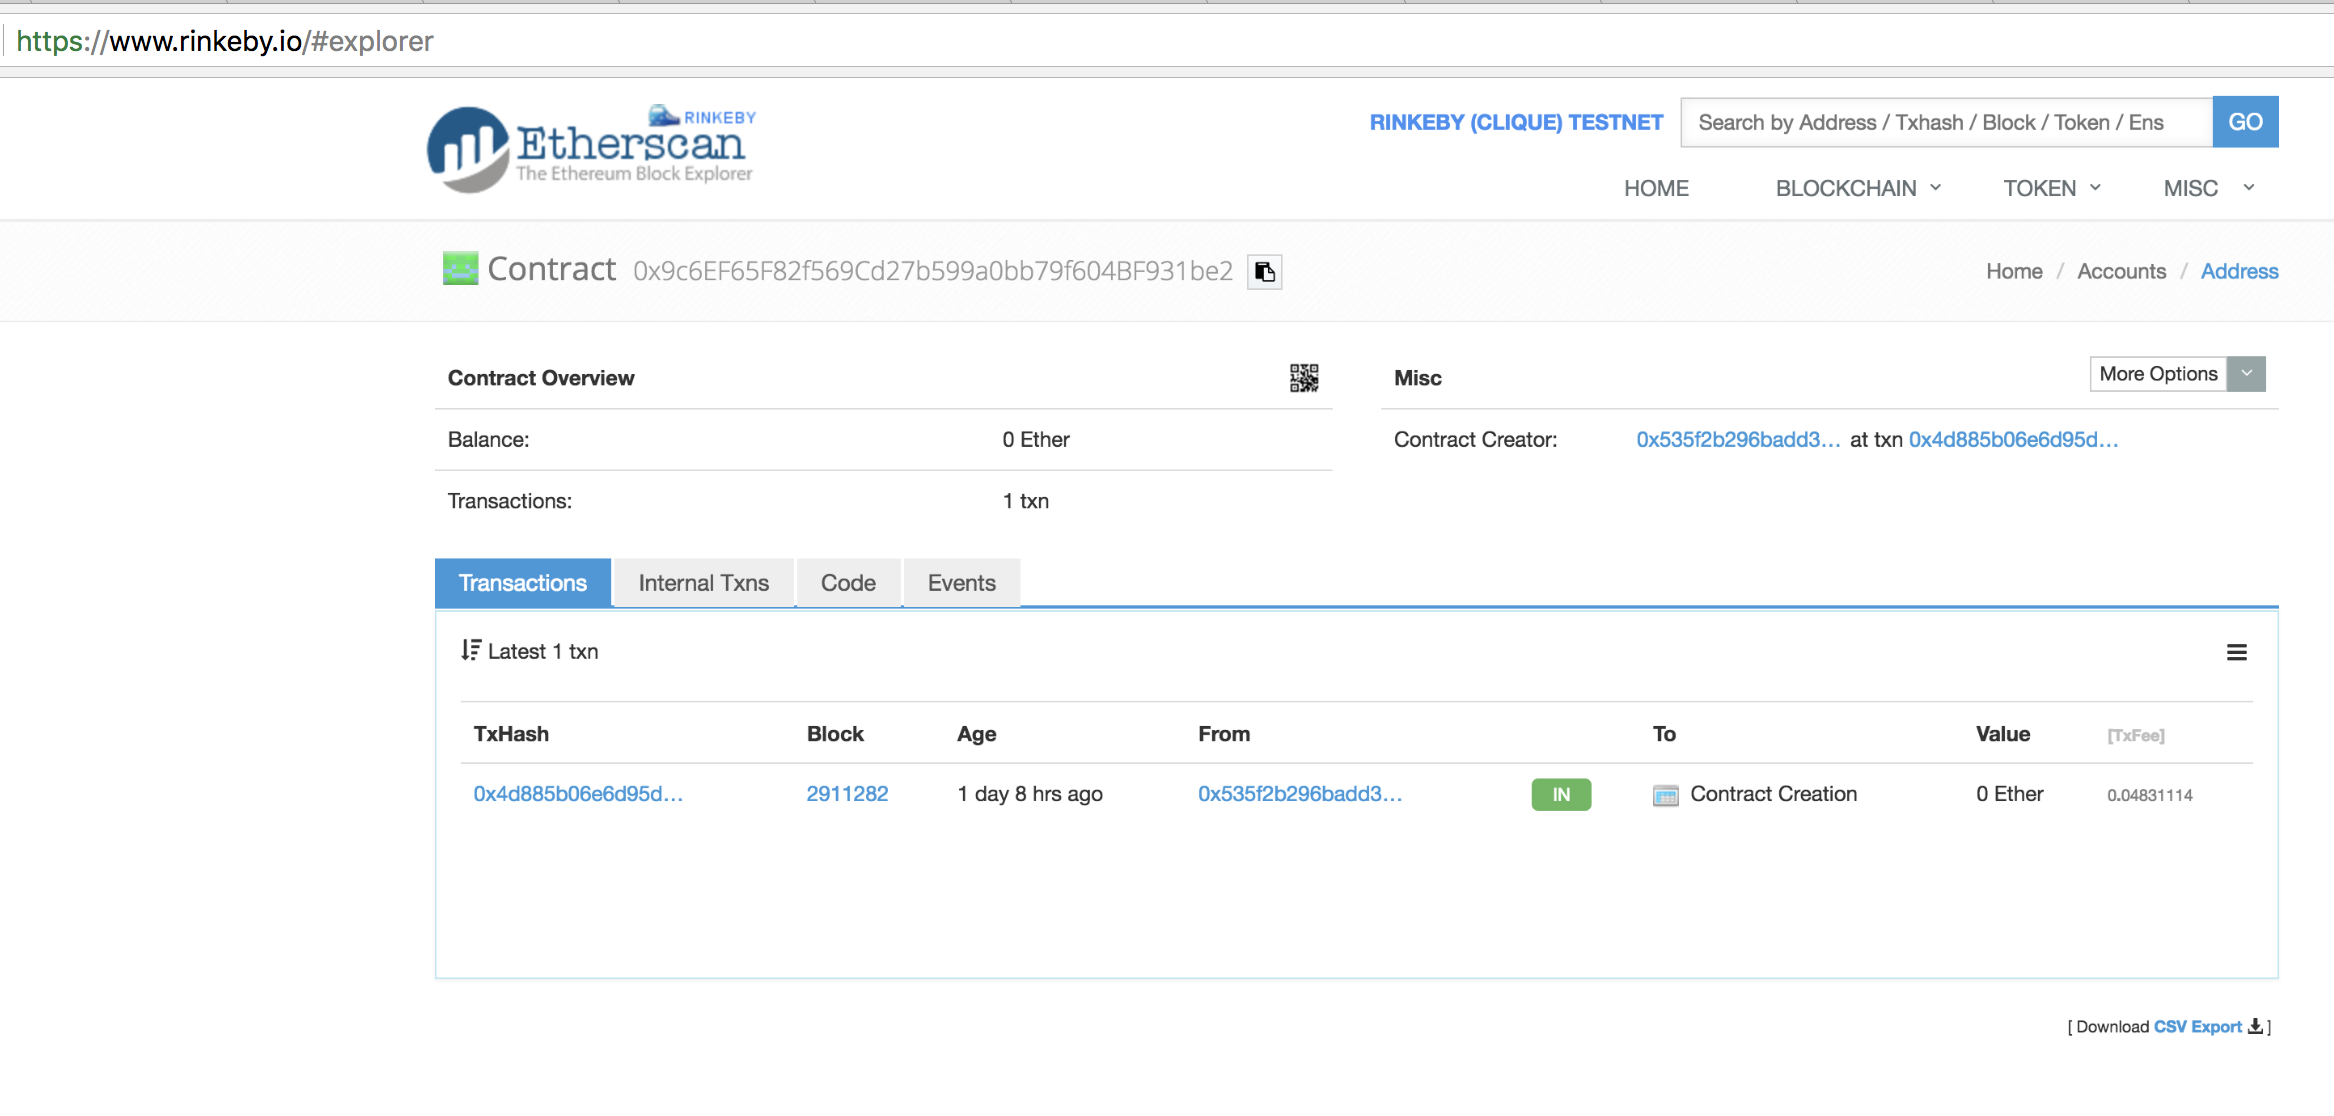
You can see more details by clicking on the transaction hash. Also, on that screen, you have various tools and utilities, which give you options for seeing various aspects, including OP Codes, of this contract.
Testing the deployed contract using Truffle Console
You can either setup test cases using Mocha and Chai or hook your contract with the DAPP to perform a full-fledged testing. However, for the sake of verification of a deployed contract, you can simply launch the truffle console, instantiate the contract and get started with the invocation of the functions as shown below:
$ truffle console --network rinkeby
truffle(rinkeby)> MarketPlace.deployed().then(function(instance){app = instance;})
undefined
truffle(rinkeby)> app.address
'0x9c6ef65f82f569cd27b599a0bb79f604bf931be2'
truffle(rinkeby)> app.checkAccess("0xF928ac0Ed0D0E91F51287A5F28dbdB1019fBbA55")
[ false, false, false ]
truffle(rinkeby)> app.checkAccess("0x535f2b296badd3d4064284edde91024c8e9df2cc")
[ true, true, false ]
When you look at the ABI of the checkAccess function, you will notice the following which matches with the output received in the previous block:
{ constant: true,
    inputs: [ [Object] ],
    name: 'checkAccess',
    outputs: [ [Object], [Object], [Object] ],
    payable: false,
    stateMutability: 'view',
    type: 'function'
}
Summary
While it is easier to test your smart contracts using the local blockchains like Ganache, it is always important that you test your contract in an environment which is closer to the production environment. Even though Rinkeby uses proof of authority (PoA) for consensus, it is still closer to the production environment as well as it is immune to attack. So, it does make sense to run your test cases against Rinkeby. Ropsten is closest to the production environment and it uses PoW consensus mechanism. However, it is not immune to the spam attacks. Hence, you must run your final testing against Ropsten. The process for deploying on Ropsten will be similar.
I’m truly enjoying the design and layout of your blog. It’s
a very easy on the eyes which makes it much more pleasant for me to come here and visit
more often.
Fantastic work!
I quite like looking through an article that can make people think.
Also, thanks for allowing for me to comment!
Hi there! I simply want to give you a big thumbs up for the excellent
info you have got here on this post. I am returning to your blog for more soon.
Having read this I believed it was extremely informative.
I appreciate you taking the time and effort to put this information together.
I once again find myself spending way too much time both reading and commenting.
But so what, it was still worthwhile!