


Blogs
Creating a custom draw sprite
Problem Statement
While Sencha Touch 2.2 already comes up with following draw sprites:
- Rectangle
- Circle
- Arc
- Ellipse
- Path
- Image and
- Text
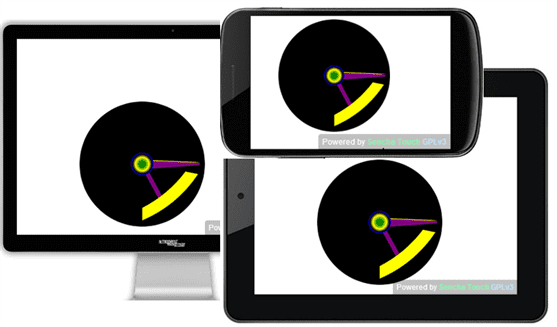
It will be great to have few more more commonly used shapes in our kitty. For example, it will be good to have an arc sector sprite, which will draw an arc as shown in below image: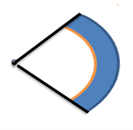
Also, we will use this arc in the example used in the previous blog (using draw package in Sencha Touch).
Prerequisites
- Basic understanding of Sencha Touch APIs
- The code provided in the blog using draw package in Sencha Touch
Terms / Definitions
Following is the list of configurations which basically describes a sector:
- startAngle – The beginning value for this sector.
- stopAngle – The end value for this sector.
- color – the color for this sector
- innerRadius: The inner radius for this sector. The default is 0, the center of the circle.
- outerRadius: The outer radius for this sector. The default is 100, the full length available.
How to do?
Step 1: Break the sprite into pieces
An arc sector looks like a combination of following path:
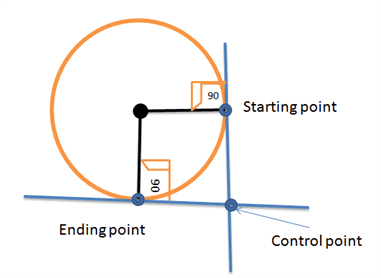
- Two arcs (one corresponding to outer radius and other corresponding to the inner radius). The corresponding points of the curve can be calculated by using the starting and end point slopes as shown in the following image.
- Using the startAngle, endAngle, innerRadius and outerRadius, we will be able to calculate the following points which will be used for drawing the actual path for the arc section
- inner start point
- outer start point
- outer end point
- inner end point
- Using the startAngle, endAngle, innerRadius and outerRadius, we will be able to calculate the following points which will be used for drawing the actual path for the arc section
- Two set of lines of same length along the radius (outerRadius – innerRadius) of the main circle at the slope determined by the startAngle and stopAngle properties.

Step 2: Create a sprite class
Since we want to create a draw sprite involving arc of a circle, like other similar sprites (say Circle sprite), the custom sprite shall also extend the class “Ext.draw.sprite.Path”. Following is the basic/dummy definition without any drawing logic:
ArcSector.js Content at this moment
Ext.define("MyApp.view.ArcSector", {
    extend:  Ext.draw.sprite.Path ,
    alias: 'sprite.arcsector',
    type: 'arcsector' ,

	inheritableStatics : {
		def: {
            processors: {
				cx : "number",
				cy : "number",
				startAngle : "number",
				stopAngle : "number",
				color : "string",
				innerRadius : "number",
				outerRadius : "number"
			},
			defaults: {
				cx : 1,
				cy : 1,
                                startAngle : 0,
				stopAngle : 0,
				color : 'blue',
				innerRadius : 1,
				outerRadius : 1
            },
            dirtyTriggers : {
				cx : 'path',
				cy : 'path',
                                startAngle : 'path',
				stopAngle : 'path',
				color : 'path',
				innerRadius : 'path',
				outerRadius : 'path'
            }
		}
	},
	updatePlainBBox: function (plain) {
		console.log('updatePlainBBox');
	},
	updateTransformedBBox: function (transform) {
		console.log('updateTransformedBBox');
	},
	updatePath: function (path, attr) {
		console.log('updatePath');
	}
});
In above code we are doing following:
- Define all the parameters required for the sprite. You will notice that def object contains processors, defaults and dirtyTriggers.
- meaning of default is self explanatory
- preprocessors defines the preprocessing used on the attributes of this sprite.
- dirtyTriggers defines what other attributes need to be updated when an attribute is changed. In this case we want to update the path attribute (which we have in the parent class)
- Override functions to
- update transformed bbox
- update plain bbox and
- update path
Step 3 : Include this sprite as one of the item inside the draw component
Add following code inside Main.js:
requires : ['MyApp.view.ArcSector'],
and
{
	type : 'arcsector'
}
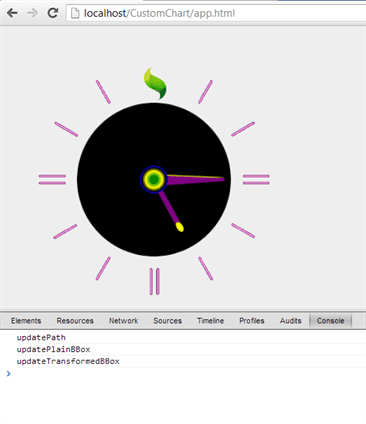
With above changes in place you get the following (while there is no change in visual, you shall be able to see the log messages corresponding to update transformed bounding box, update plain bounding box and update path):
Step 4 : Just copy the code from circle sprite and change the variables to draw circle using your own sprite
From step 3 you came to know that the drawing engine will first update the transformed bounding box attribute, followed by plain bounding box and finally update the path and draw the same on the surface.
Copy the code of updatePath, updatePlainBBox and updateTransformedBBox from the class Ext.draw.sprite.Circle. Change the variable names to ensure that it uses the attributes defined in your custom sprite. For example, I have following code:
	updatePlainBBox: function (plain) {
		console.log('updatePlainBBox');
		var attr = this.attr,
            cx = attr.cx,
            cy = attr.cy;
            startAngle = attr.startAngle,
			stopAngle = attr.stopAngle,
			color = attr.color,
			innerRadius = attr.innerRadius,
			outerRadius = attr.outerRadius;

        plain.x = cx - outerRadius;
        plain.y = cy - outerRadius;
        plain.width = outerRadius + outerRadius;
        plain.height = outerRadius + outerRadius;
	},
	updateTransformedBBox: function (transform) {
		console.log('updateTransformedBBox');

		var attr = this.attr,
            cx = attr.cx,
            cy = attr.cy,
            outerRadius = attr.outerRadius,
            matrix = attr.matrix,
            scalesX = matrix.getScaleX(),
            scalesY = matrix.getScaleY(),
            w=0, h=0;
        w = scalesX * outerRadius;
        h = scalesY * outerRadius;
        transform.x = matrix.x(cx, cy) - w;
        transform.y = matrix.y(cx, cy) - h;
        transform.width = w + w;
        transform.height = h + h;
	},
	updatePath: function (path, attr) {
                path.arc(attr.cx, attr.cy, attr.outerRadius, 0, Math.PI * 2, false);
		path.arc(attr.cx + 80, attr.cy, attr.outerRadius, 0, Math.PI * 1, false);
		path.arc(attr.cx + 160, attr.cy, attr.outerRadius, 0, Math.PI * 1.5, false);
		console.log('updatePath');
	}
If you notice, I have added few more arcs. Also, pass the attribute values for the arcsector sprite in Main view (as shown in below code):
{
	type : 'arcsector',
	cx : 200,
	cy : 200,
	startAngle : Math.PI / 18,
	stopAngle : Math.PI / 2,
	color : 'blue',
	innerRadius : 30,
	outerRadius : 50,
	text : 'Arc Sector'
}
With this you shall be able to see three circles drawn on the surface (next to the clock):
![]()
Step 5 : Draw the actual path
First thing we need to do is – to calculate the four points which is binding the overall arc sector. For this all you need to know is that
- a line can touch a circle at only one point
- at the intersection the touching line will cross the line between the center and the intersection point at 90 degree
Following is the updatePath method:
	updatePath: function (path, attr) {

		var innerStartX = attr.cx + Math.round( attr.innerRadius * Math.cos( attr.startAngle ) ),
			innerStartY = attr.cy +  Math.round(  attr.innerRadius * Math.sin( attr.startAngle ) ),
			outerStartX = attr.cx +  Math.round( attr.outerRadius * Math.cos( attr.startAngle ) ),
			outerStartY = attr.cy +  Math.round( attr.outerRadius * Math.sin( attr.startAngle )),
			innerEndX = attr.cx +  Math.round( attr.innerRadius * Math.cos( attr.stopAngle ) ),
			innerEndY = attr.cy +  Math.round( attr.innerRadius * Math.sin( attr.stopAngle ) ),
			outerEndX = attr.cx +  Math.round( attr.outerRadius * Math.cos( attr.stopAngle ) ),
			outerEndY = attr.cy +  Math.round( attr.outerRadius * Math.sin( attr.stopAngle ));

		var svgString = "M " + innerStartX + ", " + innerStartY +
						" L " + outerStartX + ", " + outerStartY +
						" A " + attr.cx + ", " + attr.cy + ", 0, 0, 1, " + outerEndX + "," + outerEndY +
						" L " + innerEndX + ", " + innerEndY +
						" A " + attr.cx + ", " + attr.cy + ", 0, 0, 0, " + innerStartX + "," + innerStartY ;

		path.fromSvgString( svgString );
	}
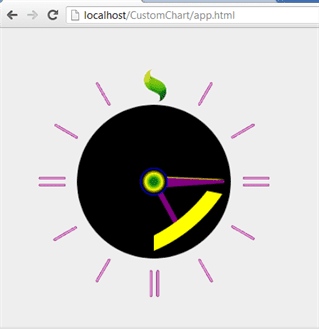
In the above code, I have calculated the required points and created the desired path string. Finally, I have used the fromSvgString method of Path class. Wish above code changes in place, you shall see the desired are as shown in below image:
 Summary
As part of this article, I have explained the steps for creating and using your own drawing sprite. While the given set of sprites will be often sufficient, at times you may need to come up with custom sprites to meet your specific need. I hope you found this helpful.
At WalkingTree, we practice and recommend Sencha Products like ExtJS and Sencha Touch to build amazing web/touch apps. In case you are looking for training or professional assistance, contact us by visiting our website.
Reference
- https://developer.mozilla.org/en-US/docs/SVG/Tutorial/Paths
- http://wtcindia.wordpress.com/2013/04/20/using-draw-package-in-sencha-touch/
- https://developer.mozilla.org/en-US/docs/HTML/Canvas/Tutorial
- http://www.w3.org/TR/SVG/
- http://en.wikibooks.org/wiki/OpenGL_Programming/Bounding_box
- http://docs.sencha.com/touch/2.2.0/source/Draw.html#Ext-draw-Draw
- http://docs.sencha.com/touch/2.2.0/source/SvgContext.html#Ext-draw-engine-SvgContext
- http://en.wikipedia.org/wiki/Trigonometric_functions
- http://www.w3schools.com/jsref/jsref_obj_math.asp