Getting your Trinity Audio player ready...
|
Extracting new insights from all your enterprise data is made easier with Amazon Redshift. Amazon’s Redshift is an easy, simple, and cost-effective data warehousing service that provides the best performance on a petabyte-scale and is also fully managed, making it very simple to use.
As part of exploring integration options for an e-commerce customer using Amazon Redshift as the Data Warehouse, where data needs to be aggregated from various sources, we implemented different ways to load data into Redshift.
This blog series will explore the different ways of loading data into Redshift.
In this first blog, we will look at doing this programmatically(using NodeJS) by taking the data first into S3 and then transfer the data into Redshift tables. S3 acts as an intermediate staging area where ETL-related activities can be performed to structure the data in the required format.
The overall functionality of the case study requires importing data from multiple sources and integrating it into a single data warehouse. On validating the different iPaaS platforms, we zeroed down on Celigo as it suited well all the client needs and also had some of the system connectors readily available for use. Celigo is one of the best integration platforms (iPaaS) which enables you to connect different applications easily hence facilitating the automation of your business flow. This topic deserves a separate blog of its own.
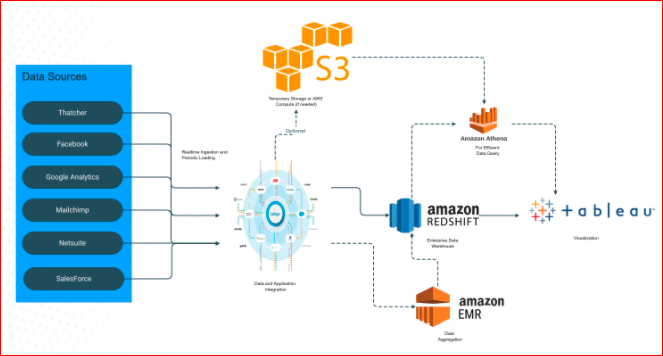
The overall architecture of the solution is as below
As part of loading data into redshift, we will share our learnings and comparisons in this series.
In the current blog, we will look at the steps performed to achieve this integration using NodeJS. Here we will write the data in a file format in S3 bucket and then copy the file from S3 into Redshift. All this will be done using Nodejs and the nodejs program can be invoked from the integration platform.
We will start with setting up the Redshift cluster assuming you already have the AWS account setup.
Amazon Redshift Setup
1. Login to the console and create a Cluster. Note: You can use the free tier option while creating a cluster to avoid any unnecessary charges. Other options you can leave as default but make a note of the database details(user, password, port etc.) which you will use in the node code to establish the connection.
https://console.aws.amazon.com/redshiftv2/home?region=us-east-1#dashboard
Also, we will create a simple test1 table in the query builder into which we will be pushing the data from node.
create table test1 (id int, accountname varchar);
2. From the List of Clusters, select your cluster using the checkbox and from “Actions” menu, Select the option of “Modify publicly access” setting and set it as below
Publicly access : YES > Click Confirm button.
This is needed for making the Redshift accessible publicly for our scenario where this
a call was being made from an external server.
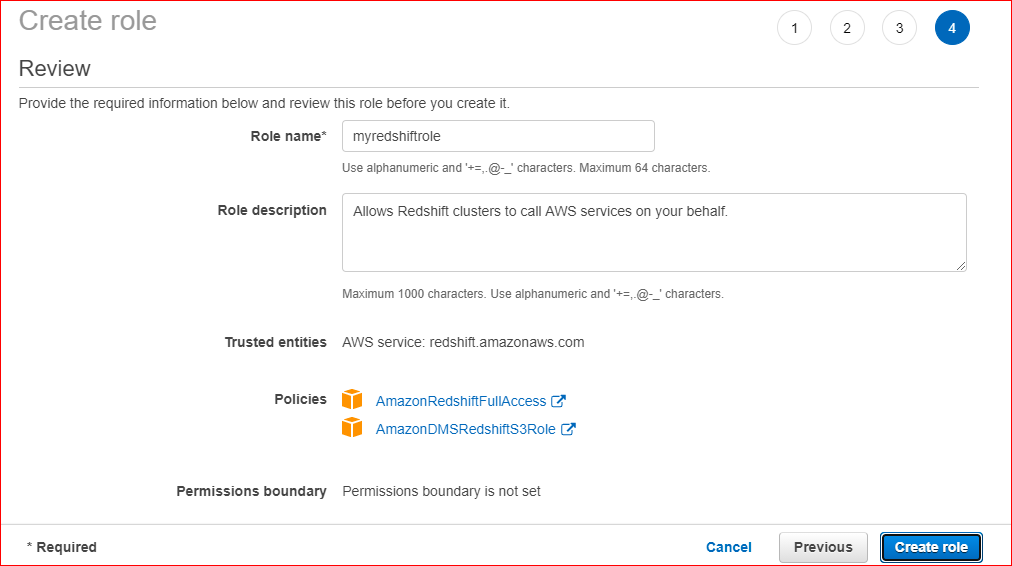
3. Create IAM Role for Redshift Customizable attaching the below policies as shown
https://console.aws.amazon.com/redshiftv2/home?region=us-east-1#manage-iam-roles
4. Create an Access Key for your account in the path below and download the file with details(Make sure you save the file for future reference)
https://console.aws.amazon.com/iam/home?region=us-east-1#/security_credentials
5. Additionally, you will have to Add your IP address in the inbound rules for the security group being used by your cluster (In our case, the security group is default). You can get your IP address using this link.
Go to > Security rules > Edit inbound rules and add a rule for Redshift as shown below.

This setup will make your cluster ready to be accessed through the nodeJS code.
If any of the setups are missing you may encounter the following error while running the node program.
Error: Error: connect ETIMEDOUT XXX.XX.XX.XX:5439
Check this link for more information on connection issues with redshift cluster
https://aws.amazon.com/premiumsupport/knowledge-center/cannot-connect-redshift-cluster/
Amazon S3 Setup
In the next step go to the S3 console and create a bucket with name aws-bucket-2021. This bucket should be made publicly accessible by deselecting the below option.
This will make our S3 bucket accessible from Nodejs code.
NodeJS program
Create the nodeJS application for the integration. Below are the step to follow
1. Create a new node app that will have the logic to transfer data from the app to redshift through S3.
Create a folder named nodeaws.
1 2 3 |
mkdir nodeaws cd nodeaws npm init |
2. Install the dependencies using npm install.
1 |
npm install csv-stringify express aws-adk node-redshift--save |
3. Create a file called index.js and add the following code logic.
1 2 3 |
var express = require('express'); var stringify = require('csv-stringify'); var aws = require('aws-sdk') |
// Create S3 service object using the access keys and region in which the bucket was defined. The key values will have to be maintained in config files instead of directly including in code.
1 2 3 4 5 6 7 8 9 10 |
s3 = new aws.S3({ accessKeyId: 'XXXXXXXXXXXXXXXX', secretAccessKey: 'XXXXXXXXXXXXXXXXXXXXXXXXXXXXXXXXXXX', region: 'us-east-1' }); var app = express(); app.listen(3001, () => { console.log('Server is up on port 3000'); }); |
//node-redshift library will be used to access redshift from Nodejs
1 |
var Redshift = require('node-redshift'); |
//Initialise the Redshift database details with the host url, database user, password, port etc.
//this is the data for the redshift cluster and its database
1 2 3 4 5 6 7 |
var client = { user: 'awsuser', database: 'dev', password: 'XXXXXX', port: '5439', host: 'redshift-cluster-1.xxxxxxxxx.us-east-1.redshift.amazonaws.com', }; |
//Create an instance of the Redshift client with the connection details
1 |
var redshiftClient = new Redshift(client); |
// Parse JSON bodies (as sent by API clients)
1 2 3 4 5 6 7 8 9 |
app.use(express.json()); var bodyParser = require('body-parser'); app.use(bodyParser.urlencoded({ extended: false })); app.use(bodyParser.json()); |
//Handle the post action for the current activity
1 2 3 4 5 6 7 8 9 10 11 12 13 14 15 16 |
app.post('/test', function (request, response) { var file_name = 'items.txt';//name of the s3 file to be created csvbody = [Object.values(request.body)]; stringify(csvbody, function (err, data) { var params = { Bucket: 'aws-bucket-2021', Key: file_name, Body: data }; var options = { partSize: 10 * 1024 * 1024, queueSize: 1 }; |
//The s3.upload function will perform the upload of the csv into the bucket with the given file
// name as specified in options parameter.
1 2 3 4 5 6 7 8 9 |
s3.upload(params, options, function (s3err, result) { if (s3err) { console.log('s3 error'); console.log(s3err); } else { console.log('s3 upload successful '); |
//S3 Upload is successful at this point
// items.txt file is created in the aws-bucket-2021 bucket in S3
// Now proceed with copying the S3 file into redshift using the copy command
// and providing the access keys as below
1 2 3 4 5 6 7 8 9 10 11 12 13 14 15 16 17 18 19 20 21 22 23 |
var pg_query = "copy test1 from 's3://aws-bucket-2021/items.txt' " + "ACCESS_KEY_ID 'XXXXXXXXXXXXXXXXXX' SECRET_ACCESS_KEY 'XXXXXXXXXXXXXXXXXXXXXXXXXXXXXXXX' escape delimiter as ',';"; redshiftClient.query(pg_query, { raw: true }, function (err1, pgres) { if (err1) { console.log('error here'); console.error(err1); response.send('error'); } else { console.log('upload success'); response.send('success'); } }); redshiftClient.close(); console.log('outside'); } }); }); } ); |
You can test the above code by running the index.js using the command node index.js
The server will be available on localhost:3001 which you can test from the postman by passing 2 key value pairs (first number and second character as per the structure of our test1 table).
This will first send data into S3 as a csv file and finally insert the data into the redshift test1 table.
You can find the code at this git repository.
Conclusion
In this blog, we learned how we could programmatically create files into S3 and also copy the file data into Amazon Redshift tables, which could help in specific data integration requirements. Alternatively additional data transformations can be done on the S3 data to structure the data as needed.
This was an example considering a simple table structure to demonstrate this capability, but when defining the real movement of enterprise data we need to be conversant with the structure of data and handle it by proper modelling of the final Redshift tables.
In the next set of blogs, we will explore other approaches available for loading data into Amazon Redshift and pick the one that suits the requirements.